Category Archives: Developing a FLOW ≋ sensor

A hydrometric pendulum using drag-induced tilt angles to infer water flow velocity.

For a case study showing the kind of data we collect from these sensors, see:
A Flexible Arduino-Based Logging Platform
at: http://www.mdpi.com/1424-8220/18/2/530

Field Report 2016-03-28: Oldest Generation of Loggers Retired

Securing the backup bungie cord to the anchor.

Securing a backup bungee to the anchor plate.

I know I said I was going to keep the ocean sensors in service till they croaked, but after more than two years of operation I’ve decided to retire the two beta units to our bookshelf museum. B3 & B4 were the last loggers in our fleet based on the Tinyduino platform (and the guys back in Ohio deserve some credit for helping us get the project off the ground!)  The clincher on this decision was the practical issue of still being able to do a full calibration on those sensors, so I can apply that to all that wonderful flow data we’ve gathered from Akumal Bay over the last 14 months.  And you run a risk of loosing your loggers every time you deploy in a high energy environment.

Four Generations of Cave Pearl Data loggers

Four generations of flow sensors, spanning two years of development. Beta4 was literally the fourth data logger I ever made, and the first to run for a significant length of time.

These replacements also bring all of the ocean units into the same generation of Rocket Ultra based builds,  so they should all deliver a year of operation before they need servicing. Much as I loved the Tinyduinos, I never got them down into the 0.15mA sleep currents that I now see the MCP1700 regulator  boards delivering.  As the folks at CEA keep pushing them further out onto the reef,  it’s getting more expensive to deploy & retrieve them, so we need all the run time we can get.

The new locations also mean I can’t just pop in and exchange them on the way to the airport… like I am doing today…

Addendum:
Akumal was the last stop on a busy trip that saw us hopping all over the peninsula to visit colleagues while staying in towns from Tulum to Chiquila.  You see allot of beautiful things outside the tourist strip that never end up in the brochures, but you never quite escape the influence that radiates from that heaving mass of transient humanity.

I think this is reflected in the work of the local artists:

Contrast

<— Click here to continue reading the story—>

Field Report 2016-03-25: Collecting Data in Coastal Mangroves

Their never too young to be a field assistant :-)

They are never too young to be drafted as a field assistants… Eh Trish?

The unique geology of the Yucatan means that hydrologists like my wife typically study water flowing through the flooded cave systems.  But she also advises some of the many great archaeology projects in the area (The Maya had to get their drinking water from somewhere…right?) so we don’t spend all of our time wrapped in neoprene.  Though I have to say that when she does do surface work, she always seems to find the stinkiest stuff around to balance all that canned-air we would otherwise be breathing:

Smells like science!

We did eventually make our way to a wider section where the water was moving swiftly.  The original plan was to simply anchor one of the flow sensors on a rock and drop it in. But after mucking about at the site for a while, we were puzzled to see hardly any displacement on our little tilt meter though the surface flow was quite strong.  Then we realized that the water at our feet also felt warmer than it did on the surface, and it dawned on us that this close to the ocean, the tide was coming in underneath the outgoing fresh water.  The best solution I could come up with on the spot was to put the pivot joint on top of one of the pendulum rods: raising the flow meter to a higher position in the water:

We will have to wait for the data to see if we’ve given the logger enough height and The temperature should tell us if the logger has been trapped in rising salt water.  I would not be surprised if we end up using an entirely different arrangement next time, perhaps with some kind of floating buoy system so we can go back to a pendulum arrangement where the buoyancy is easier to control.  Sometimes all you get from your first deployment, is an understanding of how to do the next one…

BottomDeployment_600

Further in, we could put the logger right on the stream bed which had been scraped clean by the high water velocity. You can tell from the video (above) that we are well past 10cm/sec where vortex shedding starts to be a problem.

The next day we set out at a different river, working our way much further inland to (hopefully) avoid the salt water intrusion.  We also planted a pressure unit to capture water level data near the archaeological dig site.  Given how exposed these sensors are, I can only hope that the local fishermen don’t decide our little bots should spend the rest of their days decorating someones coffee table.

The water in these coastal discharges was racing by comparison to the gentle subterranean flows we usually work in, so I expect allot of turbulent noise in the signal. On top of that the removal of their salt-water ballast mass (used on pendulum installations) moved the center of mass enough that I had to put them in upside down. That’s just the kind of things you run into when you are doing something for the first time. With all the things we learned from the open ocean deployments, I’m really excited to see the Pearls moving into another new environment.

Addendum 2016-07-18

Well we finally made it back up to the north coast, to replace those upside-down units we left back in March:

Happy to report that the first deployment gave us good data, and I think this next crop will do even better, provided they don’t get hit by a passing boat propeller…

Addendum 2017-06-24

Believe it or not the unit was still buoyant, and gave us reasonable data.

After nearly a year we returned to discover that the stream-bed unit pictured above had gone AWOL, and the remaining two flow sensors were heavily encrusted with criters of all kinds. We’d seen bio-growth before on reef deployments, but never to this extent. To avoid further losses, the replacement sensors have been painted black and deployed in “stealth mode” locations.


Addendum: 

During these deployments we stayed in the fishing village of Chiquila.  I spotted this lovely graffiti during a morning run:

JellyFish

<— Click here to continue reading the story—>

Field Report 2015-12-11: Flow sensors go Farther & Deeper

Baruch Figueroa-Zavala (from CEA) recently installed a new Cave Pearl flow sensor just down the coast from Akumal bay:

The latest reef deployment of the flow loggers

The latest reef deployment, 14m depth. (photo courtesy Baruch)

This marks our deepest ocean sensor deployment to date, and two backup bungees were added to ensure this unit does not get torn from it’s anchor like the last one we put outside the sheltered environment of the bay. The turbulence shadow from the reef will likely have some effect on the flow, and it will be interesting to see if this logger accumulates the same amount of bio-growth as the shallow water units…

Marco and I snorkeled out to retrieve both of the B-generation units in Akumal Bay, which were still running well. Both were heavily encrusted despite the thorough cleaning they had in August, and to my eye it looks like there might be even more gowning on them now than they had last time. I am wondering if the acid bath somehow roughens the surface, allowing more critters to get a foothold (?)  Of course it could just as easily be a result of some seasonal nutrient flux, so I leave it up to the biologists to comment. One thing that surprises me is that we are only now seeing the first evidence of a marine animal burrowing into the instruments, and they chose to attack the epoxy rather than the PVC. A subtle reminder that poly vinyl chloride is not the most benign substance in the world.

These units have been under water since the second flow meter deployment.  With twenty months of continuous operation under their belt, they are still producing solid results despite some fairly dodgy Dupont jumper cables that I would never use in my current builds. This makes me feel pretty good about all the laborious hand-sanding I did on those early housings:

B4_FlowRecord

Akumal Bay (North) Tilt angle (°) (from raw accelerometer readings)

It looks like a nice two-week tidal signal was coming through until the big rains took over the flow pattern. The temp sensor on-board shows how all that precipitation lowered the mid column water temperature in a pattern that is now beginning to look very familiar:

NorthBayTemperatureRecord

Unit B4: Akumal Bay (North) DS18b20 Temp (°C)

I really have to build myself a CTD to find out if the water temperature also tracks salinity, and if so, I wonder how that affects all the critters out there on the reef?

A few days later, after a good cleaning and a fresh set of batteries, we tried go back and  reinstall the flow sensors, only to find police waving everyone away from Akumal at the highway. For several days a group of protesters from the pueblo blocked roadway access in a vigorous dispute over access to the beach, so we had to leave the loggers with CEA staff for later deployment. Yet another reminder of  how the combined pressures of tourism and development completely dominate the regional dynamics, and I hope that the situation can be resolved in a way that preserves the bay for future generations.

<— Click here to continue reading the story—>

Modeling the Effect of Drag Enhancement on Water Flow Measurements

Float configuration deploymnet on new housings

A float configuration deployment with flag on one of the deep saline units.

In March we did an experiment by adding small flags to some of our flow sensors to enhance their response in low flow situations. As with so many of the things we have tried on this project, these thin sheets of ABS were the best solution I could come up with that would (1) flat pack into our luggage and (2) be assembled in the field with zip-ties. One of my pet peeves with commercial equipment is that much of it fails the suitcase test, which can be an  important part of trip logistics.

Now, I’m not even going to pretend I have the kind of skills it would take to estimate drag on those fins, which present a progressively smaller surface as tilt angle increases.  In fact, I probably know less about math than I knew about electronics when I started this project. So everything that follows here is just me just muddling through like always.  If you actually do possesses those skills you should probably look away now. I’d hate to be responsible for another academic drinking themselves into oblivion, while muttering about the internet being taken over by monkeys.

Without an expensive accoustic dopper unit to calibrate against, the best we could do was develop an empirical relationship between the new design and old ones.  So we installed one of the “enhanced” flow sensors beside a similar unit with no flag. Comparing the two data sets would show us how much the flag was increasing the sensors response to water flow.  Since we had no idea what that low end amplification would actually turn out to be, we used a tidally controlled coastal outflow that went from zero flow to peak velocities above 10 cm/s twice a day.

Fortunately, a good storm passed over the system right in the middle of the deployment: pushing that range even farther (probably to about 20 cm/s)Here is a small snippet of data covering that event:

Comparing the drag enhanced, vs the standard configuration
My first impression was that the boosted diurnal response looks like the kind DRC plank that smacks you over the head whenever you turn on a radio these days.  The low end is being boosted by a huge amount, in fact, just before the event there are some spikes in the flagged data there that don’t don’t even rise above the noise floor on the “naked” flow sensor.  Just looking at those tells me we had between 3-4x more signal at the low end. But how do I quantify that?

I started with a plot of the two sensors against each other, which showed a sharp point of inflection: Flag vs No Flag_withExcelFitLine
Note: Logger #012 had the drag enhancer attached, while C4 had no flag.  The loggers bodies themselves presented very similar, somewhat spherical, profiles to the water flow.  My newer builds are cylindrical, which opens another whole can of worms.

I was happy to see that the low end boost looking so linear and I wondered if that elbow was some kind of turbulent flow transition. Who knows, perhaps when the loggers approached sixty degrees  the fin even starts to contribute some lift. (?)  But in terms of relating one units response into the other, even I could see that Excel’s trend line was terrible. You can do better with the solver plug-in, but you have to know the equation you want to use first. If you don’t know what the formula is, it can be a tedious process to figure one out from scratch.

So I went looking for something that would give me a better way to model that relationship. That plot looked like a distorted “S” shape, and google image searching lead me to the entries on logistic functions of the form:  f(x) = a / (1 + b c –x)   These sigmoidal curves start out with a low slope, which increases to an inflection point, then levels off as they approach a maximum value. They pop up frequently in natural systems when people try to model population/cell growth, or EC50 dose response. The Gompertz function was a long-tail variant that also looked like a good contender.

First pass with Eureqa

First pass with Eureqa: meh!

While I was digging through all that, I came across references to a statistical modeler called Eureqa that was developed in Cornell’s creative machines lab a few years ago. I’d seen mention it before in the geek press, but this was the first time that I had a situation where it might be useful to me personally. So I downloaded their free trial version and day-am!  This slick bit of code made me feel like a ten year old who’s been left alone in the cockpit of some large piece of earth moving equipment that still has the key in the ignition. Clearly this was a tool for real scientists, and I should probably wait for that adult supervision. But…well…I’ve been failing that kind of marshmallow test for quite a while now.

And I didn’t get much out of it at first, but after going over their tutorials I found it was fairly easy to change the generic y=f(x) starting point to any model you want. This lets you can derive arbitrary constants from a really disorganized lump of data without having to do all that grunt work in Excel.  I did a couple of runs with the Logistic function, and with the Gompertz curve:

Modeling with Eureqa, starting with Logistic and Gompertz functions

Note: the functions specified with empty brackets: f1(), f2() etc. force the solver to put a constant at that location

My raw data did not really have (0,0) point due to sensor mounting offsets, and the loggers never went beyond 75 degrees of deflection. But I found that by adding an arbitrary point at (90,90) I could move the upper asymptote away from that bulk at the top end of the plot. After seeing the improvement from that change, and after deleting a few outliers, I let Eureqa take another shot from the default y=f(x) starting point:

Eureqa_TweakedPass2

It's turtles all the way down!

Turtles all the way down…

Now that’s starting to look better, and I was not selecting the very “best” solution according to their fit metrics. If you leave the solver running for a long time (say, while you go have dinner…)  it  just keeps chugging away, adding coefficients until you have something large and ugly. But I am sure that if I actually knew what I was doing, the correct solutions would jump right out at me. The press often overlooks this critical step with their hyperbole about Eureqa “replacing” scientists: the real world is not a simple pendulum: it’s a warm, squishy, mess that involves a lot of value judgment.

More electrons will give their lives as I burn through my 30 day trial. It’s too bad Nutonian wants $30/month for their cheapest license. If they went with the WordPress model (ie: $30 a year for the little guys) I’m sure every maker in the world would be using this software to sort out one-of-a-kind build issues like this.  Of course, I’m not sure this exercise actually taught me anything about the physical phenomenon involved. But if blindly applying complex, statistically derived equations is good enough for Wall Street, then it’s good enough for me. What could possibly go wrong?  🙂

And…Happy Birthday to my brother Mike!
As a seasoned Linux system bender, he was one of the first people to bring the Arduino / Open Source Hardware phenomenon to my attention.  And he is also someone who knows how absurd it is for me to post on anything mathematical.  


Field Report 2015-08-17: Flow Sensors go back into Akumal Bay

The surfaces were covered with hard deposits

Even after scrubbing, those surfaces were still covered with hard deposits. I wonder if hydrophobic paint would prevent this?

With the the dive deployments done, and the Rio Secreto installation out of the way, it was time to start wrapping up the trip.  Sometimes we are forced to leave the open water flow units with Gabriel at C.E.A., but he had important meetings that morning and I had enough time on to install them on my own. As we talked about potential sites for other units, I laid out the loggers, cables etc. on the table. He was somewhat  surprised to see the condition of the older units.


Treating Ocean units with muriatic acid

Nothing like a good hydrochloric acid bath at the end of a long deployment.

You see when we retrieved B3 & B4 at the start of the trip, months in the sea had coated them with so much bio-growth that they looked like something from “Pirates of the Caribbean”.  On previous trips, hard scrubbing and bad language were enough to sort them out, but after that failed I knew we were going to need bigger guns. After googling my way through a few chemical resistance charts, we popped down to the hardware store for a bucket, and bottle of muriatic acid. And as we hoped it was highly effective, but I was biting my nails as we watched the loggers, and the data they still contained, fizzing away like seltzer tablets. Fortunately those EPDM O-rings held up, and after a few hours in the soup, I was finally able to scrub away the crud and get to our data.  I did my best to keep the sensor wells away from the acid, as the epoxy there was already getting pretty old.

So by the time I was ready to swim out into the bay, our flow sensors had gone through something of transformation:

B4 before & B4 after

B4 before                                      &                                 B4 after

I spent a fair bit of time locking down a new anchor plate for B3, with sea urchins and rolling surf conspiring to make that a challenge. And I don’t know if it was the fact that I was further out on the reef, or that I just did not move like the tourists, but I swear critters came of the woodwork just to see what I was doing.  The barracudas were probably drawn in by the shiny metal surfaces on the camera, and at one point, while I was busy looking down to capture some clips of B4 in motion, a sea turtle swam right into me. I know it sounds funny, but an impact from something that big when you are floating in the sea can really scare the willies out of you.  When I spun round to see what happened, there were three more beside me (…probably doing the turtle equivalent of laughing…inside…)  But by this time the loggers were installed, and I was too worn out from all the swimming to spend any time watching them.  Reluctantly, I headed back in.

Of course, things always happen when you are not looking for it, and as I made my way to shore I noticed a spotted eagle ray swimming nearby.  I was in the boating lane at the time, and decided that trying to capture a photo was not worth getting run over, so I just kept going. However, once I reached the shallower sandy area, he reappeared right under me, and this time I dug the camera out of the mesh bag I had been using to ferry the loggers around:

…and I think I will use that to sign off on a brilliant fieldwork trip.

Addendum

By the end of all this, my field-notes went over 50 point-form pages of observations, readings, etc., and there is no way I could relate more than a small sampling of that here. Once the major diving is done, we try to grab a little social time with friends as we drop off various bins of gear to be stowed till next time.  Trips like this could never happen without the help of the dive community in Tulum, and we are grateful for all the help they have given us over the years. Of course a proper list of thank-yous would be even longer than my field notes, but I’d like to give a special shout out to Bil, Robbie, Kim, Natalie, Jeff and Gosha. I hope some of this blog-y catharsis makes you laugh, and some of it makes you proud, because you are all an important part of it.

Cheers!

<— Click here to continue reading the story—>

Field Report 2015-08-07: Retrieve Flow Sensor from Akumal Bay

Gabriel, Patricia Beddows, Marco A. Montes Sainz

Left to Right: Gabriel Sanchez Rivera / Patricia Beddows  / Marco A. Montes Sainz

I was up pretty late downloading the loggers from Rio Secreto the day before, so we had a late breakfast at Turtle Bay Bakery & Cafe the next morning. While the only decent coffee in Akumal has become something of a necessity for my aging brain, our corner table is also something of an office away from home for Trish, who knows so many people in the area that sometimes it’s hard to escape from all the hugs and hand-shakes.  With sufficient caffeine in my bloodstream I was ready to hit the reef with Marco, who had been keeping an eye on our little loggers through the Sargasso seaweed invasion that has affected coastlines throughout the Caribbean this year. He had already taken south bay unit out of the water due to a zip tie failure on the support rod.  I wondered if those dense floating mats had snagged the shallow unit, putting enough stress on the ties to break them?

Removing B4 from float line

Pulling B4 from it’s anchor rod.  (photo by Marco)

Since the B3 logger was already dry, that left only the Pearl at the north end of the bay. This B4 unit is the oldest continuously running logger on the project (it’s first underwater stint was back in March 2014) and is still running on it’s original Tinyduino core. Since the sensor is now well past my original one year design goal, I am tempted to retire it to the “bookshelf museum” as these old dogs feel like Russian tanks next to the new builds. But this project also embodies what the guys over at Boston Robotics distill down to “Build it, Break it, Fix it”, so I really want to see how long this DIY flow sensor will last.  As far as I know, this is the longest marine exposure test anyone has ever done with JB weld, or Loctite E30Cl epoxy on hardware store PVC.

And the little loggers did not disappoint, delivering a gorgeous four month record of water temperature, and tilt angle (my proxy for flow velocity)

Data from B4 Cave Pearl Data logger

This gave me another look at that June 13/14 event, and it must have been something! It almost doubled the relative flow velocities (probably more than that due to non-linearity, etc) and it pulled the mid-column temperature in the bay down by three degrees Celsius. To put sixty five degrees of deflection in perspective, here is a video clip of the relative motion of the floating logger, on the day we retrieved it:

This thing was brand new 4 months ago

That pivot joint was brand new four months ago…

I’m happy that the unit wasn’t ripped from it’s mooring by the storm, and that I installed the new super duper PVC pivot joints on that last trip. I am sure the old zip-tie swivels would have completely let go. In addition to the rough conditions, there is marine life colonizing all exposed surfaces.  When I took a closer look, the pivot joint was making some distinct “crunchy” noises – indicating something was trying to take up residence inside the tubing. The logger itself is now so hairy that I think the buoyancy is being affected. Hmmmm….

<— Click here to continue reading the story—>

Tutorial: How to calibrate a compass (and accelerometer) with Arduino

Inspecting one of the open water units before retrieval

Reading the compass bearing is more important with the open water units, as passage geometry controls flow direction in caves. To see the kind of data we get from these pendulum sensors, see case study #2 in Cave Pearl Data Logger: A Flexible Arduino-Based Logging Platform for Long-Term Monitoring in Harsh Environments In 2020 we released a 3-Part build tutorial based on that paper & in 2023 a 2-Part logger that runs on a coin cell

When I started building a flow sensor based on the drag/tilt principle, I knew that leaving sensors on their default factory calibration settings was not optimal, but I had so many other things to sort out regarding power use, memory handling, etc., that I left calibration to deal with later. Since I could not trust the electronic compass in the units, I simply installed the Pearls with a magnetic compass in my hand, making sure I knew which accelerometer axis was physically aligned North. But once my  loggers started consistently reaching a year of operation, that “later” finally arrived.  I tackled the topic of calibration with little knowledge beforehand, and there was quite a bit of background material to wade through. Rather than waffle on about it I am simply going to provide links here to some of the better references I came across:

The Sensor Fusion tech talk from InvenSense provides a fairly broad overview
Sensors Online: Compensating for Tilt, Hard-Iron, and Soft-Iron Effects
AN4246:  Calibrating an eCompass in the Presence of Hard and Soft-Iron Interference

And if that Freescale paper didn’t leave you in the dust, you could try Alec Myer’s extensive blog entries on magnetometer calibration. But since I haven’t seen a matrix operation since high school, most of that went right over my head. It didn’t help that there are so many different ways of defining a “standard” reference frame, making many code examples hard for a newbie like me to interpret. But even without the math I came away understanding that hard iron shifts the entire sensors output, while soft iron distorts it. So the goal of calibration was to transform displaced eliptical shapes into nice balanced spheres centered on the origin. And I hoped for a way to do this that would work with the many different compasses and accelerometers I had been using since I began development in 2013, because most of those flow sensors are still running.

I added color to the three projections shown here as XY (blue), XZ (orange) and YZ (green)

Here I have added color to the three Plotly projections as XY (blue), XZ (orange) and YZ (green)

I had a new LM303DLHC breakout from Adafruit that I was considering because it contained both an accelerometer and a compass (having both on the same IC keeps them in alignment), so I used that to generate an initial spread of points by simply ‘waving it around” while it was tethered to one of the loggers. Then I searched for some way to display the points. I found that Plotly makes it easy to upload and visualize data-sets, and it freely rotates the 3D scatter plot via click & drag. This gave me a good overall impression of the “shape” of the data, but I did not see how this would help me quantify a hard-iron offset or spot other subtle distortions. Hidden in the Plotly settings there was a button that projected the data onto the three axis planes. Seeing that sent me back to my spreadsheet, where overlaying these three plots (and adding an circular outline to see the edges better) produced:

Projections of 3d magnetometer data

Projections of the magnetometer data placed on the same axes.

Now at least I could see the offsets and the other distortions well enough to compare ‘before & after’.  But I still needed to figure out how to actually do a calibration. Google searches turned up plenty of code examples that simply record maximum & minimum values along each axis to determine the hard iron offset.  For this “low & high limit” method you rotate the sensor in a circle along each axis a few times, and then find the center point between those two extremes. If the sensor has no offset that center point will be very near zero, but if you find a number different than zero, that number is the hard iron offset. These approaches assume that there is no significant soft iron distortion and judging from the rounded outlines in my graph, that was reasonably true for the naked LM303 board I had been waving around.

But these methods rely on you capturing the extreme values along each axis, and my data was kind of patchy. I needed to work on my Magnetometer Calibration Shuffle if I was going to capture enough points from all possible orientations. Yury Matselenak over at DIY drones offered and an alternative to my hand wavy approach using the sides of a box to calibrate the ubiquitous HMC5883L (you might want to add a leveling table). I thought that looked pretty good until I came across a technical note at the Paperless Cave Surveying site in Switzerland. In A General Calibration Algorithm for 3-Axis Compass/Clinometer Devices it states:

“A cube can be placed with any of the 6 faces up and in each case any of the 4 side faces may be in front, giving a total of 24 orientations. Unfortunately it turns out that 24 measurements are not enough for a good calibration. A perfect set of 60 orientations is contained in the symmetry group of the dodecahedron or icosahedron. However, this set of orientations is not useful in practice because it is too complex to be reproduced in the field.”

test

jjspierx’s rig could be built with a drill & a hack-saw.

That meant I was going to need a more advanced testing rig. I found plenty of examples on Youtube where people had fashioned fancy calibration rigs out of 3-Axis Camera Gimbals, but they looked expensive, had alot of metal in them, and I was not sure if they were robust enough to transport into the field. Then I found a post by jjspierx over at the Arduino forum, who built a yaw/pitch/roll jig out of PVC for about $20. It’s a really sweet design that could be built to just about any size. I still might make one just for the fun of it, although I think I will use nylon bolts to keep any metal away from the magnetometer.

test

Roger Clark’s approach posted as test_rig.jpg in the thread.

Another elegant solution was posted by Roger Clark over at the Arduino playground.  His 3D printed polyhedron allowed him to put an MPU9150 into that ‘perfect set’ of orientations.   “Hey” I thought to myself  “That’s a Buckyball. I can make that”  But as I dug into all the different ways to make a truncated icosohedron I had this niggling idea that somehow I might still be missing something. If this was really all it took, then why did so many people in the quad-copter & robot forums complain that they never got their compasses to work properly?  The more of these complaints I found, the more I started to wonder about my sensors being too close to the Arduino, the RTC breakout, and most of all those alkaline batteries.

There was another interesting note about this at the end of that swiss paper:

“Experience shows that calibration must be repeated from time to time to avoid performance degradation due to component drift and aging. In devices using primary batteries, a calibration is needed after each battery change because the battery is unavoidably the main source of magnetic disturbance and new batteries never have exactly the same behavior as the old ones.”

The first "inHousing" test with the LM303 showing significant soft iron distortions

The first “inHousing” test with the LM303 showing significant soft iron distortions

To see exactly how much of a factor this was for my loggers I mounted the LM303 sensor board in one of the underwater housings (which had a 6xAA battery pack about 10 cm from the sensor) and ran another test. The results made it pretty clear that, yes, magnetometers really do need to be calibrated inside their final operating environment. This also showed me that unless I was willing to spring for expensive degaussed batteries, I was going to need software that could provide significant soft iron compensation: the max & min only approaches just weren’t going to cut it. And I need to make sure that the battery & sensor orientations don’t not change during deployment by adding an internal brace to keep things from shifting around. It also occurred to me that there might be some temperature dependencies, but by this point I didn’t want to look under that rock and find there was even more work to do.

The top handle swivels, while the bottom is fixed

After seeing that plot I went back to the idea of building a geodesic frame big enough to contain the whole flow sensor, that could be assembled with zip-ties for transport into the field. And I think I found a way to build one out of tubing, but in the end I simply fashioned a couple of handles that could be connected directly to the threaded ends of my underwater housing. A sliding joint on the top handle allowed me to spin the unit slowly and smoothly as I pivot my body into different positions. The whole process takes about 10 – 15 minutes, using my arms as the calibration jig. This produces a spread of points that look like the blue line plot below:

Plotly again, with lines rather than points to show the pattern in the data as I twirled the unit about its long axis with the handles. This method only spins the unit around the Z axis, which shows quite clearly in the data.

Plotly again, with lines rather than points to show the pattern in the data as I twirled the unit about its long axis. This method only rotates the unit around the Z axis, which shows up quite clearly in the data.

Although this is not the same pattern you get from a 3-axis gimbal rotation, I am reasonably confident that I have captured enough points for a decent calibration. And the handles are easily transported so that I can do some post deployment calibrations in the field on the various different housings.

Although I was still boggled by forum threads discussing the finer points of “Li’s ellipsoid algorithm”, I still had to choose some software to generate the correction factors and I wanted something flexible enough to use with any compass rather than a one-of solution that would leave me tied to a specific sensor.

The best Arduino script  example of compass calibration I could find was the Comp6DOF_n0m1 Library  by Noah Shibley & Michael Grant (and I will be cribbing heavily from their integer trig functions for roll, pitch & yaw…)

Using the FreeIMU GUI Toolset

A post in Adafruits support forum suggested Varasano’s FreeIMU Calibration Application.  The FreeIMU calibration app was written with a GUI, but fortunately Zymotico posted a Youtube video guide that shows how a couple of simple config file edits let you run the FreeIMU GUI Toolset in manual mode:
(These are screen shots from that video)

FreeIMU_VideoScreenCap1

FreeIMU_VideoScreenCap2These changes allow you to run the application without the GUI, so long as you provide a couple of tab delimited text files of data.  The video goes into some detail showing how to use a processing sketch to save serial output from Adafruit 10 DOF IMU as a csv file, but all I did the first few times was copy and paste data directly from the serial window into a spreadsheet, and from there into notepad. (since my units are data loggers, I could use the csv files on the SD cards for the in-housing tests I did afterwards)

FreeIMU_VideoScreenCap3 Then you save “acc.txt” and magn.txt” in the FreeIMU GUI folder, right beside the freeimu_manualCal.bat file that you modified earlier. Once you have your data files in place, run “Freeimu_manualCal.bat”. On my machine the GUI still launches – displaying no data, but a command line window also opens:

FreeIMU_VideoScreenCap5

Note that if you try to run the batch file that you modified with the default data files the program came with you will see NAN (not a number) errors.  This is a sign that you did not save your new data files in the right directory, or that your data does not have the correct format. Once you have the FreeIMU Offsets & Scale factors in hand, the calculation is simply:

CalibratedData = ( unCalibratedData – Offset ) / Scaling Factor

When I used this procedure on the battery distorted data from that first housing trial the before and after plots looked like this:

LM303 magnetometer data, showing Before and After results with freeIMU calibration factors.

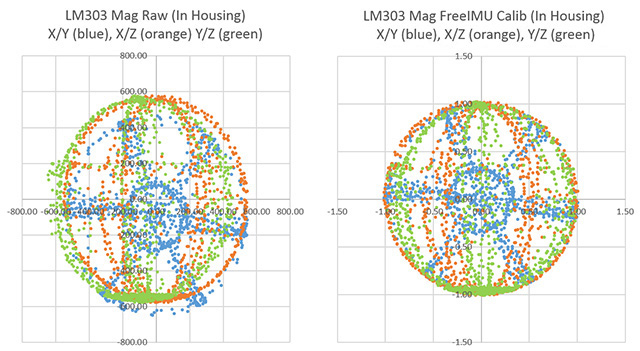
Now that’s what I wanted to see!  Even better: FreeIMU generated corrections for both the accelerometer and the magnetometer at the same time. (Units are lost when normalizing the ellipsoid because of the scaling factor. You can get acceleration back by multiplying by 9.80665 m/s*s.)

Unfortunately FreeIMU also comes with a whopping 300MB folder of support files, and with Fabio Varesano’s passing there is a real question about whether his software will continue to be available (or how long it will be updated to prevent some python version dependency problem from cropping up). I have also run across some scary looking hacked pages in the old varesano.net site, so it might be safer to use the wayback machine to search through it.

Using Magneto v1.2

My search for alternatives to FreeIMU lead me to Magneto v1.2 over at the Sailboat Instruments blog  That software was recommended by some heavy-hitters at the Sparkfun and the Arduino Playground forums, with one helpful person posting a step by step guide to Calibrating the LM303 with the Magneto software. With my earlier tests, I already had raw magnetometer data in text file, but I did not get good results until I noticed that before Scirus launched Magneto he was preprocessing the raw magnetometer readings with an axes-specific gain correction (See Table 75: Gain Setting on datasheet) to convert the raw output into nano Tesla:

Xm_nanoTesla = rawCompass.m.x*(100000.0/1100.0);
// Gain X [LSB/Gauss] for selected input field range (1.3 in these case)
Ym_nanoTesla = rawCompass.m.y*(100000.0/1100.0);
Zm_nanoTesla = rawCompass.m.z*(100000.0/980.0);

Save this converted data into the Mag_raw.txt file that you open with the Magneto program. Then your numbers match the magnetic field norm (or Total intensity) values that you get from the NOAA or BGS sites:

TotalField

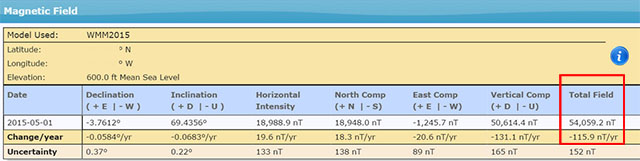
To use his method with a different magnetometer, you would have to dig into the datasheets, and replace the (100000.0/1100.0) scaling factors with values that convert your specific sensors output into nanoTesla. On the LM303, that factor is different on the Z axis than it is on the X & Y axes. But according to the author on the Sailboat Instruments site you only need to match the total field “norm” values if you want the final output on an absolute scale:

“Magneto expects to receive raw data in +- format (a value of zero indicating a null field in the current axis), but not necessarily normalized to +-1.0.

If your sensors have SPI or I2C outputs, they will usually directly produce the required format. For example, the MicroMag3 magnetometer directly produces counts from -3411 to +3411, and the the SCA3000 accelerometer directly produces counts from -1333 to 1333, and Magneto can process directly these values, without the need to normalize them to +- 1.0. I understand that a normalization may be desirable to avoid machine precision problems, but this has not been the case with these sensors.

If your sensors produce voltage levels that you have to convert to counts with an ADC, you have indeed to subtract a zero field value from the ADC output before using Magneto. You would then normally choose the maximum positive value as input to the ‘Norm of Magnetic or Gravitational field’.

But this norm value is not critical if all you want to calculate later on is a heading (if it is a magnetometer) or a tilt angle (if it is an accelerometer). You can input any reasonable value for the norm, the correction matrix will be different by just a scaling factor, but the calculated heading (or tilt angle) will be the same, as it depends only on the relative value of the field components. The bias values will be unchanged, as they do not depend on the norm.

Once I had my raw readings at the same scale as the Total Intensity numbers, I could hit the calibrate button, taking care to put the generated correction factors in the right section of the matrix calculation code:

Using Magneto1Rather than simply finding an offset and scale factor for each axis, Magneto creates twelve different calibration values that correct for a whole set of errors: bias, hard iron, scale factor, soft iron and misalignment. As you can see from the example above, this makes calculating the corrected data a bit more involved than with FreeIMU. I am not really sure I want to sandbag my loggers with all that floating point math (mistakes there have given me grief in the past) so I will probably offload these calculations to post processing with Excel.  To check that your calculations are working OK, keep in mind that in the absence of any strong local magnetic fields, the maximum readings should reflect the magnetic field of the earth which ranges between 20 and 60 micro-Teslas.

When I ran Magneto on the same data set I tested with FreeIMU, the x/y plots were once again transformed into perfect spheres, centered on the origin. Since I could not determine which software had done a better job by looking at the graphs, I took a hint from the Scirus post and decided to run the post-calibration numbers from each application as input to both programs. Since the FreeIMU “normalized” to unitless +-1 values, I had to multiply it’s output by my local 54,000 nT total field to use it’s post calibration output in Magneto. As you might expect, each program thought it’s own output file was perfect, requiring no further offsets, etc. But Magneto thought there were still “slight” offsets in the corrected data from FreeIMU, while FreeIMU thought the output from Magneto’s corrections were fine. I have slight in quotes there, because Magneto’s suggested bias corrections to the post FreeIMU data amounted to less than 0.1% of the total range. Given all the real world factors that affect compass readings, I’d say the two calibrations are functionally equivalent, although I suspect Magneto can deal with more complicated soft iron distortions.

What about the Accelerometers?

A side benefit of all this is that both programs can be used to calibrate accelerometers as well!  FreeIMU does this right from the start, producing unit-less +-1 results. For Magneto you might again need to pre-process your specific raw accelerometer output, taking into account the bit depth and G sensitivity, to convert the data into milliGalileo. Then enter a value of 1000 milliGalileo as the “norm” for the gravitational field. (Note: With the LM303 at the 2G default settings, the sensitivity is 1mg/LSB, so no pre-processing is needed. However the 16-bit acceleration data registers actually contain a left-aligned 12-bit number with extra zeros added to the right hand side as spacers, so values should be shifted right by 4 bits – which shows up as dividing by 16 in the Scirus example)

Now that I finally have a way to calibrate my sensors, I can move on to calculating the vectors for my flow meters. Being able to derive the sensors an instantaneous yaw angle from the magnetometer data would means that I no longer need to worry about the physical orientation of the sensors to calculate windrose plots  with circular averages. Of course bearing calculation brings me right back into the thick of the Quaternion vs Euler Angle debate, and I have more homework to do before I come to grips with any of that. But I also have so much soldering to do…perhaps I’ll deal with it “later” 🙂

Addendum 2017-04-20:

A pingback put me onto a long discussion at Pololu of someone working their way through tilt compensation on an LM303. They mention the use of MagCal, another software option which confusingly, outputs the INVERSE of the matrix that you get from Magneto. But there are tools to flip the matrix if that is the software you have available.

Addendum 2017-10-12:

Accelerometers are so jittery, that it’s always a good idea to read them a few times and average the results.  Paul Badger’s DigitalSmooth does an excellent job when you feed it 7-9 readings for each axis. This filter inputs into a rolling array, replacing the oldest data with the latest reading. The array is then sorted from low to high. Then the highest and lowest %15 of samples are thrown out. The remaining data is averaged and the result is returned, allowing you to calculate things like tilt angle.

Addendum 2018-04-11:

Posting a quote here from jremington, as several people have emailed questions about IMU’s, which add a gyro into the mix.

“The accelerometer is used to define pitch and roll (while the craft is not accelerating or rotating), while yaw is defined by the magnetometer. Another way to look at this is that the magnetometer defines the North direction, while the accelerometer defines the Down direction. North and Down are combined to generate East, for a full 3D coordinate system called North East Down (NED). Both of these sensors are required to determine absolute orientation. The gyro only measures rotation rates and cannot be used to define any angles. It simply helps to correct for the fact that the acceleration vector is not g (Down) if the craft is rotating or accelerating.”

Again the place to start reading about IMU’s is probably the CHrobotics library. And I’ve heard rumors that the MPU6050 with the i2cdevlib DMP example sketch generates both quaternions and sensor-fused motion data at ~100Hz, so that might be a good code reference…

Addendum 2023-12-01: A quick testing platform for your sensors

People are not likely to jump into building underwater units immediately, so you’ll need a platform to test the different accelerometers on the market. Our 2-Module Classroom data logger is probably the fastest way to get a testing fleet together, with mini breadboards making the sensor swaps effortless. Even relative power hogs like the ADXL345 should be OK for a few weeks of operation with the 1000µF rail buffer.

Field Report: 2015-03-23 Flow Sensor “drag fins” tested

Our deployments last year saw only modest instrument response in slower systems, especially those where the water was flowing slower than 1 cm/second. Most of the deep saline circulation fell into this category, and we really wanted better data from those caves. So I came up with a add-on attachement for the flow meters, hoping to dramatically increase their surface area without affecting buoyancy that much.

Officially this was an introduction to beach facies mapping, but it looks more like geosci Kung Fu to me.

Technically, this was an introduction to mapping beach deposits, but to me it looked like geo-scientist Kung-Fu

I had a couple of these new fins on this trip and I asked my wife, who was busy leading the Northwestern University earth science students around the peninsula, when I might sneak away from the group for a few hours to see if they actually worked. She suggested instead that we do an actual deployment, using the opportunity to expose the undergrads to the aspects of real underwater fieldwork.  I was instinctively cautious about this idea, having seen a fair number of tech demos go wrong over the years, but I have also come to realize that Trish’s enthusiasm is an unstoppable force, so we added the dive to a schedule that was already bursting.

The new "parallel" anchor rig make the differences between the instruments obvious...

The new “parallel” anchor rig made it easy to see differences in instrument response from the last deployment. It’s hard to achieve consistent results with all the changes I make from one generation of underwater housings to the next.

With all the other activities on the go, it was mid- afternoon before we actually donned our gear, while answering questions from the students about the double tanks, and doing little demos of the other cave-diving kit. Then we waddled off to the waters edge, festooned with the mesh bags of loggers, cables, and other bits that accompany a typical deployment. I’m not saying we looked bad, but it was probably clear to the students that we weren’t going to peal off and reveal a freshly pressed tuxedo after the dive 😉  Once in the water, we had a short swim along an open channel to the cave entrance with a gaggle of snorkeling students following our progress at the surface. One of our primary lights started acting a bit flaky on the way and we had another impromptu Q&A session floating among the mangroves as one student paddled back to fetch our spare.  A bother, but it did put a point on what we had said earlier about all the redundant equipment we were carrying. When the extra light arrived, we started the dive, and I made a note to myself to take more photos than usual for the debrief that would occur at the end of the day.

Here I am adjusting the ballast on one of the flow meters before deploying it.

Here I adjust the ballast mass on one of the flow meters before installation (with the new drag fin in the foreground)

Once on site, Trish set our mesh bags up in a little work area, and I swam out for the usual round of inspections. North? check. Epoxy OK? check. Vortex shedding? etc. Once that was in the dive notes, I began the one-by-one exchange of the old units.  The indicator LED’s pipped right on schedule, telling us that we had no epoxy failures this time round. Once all the flow sensors had been replaced, I took a few photos and noted that the unit closest to the main line was not being deflected as much as the other sensors. I then added the new drag fin to that heavier unit.  I also had a pressure sensor to install, and while I switched that out I could see that the sensor with the new drag fin was now almost horizontal compared to the other sensors:

I don’t know about you, but I am calling that a success.  In faster systems the fin might clip the high end, although the cross sectional area now changes quite a bit as the unit approaches 90 degrees. Any approximation with drag on a sphere has also gone out the window, but I already knew that empirical testing was going to be necessary to get point velocities. As I refine this idea, I will come up with different sizes, and integrate the baffles more elegantly with the ballast mass adjustment. Wheels are already turning in my head with possibilities.

Addendum:

As part of the extra video we captured for the students, I recorded a short clip of our exit from the cave. With the water at high flow, there was significant mixing at the fresh/salt water interface, producing an optical consistency similar to salad dressing. This is limited to the mixing zone region, and you can see this when I placed the camera below the level of the interface where it obtains clear visibility again.  While cave divers run into this kind of thing frequently, it’s probably something that regular divers don’t experience very often. So I thought I would post the clip just to show people what it was like:

<— Click here to continue reading the story—>

Field Report: 2015-03-18 One logger sacrificed to the sea gods.

DIY Cave Pearl data loggers based on Arduino Microcontrollers

The B4 unit has been a star performer despite the fact that it was one of the earliest logger units I ever built. It has been running continuously since its first cave deployment in March 2014.

I was happy to see Gabriel from CEA the next morning to discuss retrieval of the open water units, but he delivered some unwelcome news to go with my morning coffee: the logger at the mouth of Yalku Lagoon had gone missing. Loosing the unit itself was irritating, but loosing four months worth of data – that hurts!  Another pivot joint on one of the loggers in the bay had failed the week before, and one of the reef volunteers spotted that unit while it was still hanging from the backup bungee. I received that news before we headed south so I had quickly crafted some stronger universal joints from pvc to fix the problem. It was salt in the wound to know that these new pivots were sitting in my suitcase, having arrived a day or so too late to save the Yalku unit. Darn!

Oh well, we can only try again, and there is some solace in the fact that we are not the only ones to see equipment suffering this fate.  There is still a small chance that someone will pick it up further down the beach, try to figure out what it is on Google, and send us an email to say they still have the SD card. From this point forward, I will be labeling the inside of my loggers as well as the outside, and I will add a little “If found please email…” blurb into the data files.

Marco cuts B3 from it's mooring

Marco cuts B3 from it’s mooring on the south side of the bay. Marco has been doing regular checks on the loggers since the beginning of the open water experiment.

Gabriel had meetings to attend, so Everett, Marco and I popped on some fins and swam out to recover the units in Akumal bay.  As usual they were covered with a crop of algae & other critters but both B4, and the B3 unit that I rebuilt on the last trip, were still running smoothly. The unit in shallow water was so encrusted that I told Marco to pull the whole assembly, including the anchor plate, because there was no way to inspect it through all the accumulated cruft. That bio-fouling likely increases the drag and the buoyancy of the meter over time.


I left one of the new pivot joints on the B4 anchor plate. Hopefully these are robust enough for the constant wear and tear.

This is one of the new universal joints – hopefully robust enough to save us from more losses.

These two loggers have now been in the open ocean for seven months, and once ashore I began a familiar routine, cleaning them with green scrubby pads and copious amounts of rubbing alcohol.  The Loctite E-30CL epoxy on the LED’s is holding up well although the JB weld on one of the DS18b20 temperature sensors definitely has little patches of rust showing through. The stainless steel ballast washers appear to have fused together, but the O-rings are still looking good. The nylon bolts are sounding crunchy, perhaps indicating that they are starting to get brittle so I might replace them on the next round.  Now that the new pivot joints are more robust, I probably need to think about upgrading the rest of the connections as well.


JB weld on one of the DS18b20 sensors

The JB weld on the DS18b20 sensors is getting a bit crusty.

Once the data was downloaded, I reset the RTC’s, and checked that the sleep currents were still the same as they were in December. These units have Tinyduino stacks, so they run with fairly high sleep currents. (around 0.7 mA) With six new AA’s in the power module they should still deliver 6-9 months of operation.  After adding a fresh desiccant pack they were sealed & ready to deploy with code that crops the highest and lowest off of 13 readings, spaced 8 seconds apart. I average the remaining 11 readings to filter out the high frequency wave turbulence, and get at the underlying flow direction. So far this approach seems to be working well.  I also gave Gabriel a new logger to replace the one we had lost at Yalku lagoon Hopefully the sea gods will smile upon this new deployment.

<— Click here to continue reading the story—>

Field Report 2014-12-18: A Water Flow Sensor Co-deployment.

Heh gringos! No Cueva!

No cueva aqui…

Over the next couple of days, we managed to double the number of flow sensors in the core systems along the transect that Trish was studying as part of a biology project headed up by Dr. Fernando Alvarez from UNAM in Mexico City. We revisited our test rig at the coastal site, leaving a set of three flow units there along with our 2 Bar pressure sensor. All had been tested showing good sleep currents, so hopefully we would not loose our data this time.  Those dives went smoothly, and we ended up with a rare day on our fieldwork schedule that was not already booked.

We knew there was a system in the area were some biologist friends had a Lowel Instruments flow meter (the first time I have seen a commercial unit use the tilt/drag principal…) installed beside their monitoring equipment. But the meter was scheduled for removal in January of 2015 – so this opportunity was brief.  If we could make it out, a co-deployment would give us a chance to compare point velocity numbers from a commercial unit with our DIY project data.  On the down side, it was quite a haul to get out there, on a road that our little rental car was not really capable of handling.  But, thanks to my marathon rebuild session, we still had three flow sensors that we could deploy…

We decided to go for it, and just bring everything along in case the system looked interesting. Thirty minutes of slowly bumping, clunking and screeeeeeeeeetttcccching past the machete stumps, and we made it to the walking trail. From there we still had a good march out to the cenote, so we donned our gear and set out with doubles on our backs; placing each foot as carefully as we could on the uneven trail, while also trying to move fast enough to outpace the mosquitoes.  By the time we reached the water, it was getting pretty hot in those wetsuits!

Yep, we were not going to smell pretty after a dive in this stuff.

Yep, we were going to smell mighty good after this dive.

After we had cooled off , we did the pre-dive checks, secured our mesh bag full of sensors, and set off along the line.  And the water was…. brownish green…(?)  Much more than the other cenotes we had been diving in. But then I noticed that some of those bits of perc were actually moving around, under their own steam, and I understood why a group of biologists would select a site that was so darned awkward to get to. It was heaving with little critters!  When we found the site they had chosen for their monitoring equipment it was at the top of a trapped dome, probably perfect for monitoring things like nutrients, but almost certainly with too little flow for my Pearls to register. I set up a sensor anyway, thinking that if it was a zero flow location, we were not going to have much data to work with for that calibration. Who knows, perhaps we would get lucky and catch a big rain event flushing out the system during the overlap of the two meters?

Then we explored further into the cave.  The line soon descended below the limits of our humble point and shoot camera (so we had to leave it behind), but the visibility opened up below the tannic water showing a spectacularly wide passage, with the fresh/saline transition smack-dab in the center. Trish immediately became very excited, pointing out that there were ripples in the sediment.  We swam further into the passage, and she hand signaled her intent to find a location for a dual installation with our last two units.  I waited on the line while she searched, watching the slowly undulating halocline as it scattered our dive lights across the walls of the passage like a fun-house mirror. Once a site was selected, we configured one unit as a float, for installation on the floor of the passage, and directly above that we hung our last unit from the ceiling; up in the fresh water zone. After an inspection swim to check connectors & compass bearings, we shook hands in an exaggerated ceremony before following the jump reel back to the main line. I don’t think we could have picked a better place for our last installation of the trip if we tried. Worth the hike, and the bugs, and all the scratches & dents we put on that rental car…which now all seemed quite minor…really…no problem at all 😉

<— Click here to continue reading the story—>