Category Archives: Expedition Reports & Updates

Photos, videos & reports from the field.

Field Report 2013-12-16: The first long term deployment begins

Dec16_longDeploymentMascot

We discovered a stowaway in the car on our way out to the dive site. Everyone took that to be a good omen.

This was our last day in Mexico, so the flow meters were going in for their first long term installation today.  The over night run trials went smoothly so the last minute rebuild of logger 2 fixed the excessive power drain issue. (whew!)
But all the testing I had done over the last few days (with the units sampling and recording at a furious pace) meant that I had to scavenge the remaining good batteries out of our dive lights for the deployment.  I loaded the loggers with a sketch set to take readings every 30 minutes, and sealed the housings.

Then we loaded up our dive gear and drove to Playa de Carmen, to meet a reporter who had been interviewing Trish over the last few days. She was going to dive with us today to get video of us, and also of the little data loggers, for a documentary she was making about the growing water quality issues in the region.  Unfortunately she was was not a cave diver, so we did a “pretend” deployment on a large mangrove root out in the open water. Once she had captured the footage she needed, Trish and I continued on into the cave.

Because we were uncertain about the weight of the new batteries, we decided to install both units as pendulums for this deployment. The current at this location was pretty strong, so it was a bit challenging to stay in place, while affixing the “ceiling anchors” to the roof of the cave.

After securing the sensors, we did a final swim round to inspect the installation:

Fare well little sensor pods! We will come back in a few months to get you…we promise!

<—Click here to continue reading—>


Field Report 2013-12-15: Tweaking the Code

IMGP0554We had more diving with UNAM, and a few days of work with Trish’s own students ahead of us. But as luck would have it I had a nasty run in with señor Moctezuma, so I was forced to bow out of field work for a few days.  And now that we knew the data loggers were working, we were flirting with the idea that we could simply leave the data loggers running in another system, and come back to get them some time in the spring. I knew that the power consumption was only projecting out to about 45 days (with 15 minute sample intervals), so I had some real work to do if we were going to try a deployment of months!

I parked myself, and my little loggers, at a local restaurant where the internet connection actually worked, and the owner was friendly to researchers; despite the fact that they often spend their whole day glued to a laptop, when everyone else was out at the beach.  The waiters soon learned to ignore the guy in the corner with the laptop that had wires coming out of it…especially since he seemed to subsist on coffee alone.

I will just summarize a few notes from the daily progress journal here:

December 11th:

I examined the logger files from the 3 day test run, and there is more noise in the rubber end cap units data…I bet that’s from vortex shedding off the flat surface!

If we are going to leave these things running, they will eventually run out of power, so I need to protect the SD cards from brown out, or I risk all my data . I implemented low VCC cutoff in the code using the internal bandgap trick from this Arduino playground forum, but was left wondering if the one from Adafruit might work better?

Also posted to the Tiny circuits forum about the inconsistent behavior of the LED indicators. One unit blinks as expected when writing to the SD card. The other unit does not?  Also tried to implement a special “start up went ok” one time loop, but it did not go.
(Evidently the SD card attached to SPI bus as follows: MOSI – pin 11,MISO – pin 12, and CLK – pin 13 which is the same pin as the internal led…)

December 12th:

Yesterdays overnight tests worked fine in Unit1, giving approximately 30 readings per 16mv drop on VCC (with 6 cells) but Unit 2 showed the same drop in only 8 reads cycles. This is worse than the 3AA performance! Perhaps I have a bad cell in the powersupply? or just a bad solder joint that is letting one bank suck power from the other? Will run another overnight test tonight….

December 13th:

I duplicated the main loop data reads, with a second set of variables to cut the SD card access by ½. On an overnight run test, at one minute samples, this buffering of only one set of readings reduced the power drain by more than 50%, so obviously the SD card writing is the big achilles heel in the system.

And “Half your RAM will be taken up with the SD card’s 512 byte buffer, so you only have 512 bytes left to play with.” I need to concatenate those print statements into 512 byte strings?

I discovered that you can store constant unchanging things in the flash, like string literals.  But only if the function you are using them with supports it (which the SD card functions unfortunately don’t) – so anything with print or println with the contents in quotes can be “flashified”.

Found a snippet of code to monitor “Free memory”

December 14th:

Last days in the field now: I spent the most of the day doing multiple “elegant” for/while loops, with array variables, only to watch the free memory whittle down, cycle by cycle, bit by bit, till the “heap hit the stack” and the units start spewing junk characters faster than infinite number of monkeys….

Finally, that evening, I went back to the “dumb&simple” method. So I just copy/paste the entire block of data reading code again, and make a new set of variables for that loop. With three “buffer cycles” for each SD write cycle, its stable. But there is not enough ram to buffer 4 cycles though, so this will have to do.

December 15, 2013

Returning home after a day of fieldwork in a bug infested swamp.

Returning home after a day of fieldwork in a bug infested swamp.

From the overnight run tests: Even with the ram buffering Unit 2 it’s still drawing the power supply down three times as fast as Unit 1 with the same code? Grrr. Have to leave for fieldwork now.

Came back from field work at 8pm, but had to fix a Ph meter before I could check the run log. Unit 2 is still wonky, but our final deployment is tomorrow!  I just pulled it apart and replaced every board I had spares for. Will leave it running over night to see if that helps…

OMG! I popped a spare 128mb SD Sandisk card in for that last hour long test run after replacing the boards in unit 2, and even with read cycles every minute I saw only one 16mv drop on the power supply in over 60 readings! Those smaller size memory cards must draw way less power than the 2Gb Sandisk ones I had been using. Unit 2 is now set to run at least twice as long as Unit 1 – I might get 6 months or more out of it now. I wish I had discovered this months ago!

Last coding task of the day was to set the ChronoDots to wake the processor every 30 minutes. That’s a very long sampling cycle, but we may not be back down here for many months, so we are really stretching it out every way we can.

Field Report 2013-12-06: The moment of truth…

A couple of days into the UNAM research, there was break in the schedule, so we had the opportunity to go back and retrieve the units. When we arrived at the installation site, everything looked exactly as we had left it, with no apparent leaks or other damage to the housings.  But on closer inspection, we did observe that the two units were not exactly behaving the same way:

After catching a little more video, we spent a few minutes collecting the sensors. A short while later we finished the dive, and soon I was carefully cradling the loggers on my lap as we drove back to the CEA dorms. Once there I made sure that the units were absolutely dry before I opened them up to retrieve the SD cards.  I could see from the size of the files that both units ran smoothly, and had logged data. But what had they recorded?

Once the files were on the laptop, my wife, an Excel virtuoso, took over.  Within moments we were starting to see bumpy graphs displaying the three axes of the accelerometer.
A little more adjusting, a few labels, and we were looking at this:

3 days of raw data from the very first deployment.

Raw data from the first deployment: x,y&z axes, but with different orientations relative to flow direction.

“Is that good?” I asked. I could barely contain my excitement.

“Yes,” she replied with a big smile, ” for uncalibrated, first run data, this is pretty good.”

“Why two peaks per day?” I thought there might be a problem with the sensors.

“Actually.” she added, “That’s normal.  This area has semi-diurnal tides, and the velocity curves are often asymmetrical like that.”

“Yaayyyy!” I whooped, “We did it!” And I think I even started dancing.  Months of noodling around in the basement, and combing through forums, had just been transformed from “another one of Ed’s crazy projects…” into two real working prototypes!

It was well into the evening by this point, so we headed out for a late dinner, and a couple of celebratory ‘cervezas’.  We discussed where we might put them next, so that we could learn more about the quality of the data they were generating. I wondered about how we might calibrate them against some commercial units, and Trish said that even without ‘absolute’ velocity numbers, the information would still be useful to her research. But for me,  the real bottom line was the moment when she asked:

“How soon can you make me some more of these things?”

<—Click here to continue reading—>

Field Report 2013-12-03: The Full Monty

Trish ties off Unit 1

Trish ties unit one to the ceiling of the cave.

Although our field tests so far had uncovered buoyancy issues, both designs had remained water tight. So I was feeling brave enough to think about putting the electronics into the housings. And the UNAM crew was arriving in Tulum today, so I was about to loose my dive buddy to “real” research. We decided to go for it and install the little loggers, in a cave system, and leave them there for a few days taking readings every five minutes.

For this first deployment we chose a system that Trish had already calibrated for discharge many times over the years, allowing her to review any data that my little DIY units might produce within that context.  But given the buoyancy issues we had seen over the last few days, we decided to test everything in open water at the entrance.  And it’s a good thing we did as, once again, the o-ring design sank*… as you might imagine, I spent the next few minutes making some rather large bubbles.

…Once I regained my composure, we decided to make lemonade. If that unit was not going to float, then we would simply install it upside down, as a pendulum. The magnitude of the displacement would be almost the same, and all I had to do was change the sign on a few of the readings.  So we grabbed one of the anchors, and a bit braided line from the dive kit, and made our way into the cave.  I carried the anchor and poles, while Trish ran the dive reel leading us into the dark of the cave.  I have to admit I winced a few times as the mesh bag carrying her unit occasionally bashed into the nearby rocks, while her attention was focused on the line. I had visions of those Tinyduino stack connectors coming apart, “But hey” I told myself, “that’s what a this is all about.”  They would either survive the real world, or I would have to go looking for a different electronics platform.

We made our way to a location where we had installed one of the old RCM Aanderaa sensors, many years before. And while I found a place where the anchor didn’t sink elbow deep into the piles of organic mung, Trish tied off the pendulum unit. We did a few laps round the installation with the waterproof camera, to capture a little video, and then made our way back to the entrance. Our loggers were now out in the wild, collecting real flow data! The schedule was pretty busy for the next little while, so it was going to be a few days before we would be able to retrieve our units, to see if they worked. It will be interesting to see how the readings compare to each other.

I have my fingers crossed!

<—Click here to continue reading—>

*Some time later, we found that AA batteries vary considerably in their mass, and I had switched brands just before this deployment, throwing our buoyancy off again.

Field Report 2013-12-02: Another dunk test

In the evening of the open water tests, we reviewed video of the housings while talking (perhaps evangelizing is a better word…) to several friends at the Centro Ecológico Akumal where we were staying.

IMGP0273
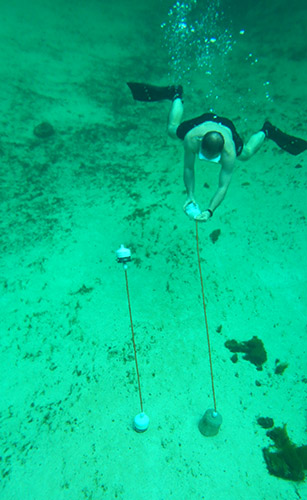
After sleeping on it, I realized that we had actually observed one other problem with the units the day before: Although the water flow was moving the housings, the videos showed that they did not quite lean at the same angle as the supporting pole. The second pivot point under the float was allowing the unit to try to right itself, reducing the tilt angle that the accelerometer would read. So the next day, while Trish was off diving with one of her students, I attached some foam floats to the support rods, which now had plenty of holes to vent any trapped bubbles, and I refashioned the float end of the support rods into a fixed ‘T’ junction.

IMGP0293After Trish returned, I put on my kit and we took the units in for their second real world test, again with a dummy payload.  With extra buoyancy on the lines, the o-ring design performed beautifully, and even with the really fast flow of this system, we were not seeing much wobble.  So I proceeded to setup the rubber bottom design, and this time I got to watch that unit slowly sink to the ground. Closer inspection revealed that the rubber end cap was slowly becoming convex. The water pressure at this deeper cave was much higher than it had been at the coastal site we used for the first test; so it was pressing the end cap inwards.

So day 2 of the field testing was nearly the mirror image of day 1, but it showed that I needed to re-enforce the soft rubber end cap somehow before that unit would behave predictably.  This also explained why we had heard the noise during the pressure test in the light maker’s dive shop:  the rubber must have been extremely concave during that test, so it sank to the bottom of the chamber with a “clunk”.

So another unsuccessful trial, but much was learned. So it goes…

<—Click here to continue reading—>

Field Report 2013-12-01: A pressure test for the rubber bottom housing.

The next day I needed to do some diving, both to test our kit, but also for me to just to get back into the “zen” that is cave diving.  This shakedown left us with one broken fin strap and one dead IMGP0219
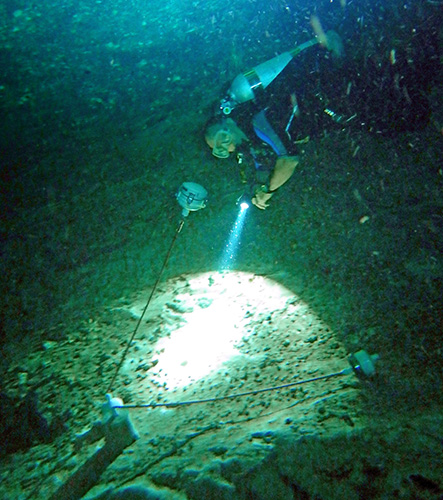
primary light. Which is pretty much on par for the beginning of fieldwork. We brought the dead light in for repair at the Dreams Tulum Dive Shop, where the owner (who makes dive lights and turns professional housings on his lathe) kindly offered to test my humble DIY housings in a pressure chamber he had fashioned from a decapitated scuba tank.  I was fairly confident about the o-ring design, but I still had lingering doubts about the one with the rubber end cap, so I jumped at the chance.  While the unit was still dry, I stuffed it full of toilet paper to act as an indicator for any water that might leak in. Then I put in the calibration weight, and he lowered it into the chamber. He pressurized it to about 100 feet and there was an a loud “clunk” sound at the start of the procedure; I feared the worst.

Perfectly dry after testing.

Perfectly dry after testing.

For the next ten minutes I paced the floor like an expectant father, much to everyone’s amusement. Then we depressurized, I dried off the housing, carefully loosened the pipe clamps to remove the end cap, and . . .

Whoo Hoo!  It survived with no leaks!  Not bad for $10 worth of plumbing!

But still I wondered what that noise was…

Addendum:  I did not find this out till after our trip was over, but the spec sheets list that caps maximum “working pressure” at a mere 4.3 psi. The pressure at 100 feet is almost 60 psi.  OOOPS! 

<—Click here to continue reading—>

Field Report 2013-11-30: The first “real world” housing test

I had some serious concerns about the wobble behavior observed during the early housing tests, and that vortex shedding might still kill the whole idea of measuring tilt as a proxy for water velocity. But without some real world observation there was no way to know if this was a lethal design flaw, or just an artifact of plain old surface turbulence. The support poles I had given the student to try out earlier were only 50cm long…

IMGP0171

The new housings get their first real world test.

So, even though we started our trip with a lovely bit of dry caving, I was very keen to get the new housings in the water before Trish started diving with her grad student and the diverse group of UNAM & Texas A&M researchers that would be arriving soon.

We piled all the bits into the rental car, and headed out to a local coastal outflow that was easy to access from the surface. I reasoned that if the units didn’t respond in the high flows at that site, there was no point in trying them out in the slower cave systems.  And, as this was to be the first test in anything deeper than a laundry tub, I decided it was safer to leave the electronics behind, and test them with simple calibration weights inside. We passed the usual gaggle of snorkelers on the way in, who stared curiously at all the plumbing we were carrying. A few continued to circle around above us as I set to work getting the anchors in place,  threading the poles, and attaching the housings.  At least I had proved that the thread plugs were easy to attach under water!

Right from the start the units appeared to be working: they were leaning in the direction of flow, and by 45 degrees (or more). I knew that the 2 G rating on our accelerometer meant we were using less than half the sensors range, but there wasn’t going to be any problem reading a signal that strong. And although we could see some of the wobble that the student had mentioned in the support poles, it was fairly mild except in the fastest flow areas. So the dreaded vortex shedding problem turned out to be far less serious than I had feared. I was happy!

IMGP0172Trish and I spent the next little while swimming around the units, trying to see them from all angles, while the curious onlookers tried to figure out what the heck we were doing. But as we continued discussing the floats, working on where to move them next, a problem was slowly developing. Over the next 15-20 minutes, the o-ring housing, slowly, inexorably, sank to the bottom. The only logical conclusion I could think of was that the seals had failed, and that the Mark II, which I had so carefully assembled, was a failure.

Later, after we had retrieved the units and dried them out at the surface, I cracked open our sinker, preparing myself for….Nothing! It was bone dry inside! How does something sink “slowly” without leaking? I put the cap back on and marched back over to the water, to dunk it in. And it floated, just as it had before, with just a small bump of pvc cresting the water. Hmmmm.

Then I grabbed the hollow support poles, tossed them in, and they floated too.  What was going on?  I moved the tubes around a bit, and spied a few small bubbles leaking out one end…Aaaha! They were not as buoyant as I thought they were. A bit more shaking to fill their internal volume with water, and I managed to get the poles to sink, very, very, slowly.

Then I jumped in, and pushed the housing down to the bottom; to observe it at depth. On the surface, it floated happily, but down around 15 feet, it rose much more slowly.  It dawned on me that I had been compressing the new o-rings for the first time! So the bubbles in the support poles were draining out, and, the internal volume of the housing was also changing with oring compression!

So today was not a failure at all!  I had simply shaved the buoyancy budget too close in my quest for more response to water flow. I could fix this…

<—Click here to continue reading—>