
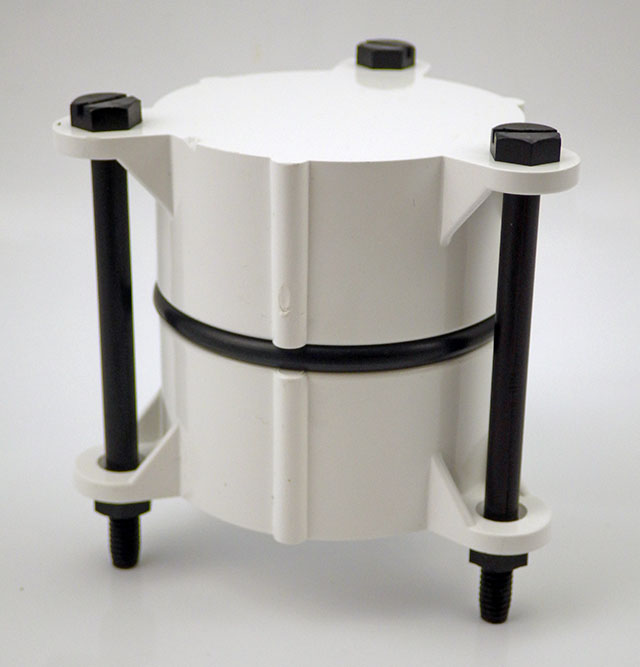
Basic concept: two table leg caps held together with 3″ 1/4-20 bolts & 332 EPDM o-ring. Internal length is 2x3cm for the caps + about 5mm for each o-ring. SS bolts work fine dry, but we use nylon in salt water due to corrosion; tightening the bolts enough that the o-rings will expand to compensate for nylons 2-3% length expansion when hydrated. PVC is another good bolt material option if you deploy in harsh environments.
We’ve been building our underwater housings from 2″ Formufit Table Screw Caps since 2015. Those housings have proven robust on multi year deployments to 50m. While that’s a respectable record for DIY kit, we probably over-shot the mark for the kind of surface & shallow water environments that typical logger builders are aiming for.
The additional RTC & SD power control steps that we’ve added to the basic ‘logger stack’ since 2017 are now bringing typical sleep currents below 25μA. So the extra batteries our original ‘long-tube’ design can accommodate are rarely needed. (described in Fig. A1 ‘Exploded view’ at the end of the Sensors paper) In fact, pressure sensors often expire before power runs out on even a single set of 2xAA lithium cells.
This raises the possibility of reducing the overall size of the housing, while addressing the problem that some were having drilling out the slip ring in that design. Any time I can reduce the amount of solvent welding is an improvement, as those chemicals are nasty:
(click to enlarge)
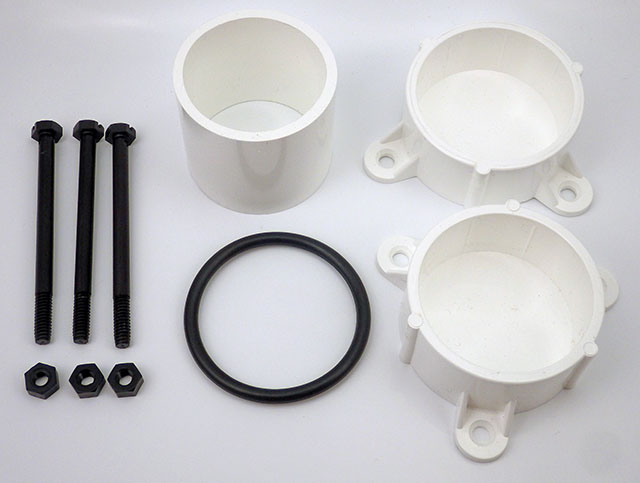 Basic components of the smaller 2020 housing cost about $10. O-rings shown are 332 3/16″width 2 3/8″ID x 2 3/4″OD EPDM (or other compound ) |
 Double sided tape attaches a 2xAA battery pack to the logger stack from 2017 ( w MIC5205 reg. removed, unit runs on 2x Lithium AA batteries) |
 The o-ring backer tube does not need to be solvent welded. Cut ~5cm for 1-ring build, & 5.5cm for a 2-ring. Leaving ~1.5cm head-space for wires in the top cap. |
 The logger stack fits snugly into the 5.5cm backer tube with room for a 2 gram desiccant pack down the side. |
 The screw-terminal board is only 5.5cm long, but the 2x AA battery stack is just under 6cm long. With shorter AAA cells you can use only one o-ring. |
 With several 4-pin Deans micro-plug breakouts & AA batteries things get a bit tight with one o-ring. So I add a second o-ring for more interior space. |
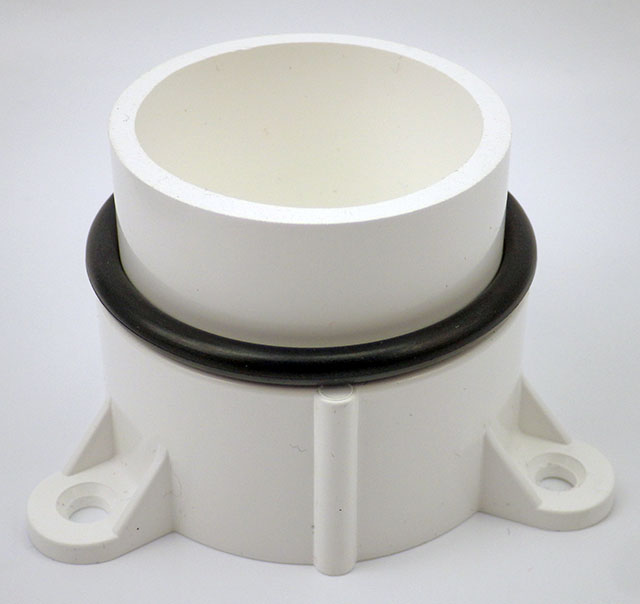
Sand away any logos or casting sprues on the plugs & clamp the pass-through fitting to the upper cap for at least 4 hours to make sure the solvent weld is really solid. (I usually leave them overnight) Then wet-sand the large O-ring seat to about 800 grit. Sensor connections are threaded 1/2″ NPT, but I use a slip fit for the indicator LED, which gets potted in clear Loctite E30-CL epoxy w silica desiccant beads as filler. Most clear epoxies will yellow over time with salt water exposure, so for optical sensors or display screens I usually add an acrylic disk at the upper surface.
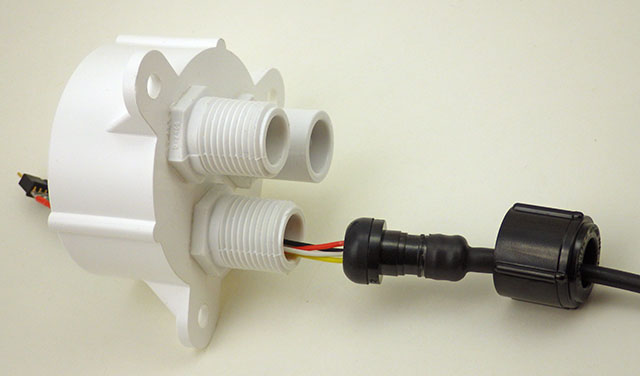
The only real challenge in this build is solvent welding the pass through ports. In the 2017 build video we describe connectors with pigtails epoxied to the housing. But you don’t necessarily need that level of hardening for shallow / surface deployments. The potted sensor connections shown in the video (& our connectors tutorial) can be threaded directly to the logger body via 1/2 threaded NTP male plugs.
Note: Position the NPT risers on the caps directly opposite the bolt struts, and as near to the edges of the cap as you can so that there is enough separation distance to spin the lock down nuts on your sensor dongles. In the photos below I had the pass-through in line with the struts, but with long bolts this may limit your finger room when tightening the sensor cable swivel nuts. These direct-to-housing connections do make the unit somewhat more vulnerable to failures at the cone washer, or cuts in the PUR insulating jacket of the sensor dongle.
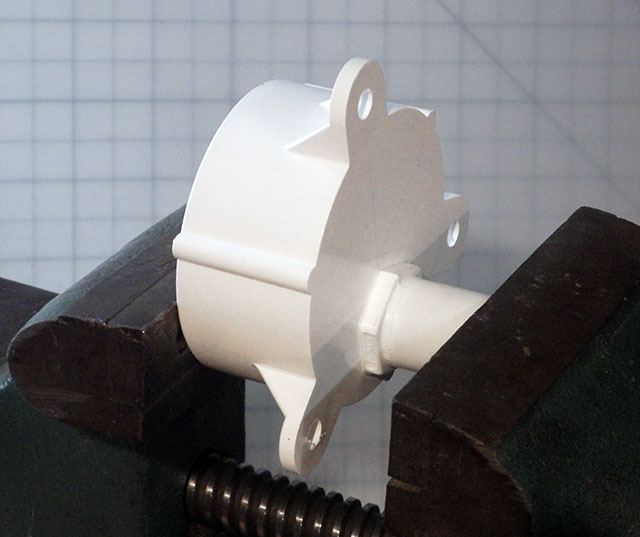
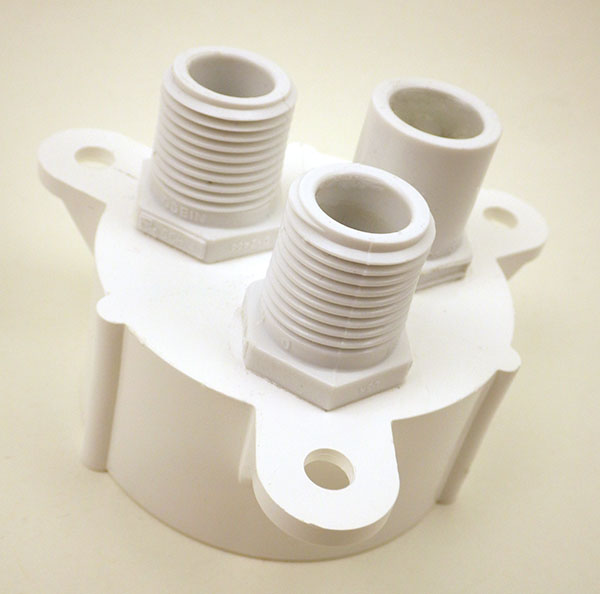 Threaded bulkhead pass-throughs get drilled out with a 1/2″ bit. Alignment with bolt struts shown here is suboptimal. |
 This closeup shows a slight gap near the center – I could have done a better job sanding the base of the NPT to make it completely flat before gluing & clamping! |
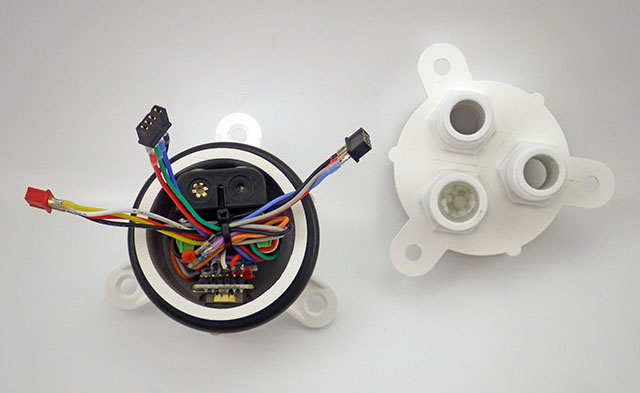 the pass through style sensor cap mates to the the lower half of the housing. We’ve always used our o-rings “dry” on these pvc housings. |
 I describe the creation of the sensor dongles with pex swivel connectors in the 2017 build video series. |
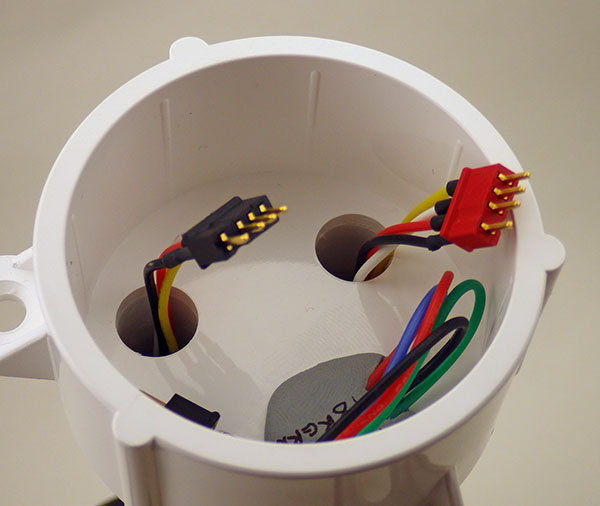 Dongle wires need to be at least 6cm long to pass completely through the cap. |
 “2-Cap” housing: Aim for 5 to 15% o-ring compression but stop if there is too much bending in the PVC struts. |

It’s also worth noting that there are situations where it’s a good idea to have another connector to break the line between the sensor and the logger. (shown in 2017) We often mount rain gauges on top of buildings with 10-20m of cable – so we aren’t going to haul the whole thing in just to service the logger. But on-hull connections like the ones shown with this new housing necessarily open the body cavity to moisture when you disconnect a sensor, and nothing makes a tropical rainstorm more likely to occur during fieldwork than disconnecting the loggers that were supposed to be measuring rainfall.
With a double o-ring and additional seal(s) in the cap, we probably won’t be deploying this new design past ~10m. Given how quickly they can be made, this short body will be a standard for the next few years; perhaps by then those fancy resin printers will be cheap enough for regular DIY builders to start using them – at least for shallow water work. For now we’ll continue with the long body style for deeper deployments or remote locations that we might not get to again for a long time. The second o-ring is not really necessary if you make a nice tight stack when you assemble the logger.
In general I’d say these ‘plumbing part’ housings reach their long term deployment limit at about ~60m because the the flat end caps starts blowing noticeably at that depth. That overlaps nicely with the limit of standard sport diving, but if your research needs more depth it’s worth looking into the aluminum body tubes/endcaps becoming available in the ROV market. As an example: Blue robotics makes some interesting enclosures if you need clear acrylic endcaps for camera based work.
(UPDATE: the double o-ring shown in the photo above was required when using 3.5″ bolts. That was a mistake as they tended to extrude easily. Using shorter 3″ bolts lets you go with only a single o-ring which is gives you a solid seal with no accidental extrusions.)
Addendum 2023-05-25
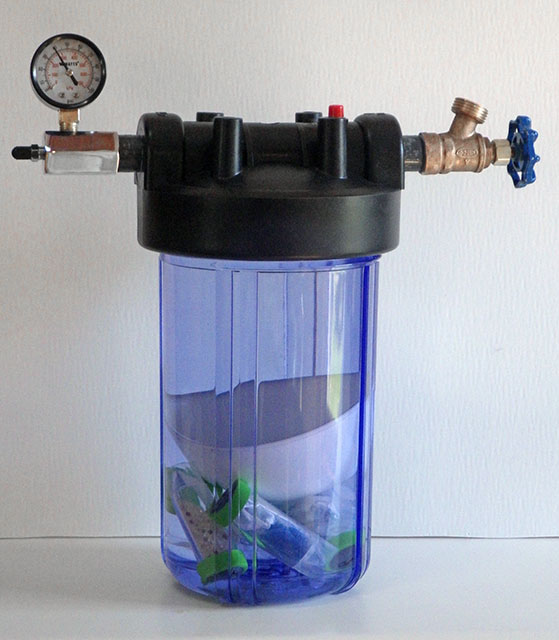
We needed a way to see how far we could take the new falcon tube loggers and water filter housings are a good solution as the domestic water pressure range of 40-80psi overlaps nicely with sport diving depths. The internal clearance of the filter housing we used is slightly larger than 4.5″ x 9.5″ so could accommodate these older PVC style housings as well:
https://thecavepearlproject.org/2023/05/24/a-diy-pressure-chamber-to-test-housings/

Darn it, you keep making my doubt my own deployment casework… in a really wonderful way. This is very nice, really compact. way to drive the system to smaller / lower power than I thought likely.
I’ve adopted a few of your ideas over the years, and who knows how long Formufit will keep making these parts? So perhaps it’s a good thing that your housings are different from mine. And you have better physics Kung-Fu.
Also note that I’m using the black DS3231 modules from DIYmore. I started buying them because they use the -SN chips but they also have a battery holder that’s a couple of millimeters shorter than the blue Z-41 modules.
Addendum: If Formufit does discontinue the table caps, it would be easy to reproduce the basic idea using flange rings to provide the bolt attachment points. Especially if I wanted to make housings with a diameter larger than two inches: see PVC mounting flanges
Hi there! Could you possible provide a different link for the two-part PEX swivel connectors you show at timestamp 11:48 of the waterproof connector assembly video? The current link on the blog post is causing a weird error for me. This part would work well for my application, but I want to make sure I purchase the right one. Thank you!
The specific part shown in the video was: NIBCO 1/2″ Poly PEX Swivel Faucet Adapter from Menards
https://www.menards.com/main/plumbing/hoses-tubing/pex-tubing/nibco-reg-1-2-poly-pex-swivel-faucet-adapter-fitting-2-pack/px01888cr2/p-1444449293411-c-19654.htm
Unfortunately I can’t keep the links ‘live’ very long because those auto-generated destination pages change every time the companies update their inventory/web interface. But those swivel adapters have been standard parts for Pex plumbing for a very long time. So they are now sold by dozens of different companies with each major hardware distributor (Home depot, Lowes, Menards, etc) carrying essentially the same part from different manufacturers (Nibco, Soux Chief, etc). There are also vendors selling them on eBay, etc. A good place to start with commodity parts like this is a search on Google Shopping.
Awesome! Thank you for providing that! And just to be sure, does that have the small inner piece with the sealing o-rings. The picture Menards provides isn’t spectacular and I just want to be sure.
Yes – the inner ‘cone washer’ is the critical part of the whole system. I’ve been using rain-bird riser tubes between the two swivels for inline connectors, but company/part availability varies from by area. It’s worth the time to physically go to the store to make sure parts fit together before buying them online because the photos are always missing some important feature like casting seams / artifacts at o-ring seal areas – hand sanding those (down to 800 grit) takes significant time.