
Temperature is a fundamental physical parameter which can be used to track how water moves and interacts with the rest of the environment. Most waterways in the world are multi use, and temperature sensors are a simple way to monitor rivers and streams, to see how they are being affected by urban pollution, agricultural runoff, solar heating, groundwater exchange, etc. In larger water bodies, we also want to track the cycles of temperature stratification. Sometimes we deliberately disrupt thermoclines with aeration to preserve game fish, but at other times we depend on metalimnion stability to provide a barrier between the E. coli we dump in, and the water we take out for drinking. Monitoring hydrothermal plumes can even shed light on geological activity under the ocean floor.
My first attempt with epoxy & lengths of 1/2″ pvc was successful enough to keep me going. For shallow water deployments, a simple treatment like this would probably be good enough to last for many months. Epoxy is the most expensive component, so each node cost ~ $4.00 with the benefit that each sensor is very robust afterward. You can also check out Luke Miller’s sensor waterproofing on his blog.
Temperature is also a key metric of ecological integrity because it exerts a profound influence on aquatic creatures. Many species time their reproduction and migration according to seasonal water temperatures and, as temperature increases, the capacity of water to hold dissolved oxygen is reduced. In coastal environments, temperature and salinity are very strongly associated so you can use it as a reliable proxy to record tidal cycles, and saline intrusion into fresh water habitats.
All of these applications require simultaneous sampling at different depths and locations, so arrays of temperature sensors are a standard tool for addressing water quality issues. Today, many researchers are looking to the open source movement to help make these large installations more affordable. One obvious candidate is the inexpensive DS18b20 temperature sensor because it’s one wire protocol makes it possible to string them together in a daisy-chain configuration. Electronics hobbyists have taken note, and are putting them all over the place with Cat5 network cables. Reading those pages convinced me to take a closer look at the DB’s from the perspective of the Cave Pearl Project: Would it be possible to turn these humble band-gap temperature sensors into something like a research quality thermistor string?
A review of typical commercial options gives you a sense of how much it actually costs to build a network of temperature sensors:
| Sensor | Cost/Node | Precision ±Accuracy | Comments: |
| iButton | $25.00 (stand alone) |
0.10°C ±0.70 | Thermochrons have made a new class of low resolution networks possible, with large #’s of sensors (Note: You need to coat these guys in PlastiDip if you are deploying them outside, as they are not really waterproof) |
| Hobo Water Temperature Pro v2 | $129.00 (stand alone) |
0.02°C ±0.21 | Here is an interesting USDA study using TidbiTs which have identical cost & spec. |
| NexSens T-Node FR | $250/node + $150/cable | 0.01°C ±0.075 | Typical of high end sensors used in large well funded projects at NOAA, etc. |
The iButtons are basically disposable, and I don’t think it would be worth anyone’s time to make them from scratch if all you need is 0.10±0.7°C. But if you need more precise information, a simple 10 node string puts you around $1500 in the mid range, and $4000+ at the geotechnical high end. Factory calibration of 0.0625 ±0.5°C puts the DS18B20s somewhere between the Hobo loggers and the low end Themochrons. But with each sensor on the same chain, you would be able to keep all the sensors synchronized better than stand alone units. After seeing the elegant pro-level system, I knew I also wanted something that could be assembled from interchangeable segments, to customize the chain for each installation.
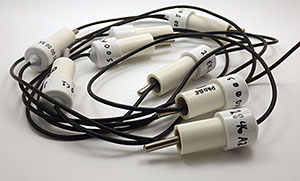
I googled and grazed my way through various YouTube videos, instructables, etc. looking at how others had water-proofed these sensors. After digesting that, I produced a some prototypes using a modified version of my underwater connector idea that have the DS18b20 potted in an irrigation pipe coupling:

~ $9 each for materials. The barbs are tapped to aid adhesion, JB Plasticweld forms a plug to hold the epoxy in.
The 1-Wire Address Finder and the library from Miles Burton work well with this changeable configuration. I preferred the code over at Paul Stoffregen’s site, as it gives you the raw integer reading, the ROM address, and the temp in °C as soon as you connect a new sensor. But like most of the scripts that uses address arrays, it will read them in numerical, rather than physical order. So you will eventually end up hard coding the Rom addresses unless you switch over to something like the DS28EA00 that supports sequence detection through a chain mode function. This allows you to discover the registration numbers according to the physical device location in a chain, and if the DS28 also had better resolution/accuracy than the dirt cheap DS18’s, I’d be converted.
The one-wire guide at the Arduino playground has a most valuable tip for driving a string of sensors like this:
“The master can address all devices on the bus simultaneously without sending any ROM code information. For example, the master can make all DS18B20s on the bus perform simultaneous temperature conversions by issuing a Skip ROM [CCh] command followed by a Convert T [44h] command.”
This means that I can minimize the number of times the Arduino has to wake-up for each set of readings. But these sensors are still going to pull about 1.5 mA each during the 750ms 12-bit conversions, so there is going to be a substantial power demand during each set of sensor readings even if I put the μC to sleep while it waits for the data. (and you can only sleep if you are not using parasite power) Thirty or more sensors on the bus will also generate allot of communication and data buffering. I have no idea yet how much juice all that is going to take so I built some larger housings, with room for twelve AA batteries, to drive these long daisy-chains:

This prototype is 14m long, with 1m, 0.5m and 0.25m cables. I’ve had no data reading errors so far…
Maxim has guidelines for reliable long line 1-wire networks which suggests that longer networks need 100 Ω resistors at each node for distributed impedance matching or you could run into timing/reflection issues. As I am working in reasonably restricted cave environments where the floor to ceiling distances rarely exceed 20m, I did not add these resistors. If I start seeing the dreaded 85°C error after I load the bus, I will try a lower value pullup resistor, or perhaps a barrier diode. There is even an I2C to one wire bridge out there that can adjust the strength of the pull-up dynamically as your network grows, although since the one-wire bus is so easy to get running, I would only cobble the two networks together if I had an unusual situation.
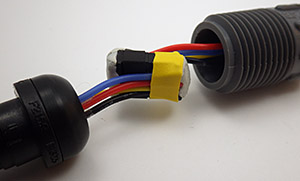
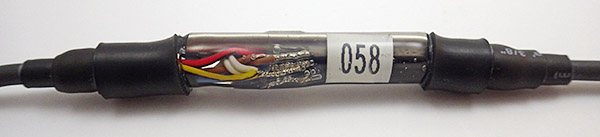
I am using Deans 1241 Micro 4R plugs, which just barely fit inside the pipe. These connectors are really solid, but the trick is to get the wires to fold without pinching when you mate the o-ring to the seat on the opposite side of the connector.
The sharp eyed will note that there are four conductors on that interconnect. I used four conductor cable for added strength because silicone jacket cables are so soft and floppy that the sheath really provides no support at all. And this offers the potential for a second one-wire network that is separate from the first if communication errors start to appear. Alternatively, I could add other one wire devices to that second line for more functionality. I have not figured out what this might be yet, but perhaps I could include some kind of leak detector to make the system more robust. I am also keeping an eye on the one-wire weather station crowd to see if an interesting sensor pops up there. And finally, I wanted a four wire connector that could also be used with I2C breakouts, as most of my other builds use sensors with that protocol.
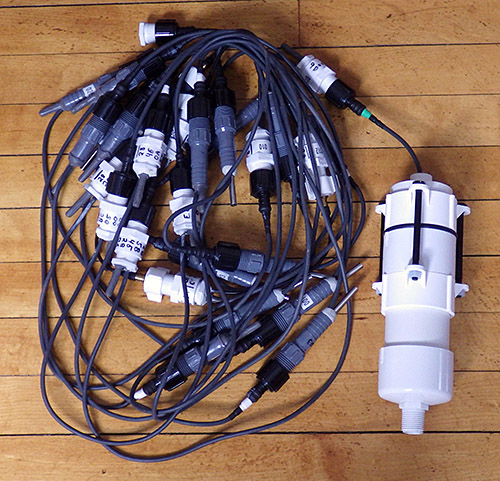
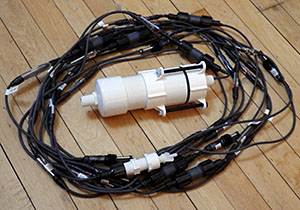
With 27 nodes, this is approaching the largest string I would want to deploy on a dive. I need to put some thought into how to handle this massive tangle hazard safely.
I have replaced the cable that came with the “waterproof” DS18B20 sensors, as the insulation was far too thin for the rough handling I expect to see and the 28awg wires would add significant resistance over a long run. But silicone jacket cable is expensive and I am still searching for an affordable 24awg, 4-conductor option. (If you have a suggestion, please pop it in the comments!) The PVC and Poly-urethane jacket cables I have tried so far are just too stiff to “hang right” under water without a weight on the line, and this would put strain the data connections. The standard solution is to run a suspension wire alongside the thermistor string with the data lines connected to this armored stiffener. While this works great off a boat or a buoy, I would prefer not to have to deal with those extra components on a cave dive.
After addressing the issues with the physical build, I still have an elephant standing in the corner. While an accuracy of ±0.5°C might be good enough to track the refrigerator in the garage, ±0.1 °C is about as coarse as you want to go for research applications. So a lot of the burden of making this thing really functional will be the calibration. If you replace the Arduino’s 10-bit ADC, then there are thermistors that give you ±0.1°C right out of the box, and I would like to get these DS18b20’s into that ball park before I say the newest addition to the Cave Pearl family is ready to deploy.
Maxim has a document describing how to curve fit the error of a band-gap based digital temperature sensor with 2nd order polynomials to achieve accuracies in the 0.02-0.04°C range, but they make the assumption that you already have a NIST traceable platinum RTD to determine what the errors actually are. But what if you don’t have that $5-600 piece of kit just lying around? (+another $150/year for the required annual re-calibration) Is there any other way to calibrate temperature sensors like this to improve their accuracy?
Actually, there are verification procedures that use the ice and steam points of water, and I will detail my attempts to use these “old-school” calibration methods in the next post. In theory at least, these intrinsic standards can bring our DS18b20’s well within a mid-range accuracy target of ±0.2°C. At the end of it all I will try to borrow a certified pt100 to see how close I actually got.
Addendum 2015-02-23
After handling that long chain for a few days of calibration, I realized that I needed to mount those sensors with a much smaller physical profile or they were going to be a pain the backside under water. So I came up with a simple combination of heat shrink tubing and epoxy that keeps the sensor much closer to the cable than a hard-sided mould:

Using clear heat shrink will let me monitor leaks, aging, etc. There is heat shrink tubing on those solder joins, but it became invisible in the clear epoxy.
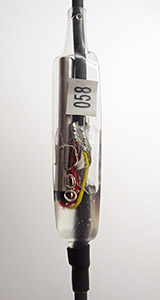
Heat from the bottom and as the tubing shrinks the epoxy “flows” up to the other end. When you seal the upper end leave some excess epoxy trapped in the tube. Apply another ring of shrink to cap it off, and with both ends fully sealed & cooled down, gently heat the entire surface. As the leftover wrinkles disappear the heat shrink tube turns into a tension structure creating a smooth rounded profile.
The trick is to seal one end of the clear tubing first, and then inject the epoxy into that from the open end. Once the tube is about 2/3 full 0f epoxy, shrink the upper open end of the tubing down to it’s minimum diameter. Very gently heat several spots along the tube – as those areas contract it pushes the epoxy up toward the open end. Then wipe away any excess so the meniscus is level, and seal the upper end of the outer tube to the cable with a short section of adhesive lined heat shrink tubing, making sure that you trap as few bubbles as possible. I usually use adhesive lined heat shrink for those two end tubes, and I let the upper ring completely cool so that if forms a good seal before heating the rest of the clear heat shrink tube. I usually use Loctite E-30CL epoxy as this sets much more quickly after the reheating process, often becoming hard in about 30-45 minutes. This approach to mounting the sensors would also work with ‘naked’ Ds18b20’s, but having the sensors already mounted in the stainless steel sleeve makes it much easier to do the ice & steam point calibrations before you commit to actually using a particular sensor. At only $1.50 each, you should expect to triage at least some of them for being out of spec.
Completely encasing the sensor like this will induce some thermal lag, if you are really worried about that you could make the tubing shorter and not seal the upper end, leaving the metal sleeve exposed. If field handling indicates that the hard epoxy is too brittle, I will hunt around for a flexible amine curing silicone, or a low durometer clear urethane, to fill the nodes (typical hardware store silicone gives off acetic acid while curing which is bad for electronics)
Addendum 2015-03-01
With more handling, those epoxy filled tubes did end up feeling a little fragile at the thin ends, so I reinforced them with a few more wraps of adhesive lined 3:1 heat shrink tubing:
I also moved the solder joins so that they overlap the sensor, this lets the metal sleeve acts as stiffener for the whole unit.
In addition, I decided to make the chain in 2m segments, with sensors at fixed distances along each segment. This reduces the total number of joins in the cable, while still allowing for custom configurations. In the photo (below) you can see that I used a longer piece of pipe in the segment connectors than was necessary. My hope is that if I distribute some buoyancy throughout the chain there will be less strain on the segment nearest to the datalogger. Those segments will be bearing the weight of the whole sensor string because the logger will most likely be mounted on the ceiling of the cave passages. The real test will be when we actually install them, as there is always some unforeseen factor that comes into play under water.
Addendum 2015-03-02
I just came across a great write up by someone using DS18b20 sensors to track ocean temperatures over in New Zealand. (I knew I couldn’t be the only one…) Interestingly, he uses a star configuration for the sensor connections. While this is much faster to connect than the daisy-chain approach I have taken, it looks like he ran into some problems with his long cable runs and had to use a very strong 480Ω pullup resistor. There are plenty of photos, and a good explanation of how he used normalization to smooth out between-sensor variations. While this is helpful for tracking relative changes in temperature, it does not necessarily improve the accuracy of these sensors.
Addendum 2015-03-06
The second prototype with 30 DS18b20 sensor nodes distributed over 12 m of cable with 7 inter connections
I have been putting more segments together for a second prototype. For the newer nodes I used Loctite U-09FL urethane. This stuff is less brittle than the epoxy after curing, however it sets almost immediately when you apply the heat to the shrinkable tubing. The result is that the nodes didn’t “smooth out” like they did with the epoxy, and so they ended up looking like clear Jello raisins. You can’t be too aggressive with the heat gun or the outer sheath splits, making a bit of a mess.

The hardest part is pulling the sensor wires free of the stock cable as it tends to be filled with black epoxy. Expect to loose a few sensors by accidentally cutting wires in the process. Most sources I found recommended using unshielded cables to reduce capacitive coupling, and warned against grounding unused wires for the same reason. Some folks also suggest adding 100-120 Ω resistors to the data leg of each sensor to reduce the load on the data bus, but I have not tested that yet to see if this really works.
Once I had enough segments ready I did some tests to see how far the chain could be extended before the coms failed. Line capacitance appears to be the controlling factor on these kinds of networks and most try to keep it low for maximum distances, or better performance. But I am packing quite a few DS18’s close together, so the sensors themselves are more likely to limit my system. With 15 minute sample intervals being typical for an environmental monitoring application, I could even look into slowing down the bus, rather than speeding it up.
With a standard 4.7 kΩ pullup, I was able to get to 30 sensors responding well on 12m of 4x 26awg silicone jacket cable. Changing the pullup to 3k3, allowed me to add 15 more sensors on an extra 8m of cabling. And taking the bus to a fairly aggressive 2k2 let me add 19 more sensors and an additional 7m of cable. So my add-hock test reached a total of 63 daisy chained nodes on 27 m of cable before the readings became unstable. I did not see 85°C errors, but when the network approached the R-C rise time limit, the readings started looking like this: (in a room at 20°C)
Probe 0 Temp Raw: 268 Temp C: 16.238
Probe 1 Temp Raw: 288 Temp C: 18.0
Probe 2 Temp Raw: 16 Temp C: 1.0
Probe 3 Temp Raw: 322 Temp C: 20.125
Probe 4 Temp Raw: 332 Temp C: 20.238
Probe 5 Temp Raw: 113 Temp C: 7.62
Probe 6 Temp Raw: 323 Temp C: 20.187
Probe 7 Temp Raw: 280 Temp C: 17.244
Probe 8 Temp Raw: 324 Temp C: 20.250
Probe 9 Temp Raw: 17 Temp C: 1.62
Probe 10 Temp Raw: 256 Temp C: 16.0
Probe 11 Temp Raw: 320 Temp C: 20.0
Probe 12 Temp Raw: 66 Temp C: 4.125
Probe 13 Temp Raw: 24 Temp C: 1.244
Probe 14 Temp Raw: 32 Temp C: 2.0
Probe 15 Temp Raw: 268 Temp C: 16.238
Probe 16 Temp Raw: 320 Temp C: 20.0
…etc…
Adding a couple more nodes after that caused the reads to completely fail. The numbers then become zeros because I use memset(rawTemps,0,sizeof(rawTemps)); to clear the temperature reading array after the data has been transferred to the eeprom buffer. Doing this between readings makes it much easier to spot when sensors drop out.
Thirty sensors is a bit tight for my application, so I will remove the 4.7K resistors I have on the loggers now and make an in-line adapter that lets me change the pull-up on the fly if a particular installation starts giving me grief. But going much larger than 10m & 30 nodes might be putting too much data at risk if we have a point failure. Another limitation on the practical side is that my FTDI USB adapter can only source about 50 mA, so I can’t use the skip ROM command to trigger temperature conversions on more that about 33 sensors before I risk hurting the chip during tethered test runs.
Addendum 2015-04-05
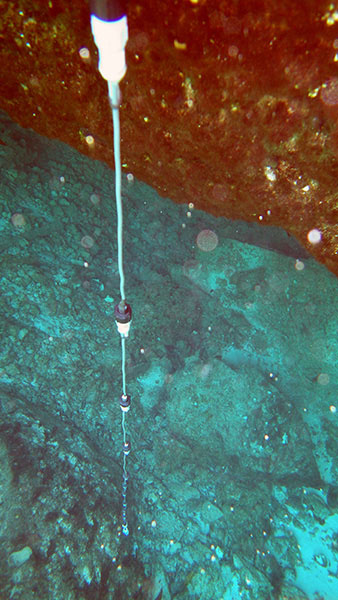 We recently had a chance to test the first prototype (with the separate individual nodes) out in open water. To make sure the connections were up to the challenges of “normal” fieldwork, I let students handle & install the unit, with no specific instructions other than letting the last sensor just rest on the bottom. (yes, I cringed a few times…) The lowest sensor was at 6.5m depth, and the unit gathered temperature data in a saline water outflow for about 7 hours with no leaks or problems. On the same trip we also deployed two “clear epoxy tube” chains in a different cave system spanning depths from 7 to 14m. I don’t have any photos as that deployment was significantly deeper, and beyond the reach of our little point & shoot. Both of those carried 12 x AA batteries, and the plan is to leave them running in-situ till mid year, at which point I should have a pretty good record of power consumption of these long sensor strings.
Addendum 2015-04-20
I mentioned using E00CL epoxy earlier, but have since gotten back some cave deployed RH sensors that all failed due to moisture permeability on the E05CL epoxy I used to build them. And those humidity sensors were not even under water! So for future builds, I will stick with E30CL. It’s gooey to work with, but I have several units that have been under water for more than a year using that epoxy.
Addendum 2015-07-08
The single sensor chain in the photo above ended up coming home after the field trip, and since it was just sitting there, I set it up on the bookshelf for a power drain test:

Because the DS18’s run on fumes when they are not doing a conversion, this logger slept at 0.11 mA. The units currently in the field have more sensors and longer cables, but seeing that less than half of a three cell battery’s capacity was used on this two month run gives me confidence that the 12 cell loggers we deployed had far more power than they needed. So the only real question is how long they remained water tight* with the crummy epoxy used on some of the nodes. If I am lucky, the marine heat shrink tubing I used for physical re-enforcement will have provided a water tight seal on those ends.
P.S. * Those deployed units survived their first underwater test and worked brilliantly. For more details click HERE
Addendum 2015-10-30
Just an update to that 20-node DS18B20 sensor chain’s power test:
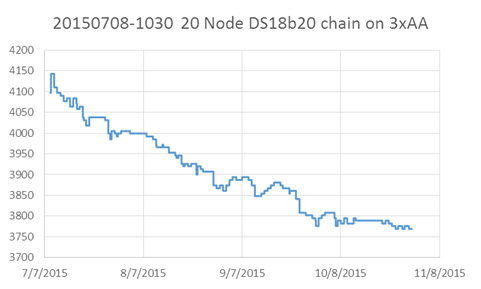
These units save 200 records (~2 days worth of data) to an onboard 32k Eeprom buffer before doing a flush to the SD cards.
So we have already done five months on 3xAA battteries, confirming that those DS18B20s are very nicely behaved sensors in terms of their overall power consumption. But that P.S. curve is bumpier than I am used to seeing from alkaline batteries read with a 2x 4.7M ohm divider, so I might go digging on what causes that to happen. It could just be that simultaneous temperature conversons ( 20 sensors x 1.5 mA x 750ms ) is enough of a load that the batteries feel that hit.
Addendum 2018-12-01
Just an update regarding a problem we ran into on some deeper deployments of 24m x 24 node DS18b20 chains. I’d been running those with 3k3 pullups and they passed all run tests at the surface – but those strings suffered a slow progressive read failure after about five months between 20-50m depth. This was a slow bus failure, and the tidal cycle showed up clearly as the sensors fell off, and then rejoined the set. My best guess is that the soft silicone jacket on the cable became progressively more compressed over time, and this raised the bus capacitance just enough to push the timing out of spec. Adding a second pull-up to the end of the bus brought all the sensors back on line, so my recommendation is to stick with ~2K pullups if you build longer chains like this. Harder PUR insulation cable jackets might also have prevented this very tricky problem.
Addendum
This was only the first in a series of posts on the DS18b20 builds we deployed on our project:
- Using multiple 1-Wire DS18B20’s for a DIY Temperature Sensor Chain
- Calibrating DS18B20 1-Wire Sensors with Ice & Steam point measurement
- Field Report 2015-08-12: Success with DS18B20 1-Wire Temperature Chains!
- Improving the Accuracy of 1-Wire DS18b20 Temperature Sensor Groups
- DS18B20 1-Wire calibration with Arduino: Finally nailed it!
- Field Report 2016-03-27: Progress on the 1-Wire DS18B20 Temperature Strings
We have now moved on to using NTC sensors for our DIY temperature chains.

this is awesome! several years ago I was working with strings of these sensors for compost monitoring. I ended up sticking them in PEX, which was water resistant, but probably wouldn’t work underwater:
http://www.cloacina.org/blog/2011/04/tuning-the-aeration-of-our-pile/
I didn’t use the stainless sensors, I used the TO-92 package. At the time I got a deal and it was cheaper to buy 200 of them than the 70 or so I needed. I still have ~100 DS18B20’s. I’d like them to go to a good home. If you need some, email me.
So far I have been sticking with the sensors mounted inside the steel sleeves as they make it much easier to do the calibration since the sensor is already waterproof to begin with. But thanks for the offer. Also, it was cool to see your catastrophe guide. Not a subject that most people give much thought to, but super important to know about.
Cheers!
I’ve got my string of 9 sensors in the water now, up to 14 meters deep. The logger logs every hour. I really hope it works, we’ll know in a month time when the buoy will be retrieved.
I don’t want to let the cat out the bag before I release the field reports, but stay tuned. I think you will really like what you see 🙂
Update 2015-08-28: Finally have that post on the temperature string deployment ready, with four months of beautiful data from those DS18’s. And the connectors worked too!
Geir Andersen has posted photos of another creative way to waterproof chains of DS18b20 sensors at Lets make Robots: http://letsmakerobots.com/node/38531 You have to go digging for it, but he has oodles of other great projects buried in the letsmakerobots site.
Great project ! This design has many possible applications in soil science and vadose zone hydrology. I have been following your website and code on github (great work, a gold mine of information). Do you have the code posted somewhere for your DS18B20 temperature string logger ? We want to make something similar for monitoring soil temperature profiles. We have some code that works but after looking through you other code I’m guessing your approach is much more efficient. Thanks.
I hate to let you down but I simply hard code in all the sensor addresses. I usually find a 3k3 pullup is good for about 24 nodes on 24m of cable, but YMMV. When I pass 24 nodes I start to run out of memory with this method, but then it’s probably not worth risking more data than that on one logger unit anyway. If you do not need to break your chains into swap-able segments like I do, then simply put all your sensors on one single chain. Every break in the main wires is a potential failure point, so I now “splice” my sensors onto unbroken wires when I build each segment.
//At the start of the program: (in the defs section before setup)
//============================
#define TS_DS18B20 INSTALLED //this loads the onewire library
#define diyThermistorString 1 // for loading up the probe addresses on multi-sensor strings
#ifdef TS_DS18B20 // variables for DS18B20 temperature sensor
#include [OneWire.h] // from http://www.pjrc.com/teensy/td_libs_OneWire.html
#define ONE_WIRE_BUS_PIN 8 //this is the pin I use for my one wire data line
OneWire oneWire(ONE_WIRE_BUS_PIN);
byte addr[8];
byte scratchpadData[2];
#endif
#ifdef diyThermistorString
const byte numOfSensors = 24; //update this to match the # of probes on your chain
int rawTemps[numOfSensors];
//Segment#X, 2m x xxcm 8 nodes:
//I assign a unique node number to each sensor during the calibration & testing before assembly
// the PJRC DS18b20 drivers are my favorite to grab the addresses, etc.
byte Probe00[]={0x28, 0x19, 0xC2, 0xD0, 0x04, 0x00, 0x00, 0xED}; //node #122
byte Probe01[]={0x28, 0xFE, 0xCB, 0xD0, 0x04, 0x00, 0x00, 0xB2}; //node #102
byte Probe02[]={0x28, 0x4C, 0xC1, 0xD0, 0x04, 0x00, 0x00, 0x66}; //node #192
//..etc… continue these defs for all of the DS18b20 sensors on your chain
#endif
In setup:
=========
Nothing in setup – these sensors don’t need to be initialized, and they automatically go back to sleep after you read them. You can change the bit depth on DS18’s with a register setting, but the default is 12-bit which is what I often want anyway
In the main loop:
=================
#ifdef diyThermistorString
oneWire.reset();
oneWire.write(0xCC); // SKIP ROM sends the next command to all devices on bus
oneWire.write(0x44); // start conversion, read temp and store in the scratchpad
delay(1);
LowPower.powerDown(SLEEP_1S, ADC_OFF, BOD_OFF); // mcu sleeps here during the 750ms conversion
//after the 1 sec Lowpower lib sleep, I read each temp sensor in turn into rawTemps array:
// … yes this could be done more efficiently in a loop, I just have not bothered yet
oneWire.reset();
oneWire.select(Probe00);oneWire.write(0xBE); // Read Scratchpad
for (int i = 0; i < 2; i++) {scratchpadData[i] = oneWire.read();}
byte MSB = scratchpadData[1]; byte LSB = scratchpadData[0];
rawTemps[0] = ((MSB << 8) | LSB); // using two's compliment
//TEMP_Raw= rawTemps[0]; //just filling this variable as a default
oneWire.reset();
oneWire.select(Probe01);oneWire.write(0xBE);
for (int i = 0; i < 2; i++) {scratchpadData[i] = oneWire.read();}
MSB = scratchpadData[1]; LSB = scratchpadData[0];
rawTemps[1] = ((MSB << 8) | LSB);
oneWire.reset();
oneWire.select(Probe02);oneWire.write(0xBE);
for (int i = 0; i < 2; i++) {scratchpadData[i] = oneWire.read();}
MSB = scratchpadData[1]; LSB = scratchpadData[0];
rawTemps[2] = ((MSB << 8) | LSB);
//…etc… till you have read each of you sensors
#endif
Note:
======
Each probe can draw up to 1.5 mA during the conversion process = Lots of power for multi node strings. So if you are powering the unit via UART serial, then don’t use the SKIP ROM command. This means that you have to break up the conversions and do them one at a time because there is not enough power provided by the FTDI chip for >30 simultaneous conversions! eg:
oneWire.reset(); oneWire.select(Probe00);oneWire.write(0x44);
LowPower.powerDown(SLEEP_500MS, ADC_OFF, BOD_OFF);
oneWire.reset(); oneWire.select(Probe01);oneWire.write(0x44);
LowPower.powerDown(SLEEP_500MS, ADC_OFF, BOD_OFF);
…etc…
Once I have all the raw readings in the rawTemps[] array, I buffer them to the eeprom on the RTC board, and when that eeprom is full I flush the data with a reverse loop out to the SD card. This keeps the SD card writes down to less than one per day. Don’t bother converting the raw integer reading to Fahrenheit/Celsius inside the Arduino. All that does is use up more memory, and does not give you any more information since it’s easy to convert the raw int to any decimal temps on the fly and Excel will do this for you with far fewer calculation errors.
You can check out how I do the buffering/writing in the old drip sensor code I posted on Github. I use Pstring to concatenate my integer data into 28 character strings (Pstring avoids any overflow problems – it simply truncates the excess) but again that is probably the least efficient method possible. Keep in mind I am not coder, so I just use the simplest method that is robust, even it is inefficient. Despite this I am still getting over a year on 3xAA batteries on most of my logger builds, including the ones with the DS18’s because they automatically go into very low current sleep modes. I am sure an engineer could get the same performance on a single CR2032, but in the scheme of things AA’s are a cheap trade for data.
We are currently working on a technical paper, and I am hoping to have a fully updated version of the core logger code posted for that, including all my recent experiments with faster bus speeds, de-powering the RTC, etc. That version will be much less crufty than the drip sensor code in that link, but you will have to wait till I get there.
Thanks for your generous and helpful reply – lots of good ideas to “chew” on. We will keep monitoring your progress and look forward to the paper and core code. Again, great work that will help a lot of people with logger projects.
I finally got around to cleaning up my DS18b20 sketch. Most of the variables are the same, but instead of defining each DS18b20 bus address with:
byte Probe00[]={0x28, 0xFF, 0x69, 0xF9, 0x61, 0x15, 0x01, 0x0B};
byte Probe01[]={0x28, … etc …
I now use an array:
// see http://forum.arduino.cc/index.php?topic=220385.0
const byte numOfSensors = 8; // # probes on your chain
typedef byte DS18Baddress[8];
DS18Baddress probeID[numOfSensors]=
{
{ 0x28, 0xFF, 0x7A, 0xD5, 0x61, 0x15, 0x01, 0x5B },/*probe #0 */
{ 0x28, 0xFF, 0xC0, 0x96, 0x73, 0x15, 0x02, 0x26 },/*probe #1 */
{ 0x28, 0xFF, 0x13, 0xB0, 0x61, 0x15, 0x02, 0x4A },/*probe #2 */
{ 0x28, 0xFF, 0x7D, 0xA2, 0x61, 0x15, 0x03, 0x98 },/*probe #3 */
…etc…
{ 0x28, 0xFF, 0x0E, 0xAF, 0x61, 0x15, 0x01, 0x9A } /*#numOfS-1*/
};
This ProbeID array lets me use a for-loop to read the sensors later in the Main body of the code:
// tell all the sensors to take a reading
oneWire.reset();oneWire.write(0xCC); // skip rom command
oneWire.write(0x44); // start the conversions
delay(1); LowPower.powerDown(SLEEP_1S, ADC_OFF, BOD_OFF); //mcu sleeps for a second while waiting
//read each sensor’s data
for (int j=0 ; j<numOfSensors; j++ )
{
oneWire.reset();
oneWire.select(probeID[j]);
oneWire.write(0xBE); // Read Scratchpad
for (int i = 0; i < 2; i++) {scratchpadData[i] = oneWire.read();}
byte MSB = scratchpadData[1]; byte LSB = scratchpadData[0];
rawTemps[j] = ((MSB << 8) | LSB); // two's compliment
}
So this saves me from having to modify the sensor reading code no matter how many sensors there are, and it frees up the ram that was wasted by code duplication. I hope that helps with your project.
Hi!
Would you happen to know what is the AWG of the original 3 core cable of the waterproof DS18b20? Is it 24 AWG?
The ‘waterproof’ probes vary quite a bit in the quality of the cables they are attached to, but generally they have wires somewhere between 26 to 28 AWG, and some even seem to be using 30AWG. That’s pretty thin so I would not want to try a long run with the stock wires. I did build my first few sensor chains with the stock cables but they were not very long because I figured that I could only go 3-4 meters at most before wire resistance became a factor. Lately, I have been using the 24 AWG 4-conductor M12C sensor wires from Omega for my longer runs. The PVC/Poly insulated cable is reasonably priced for the quality you are getting, and I have been going with silicone jacketed cable for our underwater work because I need the increased flexibility it offers. I’ve been on the lookout for other quality cables, so I’d be happy to hear about silicone cable suppliers that people find.
As far as I’ve understood the project, you are using the unregulated voltage from 3 standard Alkaline AA batteries to supply the sensors. So the sensor supply voltage goes down from 4.5V to e.g. 3.5V over the lifetime of the batteries. This is still within the specified supply voltage range (3.0-5.5V) of the DS18B20 sensor so it should still work properly. However, varying the supply voltage of *any* sensor/sensor amplifier/ADC circuit (such as the one integrated in the DS18B20) may introduce additional errors in the measurement. Even if the sensor still meets the specified accuracy from the datasheet, it may break the additional accuracy you are trying to achieve with the extra calibrations. The bad thing is that a problem like that can silently ruin the accuracy of the measurement without raising any red flags. I would consider using an LDO voltage regulator in order to make sure there won’t be any measurement inaccuracy due to the dropping battery voltage (even if this means using 4 instead of 3 batteries in series).
The whole system is powered through the voltage regulator on the Pro Mini board, (or an external vreg if you want to replace the MIC5205 with something more efficient) This provides a stable rail for the DS18b20s. The silent error problem you describe was one of the reasons we stopped using TinyDuinos in 2014.
However we occasionally see some interesting variability in main battery discharge curves on the DS18b20 strings, and I’m still trying to figure out why. Most of the other temperature sensors on the project suffered from pressure induced failures, and even with a metal casing around the DS18’s, I’m not 100% sure they aren’t also suffering from pressure effects. I’ll have some data back from deployments at 50-60 meters to look at by mid 2018.