Category Archives: Expedition Reports & Updates

Photos, videos & reports from the field.

Cave Pearls at the 2014 Geological Society of America Conference

We just returned from presenting the Cave Pearls at the GSA in Vancouver!

Having a lineup before you even finish setting up the poster in the morning is always a good sign...

Having a que form before you finish setting up the poster in the morning is always a good sign…

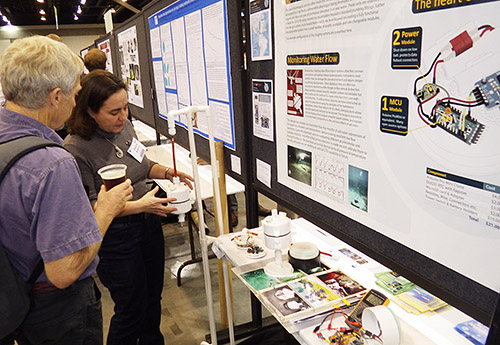
Since we left most of the operating data loggers we had in Mexico on our last trip, I had to scramble to build a few more before the conference. I also spent an inordinate amount of time making the poster look pretty, as this was our first “formal” pitch of the Cave Pearl system to the academic world. (and that is my day job right?)  While all of this was old hat for a career academic like my wife, I admit I was a bit nervous, and somewhat uncertain if there would be any interest at all.  A few researchers had already expressed to me the opinion that any time they had to spend building sensors or equipment represented an unacceptable opportunity cost. (ie: that time could be better spent on grant writing to buy commercial equipment)  and some of the more technically inclined people simply dismissed AVR based Arduinos as a second-best option, suitable only for hobbyists.

But overall, the presentation was very well received, and we had a constant stream of interested people that kept both of us busy talking all day long.

Trish describing the flow sensor deployments

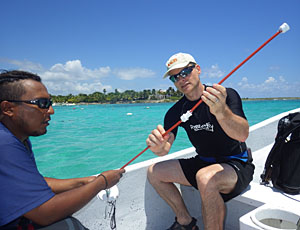
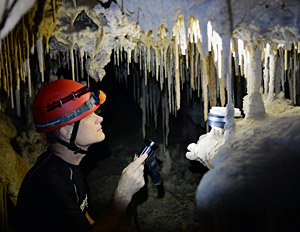
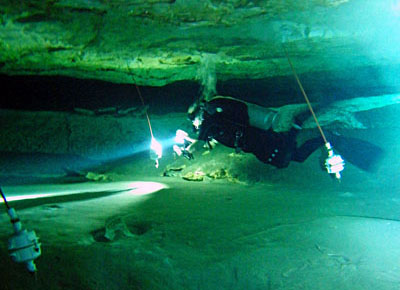
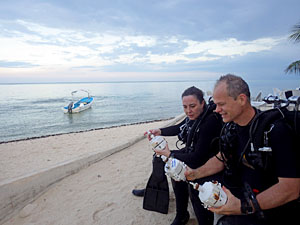
Trish describing the flow sensor deployment dives.

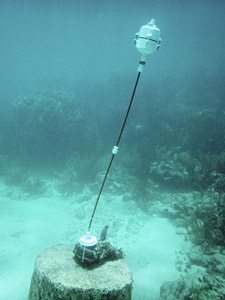
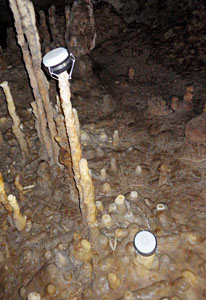
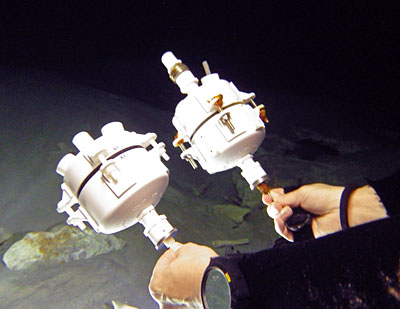
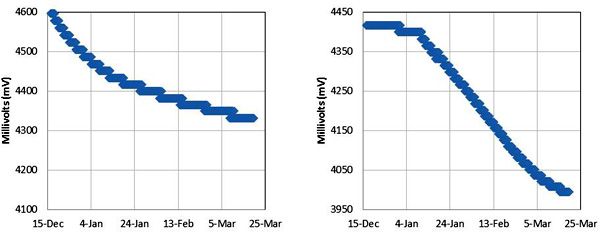
I created a display stand for the flow sensors, to explain the principle of the hydro-metric pendulum, and we had a “live” drip sensor operating under a suspended funnel of water. It’s blinking led drew some people in and I had several open units to put into their hands so that they could see how simple the physical build was.  I suspect that a few research groups will now be adopting my data logger platform, and I gave away a couple of drip sensor units to help some of them get started.  It made my maker-heart happy to find out that several other groups were already investigating various Arduino mcu boards, and they were impressed to see my loggers sleeping below 0.25 mA with the sensors running to provide interrupts. (there was no Pololu power switch on that one)   Many of them are at about the same stage that I was at a year ago,  so hopefully the code I have developed will help to advance their projects more rapidly.

So now we have several new groups to collaborate with, which will be handy when it comes time to co-deploy my DIY sensors with some commercial equipment for calibration. Of course, now I need to get a technical paper out the door…so those guys have something other than this humble blog to cite.   🙂

<— Click here to continue reading the story—>

Field Report 2014-09-02: Our first open water deployment

With the fieldwork coming to a close, we still had three working betas from the March deployment in handThese had already delivered a beautiful time series, and it seemed a shame to bring functional sensors back home when they could be out gathering more data.  So over the last few days Trish and I hatched a plan to conduct another experiment: Why not deploy them out on the open ocean, just to see what what happens? After all we were staying in the CEA dorms, and they have always been keen to support the research…

But this was going to be a real shot in the dark, as the Pearls were designed for the cave flows in the 0-20cm/s range, and the ocean is considerably more rough & tumble than that. After a bit of digging through her reference database, Trish found a write up of an experiment that had been done with acoustic doppler velocity meters at Puerto Morelos; just up the coast. A quick review of that paper gave me some sense of just how tricky it would be to get meaningful data out of my twitchy little accelerometers. While I chewed on that nut, Trish spoke with CEA’s director, who was quite keen on the idea of putting our new instruments in Akumal Bay.

Showing Marco from CEA how the support system works.

Showing Marco how the support system is assembled.    (Photo courtesy Monika Wnuk)

But it only took one look at the surf breaking over the reef to know that wave motion was going to dominate the kinetics. Fine if you are studying wave energy, but not so great if you want to gauge the direction of flow.  How was I going to tease the overall signal out of my little devices while they were being tossed around like that?  In the end I decided to really stretch the time between
accelerometer readings, hoping that my “average reading” would span the shorter frequency wave cycles.  Each sample would consist of thirteen separate accelerometer readings, separated by the maximum watch dog timer delay of 8 seconds, and then I would throw away the extreme high and low values before calculating an arithmetic mean. I was in the process of running tests with these modifications when Trish returned to our dorm room with Gabriel Rivera (from CEA’s water quality program), who told me that the centers director had arranged for a boat and that they already had an installation site in mind which they wanted me to look at. Trish already had a full schedule of work at Rio Secreto, including a public presentation of her cave research (in Spanish), so once again I drafted Monika as our team photographer and we set out for the launch.

Installing the sensor

Installing the sensor on the old buoy anchor (Photo courtesy Monika Wnuk)

The boat headed straight for one of the main reef buoys, and I was a bit concerned that they intended to anchor my delicate little sensors to that heavily chained beast. But once in the water, Marco guided me to an much older cement barrel anchor that was still in place, though it had rusted beyond use as serious anchorage. This was fantastic! We zip-tied the pivot and support rods into place, and returned to the boat for the sensor itself.  A few minutes later we had the sensor in place, but the poor thing was bouncing back and forth like a ping-pong ball. I had to do something to damp down those wild displacements, so I removed about 80 grams of the eternal ballast mass, giving the flow sensor a much stronger vertical restoration force.

Hopefully secure enough from boats, waves and tourists.

Secure enough from boats, waves and, hopefully, tourists.

The unit was in the center of the water column (at about 3m) and despite the roil of the surf above it now seemed to be consistently leaning in the direction of the particles we could see floating by. Our first open water unit had been deployed!

Our boat rental about to expire, and I now knew that I had to alter the ballast on the two remaining units, so we returned to shore for showers and a late lunch. Gabriel and I re-calibrated the last two units in a tide pool, and I gave him the last of our anchors and support rods so they could install the last two sensors after CEA staff had a chance think about other suitable locations.

After that I drove up to Rio Secreto,  making just in time to catch the end of Trish’s presentation. Her talk ended with a gratifying burst enthusiasm from the R.S. staff as we handed the 2 bar pressure sensor over to the science liaison who had been our guide a few days before. She promised to put it into the cave near the drip sensors as soon as she had an opportunity.

So I would be returning home with only one of the 13 units I had brought down, and in total this trip would see 16 different sensors running in the wild.  Brilliant!  Now it’s time for me to start digging into all that data…

<— Click here to continue reading the story—>

Field Report 2014-09-01: Our first “deep” saline installation

I was keen to see if the Pearls were sensitive enough to track the slower deep water circulations and Trish has an ongoing collaboration with some UNAM researchers studying cave organisms in a system called Ox Bel Ha.  With the new build, I was confident that we could push the envelope a bit, so we planned a dive to a deploy the remaining two Cave Pearls in the deeper saline zone of that system. (around 20m)

Did I mention how much I dislike tábanos?

…thirteen…slap!…point…rrrrgh!…seven…

Once again our friend Jeff loaned me some of his dive equipment, and even better, both he and his partner Gosia, were able take a break from their busy instructor schedules to join us for the installation.  Jeff had often offered his services to researchers in the past, and I think my nerdy enthusiasm amused both of them.  As with previous installations, I calibrated the buoyancy of the sensors at the surface with a small hand-held postal scale. Deeper systems tend to have slower flows, so I adjusted the Pearls to only 10 grams negative buoyancy. This was pretty close to the wire for a system at full marine salinity, but with flows down in the 0-5 cm/s range I was hoping for the best sensitivity I could get. With our kit sorted we put in at a rather boggy zero-vis cenote whose large population of mosquitoes & tábanos which the pre-dive checks at the surface a trial, despite the fact that they had already feasted on me while I did the buoyancy calibrations.

I was sad that we had to leave my little waterproof point&shoot at the surface, because it was a beautifully decorated system, with intersecting passages at multiple levels. Three of us followed Trish’s lead out to a nice wide section where we waited patiently on the line while she inspected the cave with her hydro-geologist’s eye. She found a spot, with a roof profile suitable for our bungee anchors, and instructed me to connect three 50cm segments to pivot, putting the meter in the center of the passage, at 22m depth. With the supports connected I returned for the first flow meter, only to make the unwelcome discovery that both of the sensors were now positively buoyant. Arrrgh! I had cut it too close by calibrating to only -10 grams in the fresh water of the cenote! We transferred a couple of five gram ballast washers over from the second unit, but we still had a slow persistent rise to the ceiling. Trish provided a temporary solution by adding a metal dog clip to the support rods, and since we only had the one spare clip, we called the dive with our second flow meter still in the bag.

Despite the buoyancy problem, everyone was happy with the overall simplicity of the installation procedure, and Jeff graciously offered to re-calibrate and install the orphan meter the next time he was in the system (and he wanted his clip back 😉 )With our shortened trip schedule, we took him up on the offer, and after a celebratory cerveza in Tulum, we gratefully left him with all the pieces he would need for the second installation.

<— Click here to continue reading the story—>

Field Report 2014-08-26: Old Flow Sensor Inspection

The drip sensor deployments left me with an couple of hours free time that evening, which gave me a chance to take a closer look at the flow sensors we pulled the day before.

From the same batch?

Different corrosion  although nuts & bolts were identical

The most obvious impact of the near marine exposure was the rust that had accumulated on the stainless steel bolts and ballast washers. (no spec on the bolts, but the lock nuts were 18-8) While they fasteners were all purchased at the same time, they showed dramatic variation in the amount of oxidization they sustained. I can only presume these are the result of the manufacturing process leaving scratches which acted as nucleation sites. Even the fasteners that suffered significant oxidization remained secure and they were relatively easy to remove once the surface rust had been brushed away.

Still clear, and nothing growing on the surface.

E-30CL still  clear, with nothing growing..

Some pitting on the JB weld surface.

Some pitting on the JB weld surface. I had some concern that the iron particles in the J-B weld might induce galvanic corrosion on the other metal parts.

Both epoxies proved to be far more robust than the manufacturers testing indicated, with the Loctite showing some surface fogging on two units, while remaining perfectly clear on the other one. The grey JB marine weld changed from a smooth surface to one with significant grit (~400 grit sandpaper?). I suspect the pitting is a result of the iron particles in their formulation rusting out of the the matrix, and I will try to get these puppies under a microscope later.  The rubber 0-rings were still in pretty good shape although they had a significant layer of bacterial slime on the exposed surfaces which I cleared off with a touch of isopropl alcohol. I suspect that any material with suflur in it is a banquet for critters the low energy cave environment, but the O-rings certainly look like they will survive for at least a year. (something for me to keep in mind with the bungee anchors though, as the older one’s are at 9 months submersion now)

Three of the four units pulled their 6 x AA power supplies into the 3.3 volt range (as read by the Atmel internal 1.1 vref trick) ; more power drain than my earlier tests had indicated for a 5 month run. But those bench-top tests were done too fast to include self discharge, without isolation diodes, and the real world batteries had been exposed to a relatively high humidity for the duration. (I have added 10 gram desiccant packs to the current crop.)

Perhaps the most interesting power consumption result was from the one unit that included a voltage regulator in the power supply module. I was unable to measure the cell voltage directly till a few days after the units were disconnected, but after the rebound period the AA’s supplying the NCP1402-3.3V Step-Up regulator were at 1.35v, while identical cells that had powered the unregulated Tinyduinos were at 1.4 v.  That’s a pretty small difference given that the nominal efficiency of the regulator is around 75%.

I will have to analyze the rest of the data later because the little net-book I have with me doesn’t have the gumption to chew on data sets of nearly 34000 records. So now we have the three older model Cave Pearls (and a pressure sensor!) cleaned up and in working condition… I think it’s time to put some thought into our next experiment!

Field Report 2014-08-26: The First Drip Sensor Deployments

Selecting test locations. (Photo courtesy of Monica Wnuk)

We were spoiled for choice of locations in a beautifully decorated system like this.  (Photo courtesy: Monika Wnuk)

Yesterdays success with the flow meters meant we could now turn our attention to deploying the new drip sensors. Trish had ongoing work in the Rio Secreto Nature Reserve section of Pol Tunich cave, included an interesting student project monitoring calcite raft deposition. A maintenance visit to those experiments was already on the schedule, so it was an obvious choice to use that site for our first drip sensor deployment as well. Even better, Rio Secreto had several capable science liaison staff, some of whom were conducting experiments of their own nearby.

Units are tethered so flood conditions don't wash them away.

When you do something for the first time in the field, you tend to improvise allot, especially when you are trying to apply the Goldilocks principle to something as random as cave drips. But Trish seemed to know exactly what she was after, and with the help of our guide from Rio Secreto, we quickly started locating ‘gotas’ that were ‘just right’.  We knew from Kayleen’s video that the water level in the cave could be highly variable so we tethered the units located close to the water level to assure that flood conditions would not wash them away.


ComparisonTest

They are intentionally placed at an angle, so that water does not pool on the sensor surface and cause spurious readings.

We also wanted to set the sensors in areas with multiple drips in relatively close proximity.  Trish has always been fascinated by the question of why some drips readily form deposits while others quite nearby,  possibly with similar chemistry, are much less capable of creating decorations. With this in mind our guide led us to a wonderful “stalagmite garden”  which had many excellent drip sites for comparison.  We found that the soft, slightly concave rubber bottom on the drip sensor housing made it very easy to perch the sensors without harm to the stalagmites. Several units were set up in short order, and as we exited the cave we could see their little green indicator lights blinking away in the darkness behind us.  Even with the help of lithium AA batteries, there is a fair bit of uncertainty about how long these units will actually run, so I was quite happy to hear our guide Fernanda say that she would stop in to check on them when she had the chance. The sensors are designed to light a red led when the battery voltage falls too low, but I told her to remove and disconnect them before that if they showed any other unusual behavior. These units were assembled with an assortment of cheap clone boards, most of which use the MIC5205 voltage regulator, and I will be especially keen to see the performance of the one build with the Rocketsream Ultra, as it’s MCP1700 delivered some very low sleep currents during my bench top testing.  My hope is that we get at least four months of good data from all of them before the batteries expire.

<— Click here to continue reading the story—>

 Addendum 2014-12-12:

This first deployment was a great success, which you can read about here.

Field Report 2014-08-25: Retrieve & Deploy New Flow Sensors

We started the day with breakfast at Turtle Bay Cafe, and once I had enough caffeine in my bloodstream to engage more than two brain cells at the same time, I reviewed the data on the SD cards from the overnight test runs. They all looked good.  Over breakfast we met up with Monika Wnuk, a multimedia journalist and documentary photographer from Northwestern University, who wanted to interview Trish for a water & development story she was working on. Yesterday, when she heard about our abbreviated schedule, she volunteered to help with the sensor preparation, and to provide shore support for our deployment dive. I was glad for the assistance, as two scheduled days were now being merged into one single operation.

Pre-dive planning with Bill, Trish, Monica & Jeff.

Pre-dive planning with Monica, Bil, Trish & Jeff.

Our diving field work almost always begins with a visit to Speleotech in Tulum, to see our long time friend Bil Phillips. Bil taught me to cave dive many years ago, and I still have much to learn from that remarkable man, who is without doubt one of the most dedicated cave explorers in the world. We also had the good fortune of meeting another good friend, Jeff Clark, who loaned me some equipment I needed for the days dive. The dive community in Tulum has always been generous to visiting researchers because they understand, more than most people, what is at risk with the rapid development that is happening in the region.  We all share a passion for protecting the caves as both a vital water resource, and as areas of natural beauty & wonder.

Checking for rotation, damage, etc.

Inspecting the old units for rotation, damage, etc.

With the kit sorted, we headed out to our main deployment site where I began to adjust the buoyancy of the new sensor units. With the new internal copper ring of ballast mass (45g), and heavier
aluminum battery holders, it only took 2-3 external washers to bring each unit to my target of 15 grams negative. This is slightly heavier than the last deployment but I am expecting any reduction in the tilt angle to be more than compensated by the 14bit 1g resolution of the new BMA180 accelerometers.  With
calibration out of the way,  Trish and I set off on the dive. High tide at the coast meant the system was experiencing very low flow, so we had a relaxed swim, with three new pendulums and a pressure sensor stowed neatly in the mesh bag by my side.

Old vs. New

New  vs. Old

Once at the site, the first task was to do a general inspection of the old units, noting anything unusual in my dive notebook.  After almost five months of submersion, there was plenty of rust on the stainless steel bolts and one of the units needed it’s anchor plate replaced.  Using the checklist I had prepared earlier, we swapped each unit in succession with it’s replacement.  In the calm conditions, percolation obscured our view a bit as our bubbles meandered around the ceiling of the cave, but it was still a very simple operation to exchange flow sensors.

Once the new units in place, we did a final inspection swim:

…checking that the new units were secure, with the X axis of the accelerometers oriented toward north.  While this is not strictly necessary with magnetometers inside the units,  I can use it as a rough confirmation of the compass bearings when I get the chance to do some proper data analysis later. I gathered the old sensors into the mesh bag and we made our way out of the cave.  I am not sure I can fully express the excitement that an inventor feels returning from a dive like this, but it’s very, very cool.

I think there is an ocean and a sunset in this picture. But at the time, we did not even notice it.

There is an ocean and a beautiful sunset in this picture. But at the time, I don’t think we even noticed it. (photo courtesy Monika Wnuk)

Back at the surface we had a chance to do a better visual inspection of the old units, which all appeared to be intact. I had some concern about the hull penetrations, as none of the epoxies were rated for long duration marine exposure. But the indicator LEDs were still piping on schedule, telling us that they were all still running.  Back at the dorms, we were equally thrilled to find complete data sets recorded on the SD cards.  (I will post more on the actual data after we have a chance to work on it.)

 <— Click here to continue reading the story—>

Field Report 2014-08-24: Assemble & Test all data logger units

Re-assembling the units

Putting the Pearls back together again.

Life intervened while we were still mid flight to Mexico, making it clear that this trip was going to be much shorter than expected. We would have only 5 days on the ground instead of the planned 12.
I started re-assembling the new drip sensors in the car as soon as we left the Cancun airport. With a 15 minute sampling schedule they would need a full 16 hours before data buffered in the eeprom would be written to the SD cards.  Later that day I put the flow sensors back together and loaded the final deployment scripts. With the flow sensors using a short five minute sample interval,  they only need 8 hours to complete a full cycle. While all the units had been tested at home, I always want to see at least one more successful run before a unit is installed into a cave.

One dead soldier before it even goes in the water

We had one dead soldier before it even went into  the water

The software for the unit with three accelerometers still needed some final tweaking, so I set to work on that (I had the epoxies clamped on that one till the last possible minute before packing) but it turned out that the ADXL345 would only read on the x & y axis.  As it was too late to fix the problem,  I just commented that sensor out of the code.  The resulting script will only give me data from the BMA180 and the BMA250 but that is still enough to bridge the data sets from our main installation site. Fortunately the three temperature pearl was running well, and I will be quite keen to see how those sensors differ in their behavior once the unit is in the actual cave environment.

Addendum 201409-10: Looks like I might have made a mistake with the ADXL345. Turns out that many of them are so badly calibrated from the factory that the Z axis is almost useless unless you change what’s in the offset registers. I live and learn.

Project Update: Gearing up for field work 2014-07-20

GluingSensorsThe last two weeks have been a complete blur of sanding, gluing & soldering, with simultaneous assembly of five next generation of flow meters, and six new dry cave drip sensors.  With the leftover beta unit I used for the long bookshelf power drain test, and the new 5 Bar pressure sensing unit, we will have 13 deploy-able Cave Pearls with us this trip.

Packed & Ready to go..

Packed & Ready to go..

Laying all this out, I realized that while our clothing for would easily fit into a single carry on, I could not remember the last time my wife and I traveled without two 49.99 pound suitcases of equipment. I make detailed component identification sheets for the TSA inspectors, who always return the favor by putting their own little pieces of paper in our luggage.  So far it has worked out OK.

Flow meter updates:

Since the last deployment, I have located better sensors for the flow meters and tweaked quite a number of things in the physical build. The new accelerometer is the BMA180, the only 14bit 1g accelerometer I could find on the market.  The venerable DS18B20 temperature sensor has been replaced by the Sparkfun TMP102, in my quest for completely interchangeable I2C sensors. Several new epoxies will also be tested in this build, including a very expensive Arctic Alumina thermally conductive epoxy to see if it will improve the temperature sensor response.

RosettaStone1

Does a logger with three temperature sensors know how warm it is?

I have built two special “Rosetta Stone” units for this deployment. One has the Ms5803-05, TMP102 & Ds18B20 temperature sensors, while the other has three accelerometers in it.  Data from these units will give me a head-to-head comparison of the sensor performance, and allow me to unite the data sets that we are generating with each successive build. The multi-accelerometer unit will sport the BMA180, BMA250 and the ADXL345. I think the 180 will come out on top, but there is always the chance that the increased sensitivity of that acclerometer will contribute more noise than accuracy to the overall performance.

The anchoring system now uses modular 50 cm long connecting rods, so we can hang the pendulums at different heights in the cave passage simply by adding or removing sections. (and they are much easier to transport in the luggage) Replacing the stainless steel rim bolts with nylon removed about 80 grams of ballast mass, so I have embedded a ring of copper inside the upper clam-shell. Hopefully this will improve the accuracy of  the data from the compass sensor.

Drip Sensor Progress:

Similar to one of the early flow meters, this would probably withstand submersion for quite a while.

Similar to one of the early flow meter designs, this would probably withstand complete submersion for quite some time…

Developed from a minimalist three component design, these are the first data loggers I have constructed where the mcu board possesses an always-on voltage regulator. Using only 3 AA batteries to power systems already sandbagged by the relatively high quiescent current of the MIC5205, really forced me to look for other ways to conserve power. Thanks to at tip from one 0f the advanced users at the Arduino Playground I discovered that the heartbeat LED pips are still quite visible when I use a whopping 10k limit resistor. This brings the 20mA LED currents well below 1mA, and if I sleep the processor while the LED is on, we save another 5mA for the pip duration. This little tweak will become part of my standard build from now on. Wherever possible I have replaced delay statements with brief MCU sleeps, and I am only reading Vcc once before the SD card writing process, since that is the only time the information becomes important. I originally conceived these units around the Sparkfun Pro Mini,  but early bench tests are indicating that the Rocket Scream Ultra could be the board of choice for future Cave Pearl data loggers.

<— Click here to continue reading the story—>

Field Report 2014-03-22: The next generation of flow sensors is deployed.

The Field Testing Station.

The field testing station. The polished O-ring seats are covered with blue painters tape for protection.

After the successful retrieval, I set to work on scripts for the next generation of sensors. It’s amazing how the kind of focus that coding requires can really mess with your perception of time, leaving you feeling that everything is being done at the last possible minute, though you have been working on it for several days... But after some datasheet slogging (thanks once again to the folks at Turtle Bay Cafe for their patience), the units started to produce reasonable
numbers, and on the morning of the 20th we were “all systems go”. I had three pendulum units (plus one backup) and one high resolution pressure sensor ready to deploy.   The pressure sensor would be stationary to record the water level, and I did not want it swing around on a pendulum until I get a chance to do a bit more homework on the calculations required to compensate for that motion.

As usual, we had one unit misbehave on the bench so badly it needed a complete "brain transplant".

We had one unit misbehaving so badly it needed a complete “brain transplant”, but the modular design of the system meant this was pretty easy to do.

The low power consumption of our bench tests gave me the confidence to set a couple of the loggers to 5 minute sampling intervals, while leaving the third on a more conservative 15 minute schedule. (in case the faster loggers run out of juice before we can collect them). Then we sealed everything up and set out to collect the tanks, etc. from our friend Bil Phillips at Speleotec dive shop in Tulum. On the way there I monitored the heartbeat LED’s.  But unit 3 did not pip, so while Trish sorted the dive gear I cracked it open to find that indeed, it was not logging (I suspect because of a loose RTC alarm/interrupt line).  As luck would have it, a couple of researchers working with a group from Denmark/Austria  (who have done some impressive work ) arrived to prepare for their days dive. They were testing some newly developed 3D scanning equipment, including a flow meter using an optical method based on laser tracking of particles. A good nurtured discussion ensued about the pros & cons of different measurement methods: “How will you calibrate?” “That’s going to be really non linear..” “Yep, but I have no problems with bio-fouling, and no issues with salinity/refractive index…” I will skip the rest of the nerdy details, but let’s just say there’s nothing like a bit of friendly competition to motivate…

I used the deflection of an 8 inch cable tie as a rough field balance. Units were tuned to approximately 10-20 grams negative.

I used the deflection of an eight inch cable tie as a rough field balance. The units were tuned to  approximately 10-20 grams negative.

Once out at the site, I tried to standardize the buoyancy of each unit. The beta’s had significant variation in their response to water flow, and my goal on this build was to achieve a more reasonable amount of inter-unit consistency. Even with stainless steel bolts on the housings, I still had to add about 150 grams of ballast to each logger. (weighted towards the top of the units to offset any torque from the internal mass of the AA batteries)  I am not happy about all that hard iron near my compass sensor, but the data will tell me if it causes a serious problem, as compared to all the other factors, like the batteries, etc. My humble budget will not extend to a degaussed power supply!

They are deployed quite close together, to allow me to assess inter-unit response for this build.

They are deployed quite close together, to allow me to assess inter-unit response for this build.

Low channel flow meant that the deployment dive was pretty easy, and we re-occupied the previous logger location for a continuous data set. The new bungee cord anchors are much easier to attach to the ceiling of the cave than the knots of nylon string used earlier, but of course we don’t yet know how long the rubber will last. Despite my surface testing, I still needed to transfer a few ballast washers to achieve a similar angle of inclination on the pendulums.  During this operation I was promising myself that the next units will be much more compact, and have no metal parts on the outside.  After a final inspection swim, with the capture of a little video, we were done.  Although the whole installation went smoothly, the earlier delays from Unit 3, and my buoyancy calibrations, made for a very long day, so it was well after dark when we finally left the water. After so many months of work, I could finally relax a moment and take it all in – my little cave pearls are starting to feel like a “real” scientific monitoring platform:

(Yeah, shakey cam: but our WG-3 croaked last year and the Heros are not great in low light, so this was captured on a little Powershot D10, that’s nearly 10 years old)

It will be a while before we see data from the new units, but I am confident we will see good numbers from them. (…still have my fingers crossed though!) I think I need to go have a moment on the beach, before my brain starts chewing on all fixes for the next build. I have homework to do before I get a good electrical conductivity sensor in the mix that can cover the entire fresh to marine range (standard electrodes are not designed for this) but I wonder what else I could add to the little loggers?

<— Click here to continue reading—>

Field Report 2014-03-19: The Cave Pearls have landed!

About to surface with the beta loggers.

About to surface with the beta loggers.

All the usual grumbles of getting our kit out of storage and ready to roll delayed the Beta unit retrieval till late afternoon, and I was really chomping on the bit by that point. It was a good haul against the current out to the deployment site, but once there I was very happy to see our little loggers swaying gracefully. After a good visual inspection, to examine the anchors and brush away the sizable clumps of rusty brown goo that had grown on the exposed metal, we popped them into a mesh bag and headed back to the surface.  With my ears above water, I dared a few little shakes to check…had they leaked….?

Breaking the seal.

Breaking the seal.

We cradled the loggers all the way back to Tulum while we waited for them to dry out.  After a quick rinse, we stowed the dive gear and then set to work on the pearls. Both of them opened with a satisfying “ssshhhick” indicating that the seals were indeed good. (they were compressed a bit at depth) I have to admit I have been working on the new builds so intensively, I laughed to see the tape that was holding these guys together, and the leggo I had solvent welded into the battery compartments. I checked the hour: it was 7:45pm…perfect time to cut the power, as the units had been left on a 1/2 hour sampling schedule. Once the power was disconnected, I could breathe a sigh of relief, as we  were then safe from any further calamities that might hurt the precious SD cards. But we did not have a reader with us, and as usual, Trish had filled the evenings schedule with meetings with some of the other researchers in town. In the end it was 11:00 pm before we could look at the SD cards and know if our little experiment was truly a success….

And it was! In fact both units were collecting readings right up to the point where I disconnected the battery. Woot! Trish went to work, and I just sat back, impressed by the super sonic “squiggle wrangling”.

“Temps…no trending..but nothing useful there… offsets…”, she was talking to the screen more than to me. No surprise on the temperature data as the readings were from the RTC, completely trapped inside thermal mass of the housing.

“Can you bring up the two voltage curves?” I asked, “I want to know how we did on power consumption.”

“Right.”…clickety, clickety, click… “How’s this?”

Left: Unit 1    Right: Unit 2 (rubber bottom)

Left: Unit 1 Right: Unit 2 (w rubber bottom)

Quite a difference, but both units had run in the > 4 volt range for three months.  So we had been far too conservative with the 30 minute sampling routine, although I had no way to know that when they went in last year. Pretty much identical components in the build, so for now I am attributing the different power curves to the mix of batteries that were used.

“Z offsets….X and Y as well….” clickity, click… “…easy to fix… and we can do a quick running average for that noise…”

“No, don’t fix it!” I injected, “I want to see the raw data,  side by side.”

Trish’s hands paused, and she dropped out of the excel trance long enough to give me a puzzled look: “Why would you want that?”

I explained that while she was rapidly turning the numbers into something relevant to the actual water flow, I (as the builder) wanted to know how the two units compared to each other, as basic machines…

“Hmmm, Ok”….

Left: Unit1  Right:Unit2  Raw z Axis, sub-sample

Left: Unit1 Right:Unit2 Raw z Axis, sub-sample

The different amplitudes were not a surprise, as our buoyancy control was just best guess approximation. But in theory, the accelerometers were identical, so the offsets were kind of interesting.  Ah well, it will be a while yet before I am at the point of calibrating these things…

I am still amazed that all this makes it through the airport scanners...

I am amazed that we don’t get more grief from airport security when we travel with this kit.

Trish was still talking to the screen  “mmmm…some finer structures here…”, and clicking away, but it was nearing 1:30 am at this point, and I was starting to fade. I uploaded all the data to a Google doc, and suggested that we call it a day.
I knew what I still had ahead of me ->

I hope that Turtle Bay Cafe doesn’t mind if I take up residency for a few days, while I work on the next generation:

“Mass caffecito porfa…”

<—Click here to continue reading—>