
Addendum 2017-02-20:
This post is the second in a series of online tutorials that I’ve been developing to help teachers bootstrap their own Arduino based curriculum. The full set are listed at How to Build an Arduino Data Logger which walks you through the most recent versions in a more or less logical progression. But if that material leaves you in the dust because you are teaching yourself as you go along ( like most people in the makers movement! ) then check out the beginner’s guides & video tutorials in the Ideas for an Arduino STEM Curriculm post.
Also Note: Once you’ve mastered the basic UNO logger described in this tutorial, you can transition to smaller Pro Mini Based versions that run the same code, but provide much longer battery-powered operation. [see: This open access paper describing how we use those for scientific research.]
Original Post from 2015-12-22:
Since posting the step-by-step build guide in November, I’ve had enquiries from people saying that the equipment & time required for that build still presented a significant barrier in the classroom. A few asked if I could come up with a plan based on the Uno/Breadboard combination that has become a standard starting point for many people. So here is a simplified data logger for those high-school teachers who want to add environmental monitoring projects to the curriculum:

An Uno-based basic data logger, with no soldering required. As the instructor, you can assemble this logger very quickly with pre-made jumpers but we found the connections were too easily knocked loose by clumsy students, so it’s worth taking the time with them to put stiff solid core wires in place. Note: I used an older UNO R1 I had lying around for the photos on this page, and the current R3 has A4&A5 broken out again on the right side above AREF, so follow the pin labels rather than the physical positions to accommodate your particular board revision (R1 / R1 / R3) pinouts

SPI micro SD card adapters like this can be had for less than $1 on eBay, and these can be connected directly to the pins of 5 volt Arduino’s like the UNO or the smaller form factor NANO. (note: the SPI pin labels are on the back). Note: These SD card adapters do not always get along with other SPI devices on the same bus.
Similar approaches to assembling a DIY logger can found at other places on the web (including many pre-built data logger combinations), but I thought I would add a quick breadboard logger to my other tutorials for those who Googled their way to this blog looking for something fun to try with an UNO – even if they did not have much experience with electronics. If you go with no-name clones, the approach I’ve outlined here might also qualify as the cheapest option available (…if you are funding the everything out of your own pocket, like some of the science teachers I know…). The key difference between using an (unmodified) UNO, and the smaller pro-mini style loggers described in my earlier tutorials, is that UNO’s operate at 5v, while smaller form factor boards are generally regulated to 3.3v. This limits the sensors you can connect directly to those capable of operating with 5v logic levels, but most importantly it affects the SD cards, as they can only handle 3.3v. So you would need to use a raw adapter board with a level shifter to accommodate the different voltages. Fortunately, SD modules that already have the regulator & level shifter on the breakout board are very inexpensive, so this issue does not add complexity to the basic connection plan. These cheap regulators are notorious power wasters, but most people operate UNO based projects on a USB tether for live sensor data in the serial plotter, or power them via a wall ac power adapter.
Parts you will need:
Arduino Uno ($24.95)
A few students used less expensive clones for their personal projects (~$4.00) and they worked OK, though the soldering looked a bit dodgy, and a couple of the eBay ones used non standard UART chips so we had to go hunting for drivers. I often use the cheap stuff when I am noodling around on the workbench trying to get something working, and then deploy better quality hardware in the field. If you are just starting out, I suggest that you save yourself the driver headaches and use the standard kit. If you do go with the clones, donate something to the Arduino group as a thank you for making such awesome software
DS3231 & AT24C32 RTC module ($1.00)
Mini 400 Contact Solderless Breadboard ($1.50)
CR2032 coin cell battery for the RTC ($0.50)
SanDisk microSD card: 256MB to 1GB ($2.00-4.00)
Stick with cards smaller than 2Gb and format them with SDformater utility (not windows!) to fat16 and test with H2testw. I generally buy 1Gb MUVE music cards from eBay because they are usually genuine; drawing lower sleep currents. WRT Filenames: use 8.3 format and don’t use spaces or special characters.
SPI microSD breakout ($1.00)
Common Cathode RGB LED (<$1.00)
+Various tools including needle-nose pliers, wire cutters, strippers, soldering irons, etc.
Total parts cost: $15 to $35 depending on which Arduino board you use
Optional parts:
USB cable A-B ($1.00)
Jumper wire kit ($2.00)
I usually go with thicker 22 AWG, but 24 works too
Resistor kit ($2.00)
The limit resistor for the LED can range from : 1,000Ω, to 30,000Ω with 10K being a reasonable option. Note that cheap multi-pack resistors often have thin 0.4mm wire leads which are not “breadboard friendly”, while more expensive resistors from Vishay or Speer usually have 0.6mm leads which stand up much better to handling
6xAA battery holder ($2.00) or 8xAA battery holder ($6.95) with 5×2.1mm power jack
for longer life a 9v D-cell pack should get you out to a couple of weeks of operation
Scotch Outdoor foam Mounting Tape, 5Lb ($4.00)
Plastruct #91105 .060 White Styrene Sheets 3Pack ($10.00)
We attached the UNOs & breadboards to cut rectangles of styrene with the double sided tape to make stable platforms that the students could just pop into their project boxes when class was over. But premade acrylic mounting plates are also available.
For an extensive list of parts & materials see: Building your own Arduino Classroom
Arduino software & libraries:
Before you tackle the assembly, install the Arduino IDE and test that it can communicate with your Arduino. Then there are a few libraries to download and install so that they are available when the Arduino IDE compiles & uploads you programs.
a) A library to control the RTC:
https://github.com/MrAlvin/RTClib
(Note: there are many other good libraries out there that you could use and confusingly most of them have the exact same name, but this one allows you to set sub-minute alarms if you need to)
b) An I2C bus scanning utility:
http://playground.arduino.cc/Main/I2cScanner
(to make sure your RTC and I2C sensors are connected & working)
c) A utility to test communication with the μSD card :
https://www.arduino.cc/en/Tutorial/CardInfo
(You will need to change the CSelect variable to pin 10 from the pin 4 in the code at arduino.cc)
d) A library that puts the Arduino processor to sleep between readings:
https://github.com/rocketscream/Low-Power
(you can’t put the UART to sleep on an UNO, but every little bit still helps save power)
e) A program to make the logger read & save data on the SD card:
A good place to start would be Tom Igoe’s excellent analog pin reading example at Arduino.cc (but change const int chipSelect = 4; to const int chipSelect = 10; for the build described in this tutorial)
For something a little more advanced, I have prepared a basic data logger script that puts the data logger to sleep and wakes it up again based on timed alarms from the real time clock. These are both just starting points for you to add to as you learn more about programming an Arduino
Putting it together:
1) Prepare the RTC board

I usually begin by removing the resistor highlighted in red to disable the battery charging circuit. There is also a power wasting LED on the RTC board that you can remove as well, but that’s only worth doing if you want to run the logger on batteries. For more details about these cheap DS3231 breakout boards, you can dig into this RTC Post.
I have been using these cheap DS3231 RTC boards for a while now. They have proven to be very robust, although they have one element that is slightly annoying: they come with a charging circuit that assumes you have a rechargeable LIR2032 backup coin cell installed. You can use the RTC board as-is if you have on of those LIR’s in your RTC, but since you are not supposed to ship lithium batteries in the post, you almost always receive these RTC boards with no battery, or even worse they will just stick an non-rechargeable CR2032 in there which will pop if you leave it plugged in for long with the charging circuit connected. I usually end up finding a local supplier for non-rechargeable CR2032 coin cells which work fine as a backup power source for the clock provided you disabled the charging circuit by removing the resistor highlighted in red above. You can cut that resistor off with a knife, but I find it easier to flick it off the board with the tip of a hot iron ( I know I promised that this was a solder-less build… but I didn’t say anything about de-soldering 🙂 ) Then insert a fresh CR2032 coin cell into the backup battery holder on the other side. If you forget to put in the battery the logger will still run, but the RTC will forget the date/time every time you shut your logger down, so the time stamps will not be correct unless you reset them every time you start the logger.
2) Power the breadboard rails
 Bring the ground and 5v lines over to the power rails on the breadboard with some solid core 22 gauge wire. I usually do this at the end of the board that is farthest from the rest of the wires I am patching over. Its worth tucking them in as neatly as possible so that they don’t get bumped around later. Make sure you have stripped enough insulation from then ends that the bare wire penetrates into the riser holes enough for a good connection.
3) Jumper the RTC module

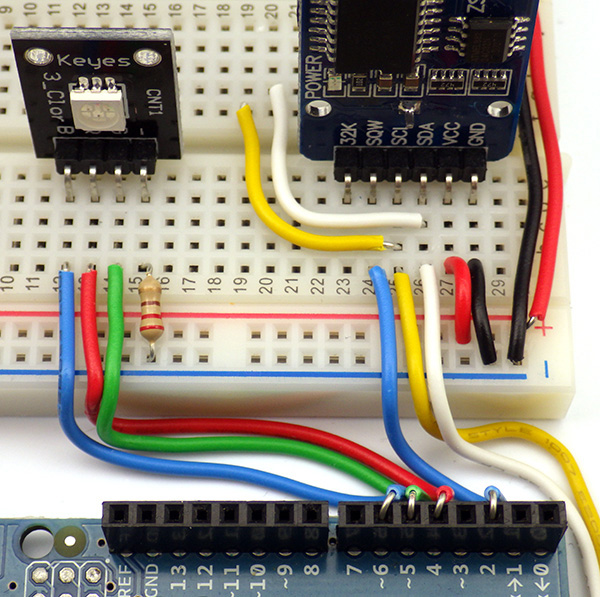
Connecting the DS3231 RTC to an Uno: This is possible because the DS3231 has a wide voltage range from 3.3v to 5v. Many other I2C devices would require a 3.3-5v level shifter before they could be connected to the 5v UNO pins. Note: The long red & black wires at the bottom are simply patching power over to the rails on the other side of the mini breadboard.
The RTC board has clearly written silk screened labels for each pin:
Connect VCC & Ground to the appropriate rails on your breadboard.
Since the RTC is an I2C device, it uses the A4 pin on the Arduino as the SDA data line (white) and the A5 pin as the SCL clock signal line (yellow). There are many easy to use I2C sensors (that have pre-written libraries) that you may use with your logger, and they will be connected to these lines in parallel with the RTC. ( …if those sensors can tolerate 5v logic levels like this RTC ) To enable I2C communications, this RTC breakout board already has 4.7K pullup resistors installed on those two lines, so any other sensors you wish to connect to the SDA and SCL communication lines will probably not need pullup resistors to function. Many sensor breakout boards also have pullups on them, which you can usually leave in place, provided that the combined resistance of your parallel pullup resistors does not fall below 2.2k ohms.
Jumper the SQW line (blue) from the RTC board to Arduino pin D2. This wire will carry the “wakup alarm” signal from the RTC to the INT0 line. (note: the angle on the diagram above makes it look like the wire is in D3, but it is D2)
4) Set the time on the RTC module
Before connecting any other components to the Arduino you should make sure you have the RTC working. Download the library ZIP file, extract the package, and move the library into your Documents/Arduino/Libraries folder. The moved folder must be re-named ‘RTClib’ for the compiler to find the library and sometimes un-zipping adds extra folder layers that you have to remove to get to the library you want.
Update: 2016-10-12: I just noticed that they have taken the setTime & getTime utilities out of that RTC library that were current when I wrote the original post. Now you will need to load File/Examples/RTClib/ds3231_v2 and set the time by following the instructions on screen in the serial text monitor. The new method should let you set your RTC more accurately than using the compile time with setTime.
OLD instructions: the greyed out instructions below apply to older versions of the RTClib that were distributed with the gettime & settime utilities. I’ve posted copies of setTime & getTime utilities to my GitHub and there is an alternate version of the setTime sketch with Paul Stoffregens DS1307RTC library, which sets the RTC to the compile time with the command RTC.adjust(DateTime(__DATE__, __TIME__)); but I found I also had to install Paul’s Time Library, to use his version of settime.
I set my loggers to UTC to avoid problems with local daylight savings time variations. To do this simply change the time zone on your computer before uploading the settime sketch.
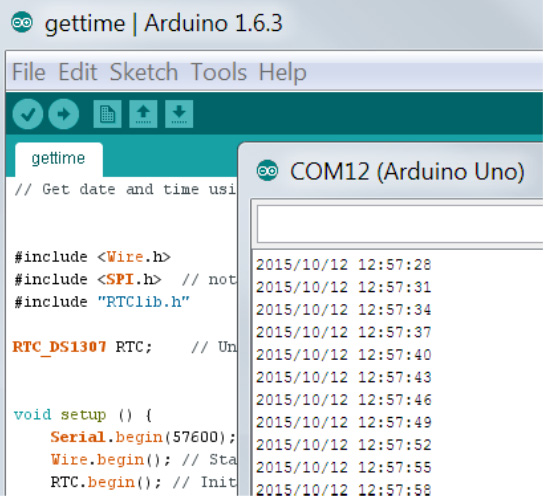
RTClib includes two useful utilities called setTime & getTime that can be found via the IDE pulldown menus after the library is installed at: File / Examples / RTClib / settime & File / Examples / RTClib / gettime Open the settime sketch, verify it, and then upload it to your Arduino via a USB cable connection. This takes the time signature from the compiled code itself and sets the RTC clock with that time. Do not open the serial window while settime is running or the program restarts – setting the time again incorrectly. Immediately after the settime has been run, LOAD the gettime sketch in the IDE and upload it to the Uno. Now open the serial widow, set the IDE serial window speed to match the script, and you should see the date & time being read from the RTC.
Technically speaking, if your RTC is showing the correct date and time in the serial window, you can move on to the next assembly stage. However, I usually run other programs to make sure that both the RTC and the AT25C32 eeprom on the breakout board are working properly. Rob Tillaart wrote a bus scanning utility which is quite useful for this: http://playground.arduino.cc/Main/I2cScanner.
If you run this utility you will usually find that the RTC is on the bus at address 0x68 and the 4K chip is on the bus at address: 0x57 – although the eeprom can move around from one board to the next. In fact the memory address can be changed to avoid conflicts with other devices by connecting the solder pads provided on the breakout board.
On that arduino.cc page you will also find a link to a “Multispeed I2C Scanner” which I like because it scans the I2C bus with different speeds. This is useful as it identifies when your wires have become so long that capacitance is starting to interfere with the serial communication signals and cause the devices to act flaky and/or “drop off the bus”, but the basic scanner works just fine for most cases, especially when you are adding new sensors to your logger and you don’t know their bus address.
Note: If you see junk characters scrolling across the screen when you run any of these little utility programs, you probably need to check that your serial window is set to the same speed specified in the serial.begin command inside the program:

* I have also found that with some of the cheap UART boards that are needed for Pro-mini style Arduinos, I end up having to set the serial window to 1/2 the speed listed in the arduino code to make them work because they are not consistent with the standard board definitions. But the smaller 3.3v units have their clock prescalars set differently, so this should not affect the Uno based builds.
5) Connect the indicator LED

I find that its easier to keep the wires tidy by connecting one end of the wire to the Arduino, and then bend / fold it into place before trimming the other end.
Connect a three color common cathode LED to Red=D4, Grn=D5, Blue=D6. A KEYES KY-009 SMD 5050 breakout board is pictured here, but any common cathode LED would work fine. Use at least a 1 kΩ resistor to connect the common ground line to the ground rail on your breadboard, to limit the current flowing through your LED. As the limit resistor gets bigger the LED will become dimmer, but most are still visible with limit resistors up in the 20-30 kΩ range so the value is not critical. You do not need a three color indicator LED, but I find it helpful to put different color led flashes in the code so that I can keep track of what the Arduino is doing when I don’t have it connected to the serial window. So I turn on red for SD writing, blue for eeprom buffering, green for sensor reading, etc.
Two extra I2C jumpers (white and yellow) shown here simply patch those lines to the other side of the breadboard. These are not necessary, but they make it easier to add I2C sensors to your logger later without disturbing the RTC connections. The 220 Ω limit resistor pictured here is an absolute minimum, and probably should be bumped up to between 1-10K Ω.
6) Connect the SD card Adapter
Place the SD card holder on the breadboard and jumper the following SPI lines from the adapter board ( check and match the labels printed on your particular SD board):
D12=MISO, D11=MOSI, D13=SCK, D10=CS
Then patch the Ground and VCC lines to the rails on your breadboard.

Before connecting your Arduino to test these connections, you need to insert a micro SD card in the adapter. Check a new card on your computer first, and delete any files that already exist on the card, then save a new blank text format file named “datalog.txt” onto the card (note: name in lowercase letters). Eject the sd card with the blank text file on it from your computer, and insert it into the SDcard adapter on your breadboard. It should slide into the socket. It should register with a nice click when it is in place. I often buy used MUVE music 1-3 GB micro sd cards because they are genuine Sandisk cards so they sleep at low current, and they are cheap because of the DRM on them that only lets you see 1gb of space – which is far more than you need for most data logger applications. (A typical logger recording Date/time and a few sensor readings every 15 minutes might generate about 5mb of text data after running for a year)
7) TEST the SD card with CardInfo
This handy utility can be downloaded at: https://www.arduino.cc/en/Tutorial/CardInfo
From there COPY & PASTE the Cardinfo code into a new window in the IDE and make the following changes to the default CARDinfo script:
(a) CHANGE the chipselect from pin 4, to pin 10 with: const int chipSelect = 10; at the beginning of the script. We have already used pin 4 to drive our indicator LED’s red channel.
(b) ADD #include <SPI.h> to the beginning of the script if it is not there already.
VERIFY & SAVE this file on your computer with the name CardInfo. (you will end up using this utility many times again in the future!) Then plug in your Arduino and upload the code, and open a serial window. You should see something like the following:

If you do not see a message like this one, it is possible that
-> The SPI line jumper wires are not in the correct place or you have a loose wire somewhere. There is some variation in the different board pin locations so review these on your board first to make sure you have everything connected properly. Note that your particular SD card adapter board pin-outs may not match my diagrams here, so you will have to adjust for that.
-> Your SD card is not formated as fat16 or the card is not inserted properly. I usually use smaller 1-2gb cards, as some of the new larger HDSC cards don’t format as fat16.
-> You have a bad sd card adapter board. I have had plenty of crummy sd card adapters with bad spring contacts, so try to have 2-3 of these on hand in case you get a bad one too.
At this point your jumpered connections should look something like this:

Note that some overhang the SD card adapter board needs to sit “in the groove” at the center of the breadboard so that the pins make proper contact. The RTC and LED boards don’t require that, but it makes the build look a bit neater if you move them to match.
and your pretty much ready to start using your data logger.
8) Upload a basic data logger script
The code for your logger can now be downloaded from github via this LINK
Starting with Tom Igoe’s excellent example at Arduino.cc, (which would also work fine with this build if you make sure to change CS to pin 10, but that code does not make use of the RTC, etc) I added some functionality to create a time stamp and read the temperature register from the DS3231, and then write that information to a file on the SD card. Here is graph of typical temperature output from that RTC: (@ 15 min interval)
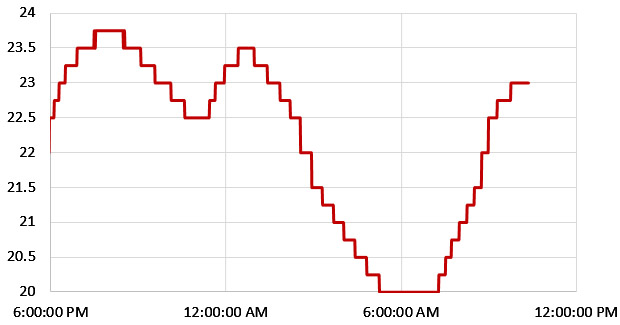
The RTC temperatue record only resolves 0.25°C, but I have found these chips to be far more accurate than the ±3C listed in the data sheet – often less than half a degree away from sensors like the MCP9808
The code also puts the UNO’s cpu to sleep between readings, and it wakes up again to take a sensor reading when the RTC alarm goes off. The serial print output is all optional, so you can comment out those statements when the logger is running in stand alone mode. When you start making changes to the code, commenting out the lines you don’t need is generally much safer than deleting them.
This script is only meant to provide you with a basic starting point, and it should be easy to add other I2C sensors, or simple analog sensor readings following the example from Arduino.cc . Before you add some new sensor to your logger, spend time searching through the forum at Arduino.cc, as someone has probably already answered any question you might have about getting it to work. When you are just starting out, choose sensors that already have good libraries written for them.
It’s worth noting here that this code would also run fine on my pro-mini based logger builds. All you would have to add is a few lines to read analog A0 which tracks the main battery via a resistor voltage divider which is not included in this UNO build. The main Arduino page has a lot of free books and resources as well as explanations for all of the built in code examples. There are also plenty of good Arduino programming references out there if you google around, which should help you customize the script.
Running the logger:

Six in series AA battery packs like this are fairly common, and should power this basic Uno logger for a few days of stand alone operation – especially if you use Lithium AA’s which have a flat discharge curve. 8xAA packs are available, but you have to be careful that over-voltage on new batteries does not push the total output above the UNO’s 12v maximum. The optimal solution might be to use 7 batteries in an 8-series battery pack, with a simple wire soldered across the last holder. 18650’s in series would be another option. If you need something that runs longer, rare earth magnets (soldered to the ends of jumper wires) make it easy to connect a number of C or D cell batteries into a custom power supply held together with painters tape. I would not try to power this logger from a 9V battery, as I don’t think it can deliver enough current for safe SD card writing. Rechargeable LiPo shields are also available if your pockets are deep enough.
Always do tethered test runs with sensor output echoed to the serial port so you know the code is working before you run the logger in stand alone mode. In fact, I assume that most people will use this logger as a data acquisition system so I’ve put together a separate tutorial on using the Arduino as a basic DAQ with the serial plotter tool. (scroll down to the 2016-08-15 addendum for the UNO only section) Note that to copy data from the serial window and paste it into excel you need commas printed between your numbers, and cartridge returns after, by using println rather than print for the last bit of data. Sometimes students have trouble cutting and pasting from the serial text window, or they accidentally shut the serial window by pressing the wrong button. So it is still a good idea to save to the SD card (if you have enough memory…) because this makes it easy to graph the data later. (with Excel or Google Docs)
One of the weird behaviors to know about with Arduinos is that every time you open the serial window from the IDE, the program that is running on the Arduino will restart, so if you are writing header data to the datalog.txt in the setup section, you will see a new copy of that header in the file each time the serial window is opened.

The easiest way to estimate how long your logger will run on batteries is with one of these USB power meters. Insert one of these $4 adapters between a USB power supply adapter & the datalogger. Reset the timer and let it run for a few hours and then look at the cumulative mAh number. Divide that into the rated mAh of your battery and you have a ballpark run time estimate. For reference, most alkaline AA batteries provide about 2000 mAh. It is even possible to make your own power meters.
Once you are comfortable with the serial plotter tool in the IDE you can look at other methods for graphing the data in real time. One common method is by using another program called Processing. But be sure you test everything before your classes, as I’ve had some challenges getting processing to work on different windows systems (with the data on the SD card saving the day once again…) There is also an Excel macro called PLX-DAQ that can be used to monitor any serial port and display the data sent through it, but I believe that macro only works with older versions of excel/windows and I’ve never gotten it to work on my versions. Like Processing, it requires a few extra lines of code to be embedded in the Arduino sketch to direct the data to specific cells in the spreadsheet. Plot.ly might also be worth using to share data online in a way that looks professional. And if you are really get the bug, you could take it all the way to the ‘Internet of Things‘ level if you add a shield or two. Home automation & wireless gardening, are popular applications, with some people using Google Charts to display live data on their websites.
Note:
With the always on UART chip, it’s hard to get an UNO to run for long on batteries, but you should still be able to get few good days out of a set of AA’s with this plan. If you want a smaller footprint, you could bend the pins 90° and connect the RTC & SD boards with a lower profile to one of the many ‘stack on top’ proto shields available. Probably the best of the lot is the Dead Bug Prototype shield for an Arduino UNO (~$24.00), as this shield also lets you run an UNO for a very long time on batteries, though you would have to wrangle with his code a bit to make things work. That shield has the RTC, & SD carrier already built in, so my advice is build a jumpered UNO logger as per this tutorial, then when you get all your code & sensors working properly in tethered mode, transpose what you have learned to create a stand alone unit using the Dead Bug shield. Moving on from there: another option that really helped me at the beginning of this project is the compact TinyDuino platform, which is code compatible with all of the larger Arduino boards so you can usually use your existing programs directly. I used Tiny’s in several of my earliest loggers, and some of them were still running after more than two years. When you are ready to graduate to other small form factor Arduinos like the pro mini, perf-boards & wire wrapping is a quick way to make solder-less prototypes that can be disassembled afterwards. Once you are really comfortable with the different Arduinos, it is even possible to use the raw Atmel processor by itself on the same breadboard as your other parts. Strip-boards are another popular way to go from circuits on a breadboard to a deployable prototype.

In the stand alone logger tutorials, I describe how to build a housing from 4″ PVC fittings, but those parts are all available in larger diameters so the same basic idea could be used with the larger UNO based logger, though the caps get a bit expensive at that size.
With your ‘deployment’ build ready, you can go hunting for a waterproof enclosure for your combination (here is an example using a prebuilt project box and anti vibration mount), or you could try building something more creative with pvc plumbing. Lego blocks are not waterproof on their own, but they are made from standard ABS, so a little dab of ABS plumbing solvent around the edges lets you quickly assemble very robust internal scaffolds for your prototypes.
Addendum 2016-01-05:

After UNO based labs, the students move on to pro-mini based logger builds with many different sensor combinations. The Pro Mini is essentially just a stripped-down Uno and uses the same pin mapping. So it is generally possible to transfer UNO logger code into a Pro-mini based build with few (if any) changes to the programming.
It’s also worth noting that this UNO logger has been ‘field tested’ many times during Trish’s Instrumentation course. I am happy to report that once the solid core wires are firmly in place, the students were able to reassemble the loggers quickly at the beginning of each class by simply popping the RTC, LED & SD adapter back into place. This saved a great deal of time, and the students used the UNO’s as a code development platform while they built “stand alone” loggers for their final projects.
However there were a few bumps along the way that I would like to share with other instructors:
1) No matter how many times you tell your students to unplug the Arduino from the computer before changing wires around on the breadboard, they will forget, and start changing wires around while the whole system is live. (…making plenty of mistakes in the process) While our Arduinos survived, the USB ports they were connected to sometimes did not. I would recommend that you use a sacrificial powered usb hub between the computer and the Uno to protect the computer’s usb ports from this abuse.
2) The single most common mistake that the students made was forgetting to put the limit resistor on the LED, and a few digital I/O’s were lost from resulting high currents if student failed to notice the the led was unusually bright. (Again, I am amazed the mcu’s survived these events without needing surgery) With younger students, I suggest that you pre-solder a 10k limit resistor directly to the ground line of the LED’s before you hand out the parts so that there is no way to make this mistake. They will still hook the thing up wrong, and three color led’s will light up with unusual color combinations if you ground any of the 4 lines, but I don’t think we lost any digital pins that way.
Addendum 2016-03-10
Well looks like someone sent this post to Scrbd. I guess that means you can download it as a PDF from there. Slightly annoying to see advertising over top of something that is being given away free, but more so that their page comes up higher in search results than the original. Though I guess it’s all good in the end, if it helps more people get started with their logger projects.
Addendum 2017-12-17
After you’ve built your logger you will probably want to add some sensors to it. To get some pointers on how to do that pop over to Part 2 of the UNO logger series at: Adding Sensors to an Arduino Data Logger

Hi Edward,
First of all I’d like to say how much I have enjoyed your projects over the past few months. As an oceanographer with minimal knowledge in electronics, your clear tutorials have inspired me to embark on my own data logger project. Thank you.
Would it be possible to upload the correctly formatted version of the example code onto Git? I am having trouble getting the code to verify and I’m sure its just down to formatting issues.
Keep up the good work,
Regards,
Ben
Hi Ben.
Here is a link to the code on Github.
I tried re-copying the code back out of wordpress myself and it was horrible; even the quotes were changed to something non-functional. Please accept my apologies to you, and anyone else I subjected to that.
Hi Edward,
thank you very much for all the information you’ve written on data loggers. I am finding it very useful and interesting. And am having a go at my own projects.
I am trying this Arduino UNO based logger and have downloaded the ZIP, and included the library RTClib, but in the File/Examples/RTClib/ I do not see the settime or gettIme utilities. Have the files been renamed or have I misunderstood something?
Thank you for your time and help.
Kind Regard
David
When you have the RTC library installed in the the libraries folder of the Arduino IDE, the gettime & settime utilities should be available from the pull-down menus. But it’s buried 3 levels deep at: File->Examples->RTClib->(a bunch of utilities there). If you don’t find them then its possible you have not put the RTC library into the right folder yet. Dig into Arduino.cc and you will find links to guides on how to add new libraries to the IDE. Also keep in mind you need to shut down and restart the IDE before any new libraries show up. I always for get to do the restart….
Ed, you’ve rekindled a cave stream depth logging project that I’ve had on the back burner for the past few years, your instruction are fantastic, and so well documented. Many thanks!
The MS5803 series of pressure sensors have been star performers in terms of underwater durability, and they give you a fantastic 24-bit temperature record as well. Luke Millers libraries make it easy to get them running without too much effort. But they are only 3.3v sensors, so if want to use them on a 5v UNO board, you need to use a level shifter to protect them from the 5v because the I2C library turns on pullup resistors inside the main processor by default. But you will need a whopper of a battery to make an UNO run for long unless you use the Dead-bug logging shield I mentioned in the post.
Thank you Emallon for this amazing tutorial!
I’m working on a project similar to this. Except, for the RTC, I’m using PCF8583 which doesn’t have an alarm function. So, I use delay inside the loop function for data acquisition. The problem is that I also have to implement RS232 communication with Arduino. Is there any possibility to integrate Serial interrupt with Delay?
Thank you very much in advance!
If you search the Arduino.cc formus, you will find theads by people waking up a fully sleeping Arduino when serial communications start coming in from the outside. I think they use pin change interrupts on RX, but you could just as easily use an optocoupler to trigger the interrupt on some other pin. Then set a flag in an ISR that you check while you do the delay.
Hi Edward.
I am getting involved with a school endurance kart / buggy project. I am wanting to data log 9 channels (maybe a couple more). These are battery 1 voltage , current and temperature, battery 2 voltage, current and temperature, motor speed, torque and temperature. I can get all these inputs to arrive as 0 to 5v inputs, motor speed may be best kept as a frequency. The output would idealy be a huge table of figures to export into an excel spreadsheet. I am wondering where to start with some form of data logger and what is available. I want to spend my time getting the data and evaluating the data rather than spending all my time on the data logger itself. Any thoughts would be a great help. Kind Regards. Rob Smith (not the Rob Smith who has previously replied )
If you don’t want to build the data logger, then I would suggest one of the many pre-made data logging shields out there (if you are using an UNO) or one of the dedicated 3.3v boards like the Adafruit feather series. Then bring your analog voltage inputs into the Arduino’s ADC using a 16-channel MUX Breakout Board such as the CD74HC4067 which can usually be found on eBay for about $2. There are libraries out there to help you controlling the channel setting on the mux.