

The next generation of flow sensors running “hang” tests so I can quantify sensor mounting offsets. I like to see a few weeks of operation before I call a unit ready to deploy. Each new batch suffers some infant mortality after running for a few days.
I’m finally getting the next generation of Pearls together for their pre-deployment test runs. The new underwater units will all be in 2″ enclosures and perhaps it’s just me, but I think the slimmer housings make them look more like professional kit. These units are larger than I would have liked, but with six AA batteries they needed some extra air space to achieve neutral buoyancy. With the slow but steady improvements to the power consumption, this might be the last batch designed to carry that much juice. There are a host of other little tweeks including new accelerometers because despite all the hard work it took to get them going the BMA180’s did not deliver the data quality I was hoping for. It would seem that just having a 14bit ADC does not always mean that the sensor will make good use of it. This is the first generation of flow sensors that will be fully calibrated before they go into the field. That’s important because most of these guys will be deployed in deeper saline systems with flows slower than 1 m/s.

This is a sensor cap for the Masons hygrometer experiment which uses waterproof DS18B20s for the wet & dry bulb readings, with the extra sensor letting me compare different drip sources simultaneously. An MS5803-05 records barometric pressure, and I put a (redundant) MCP9808 in the leftover sensor well to track the housing temperature.
A new crop of drip sensors is ready, and this time a couple of them will be based on the Moteino Mega, with a 1284 mcu providing lots of SRAM for buffering. They performed reasonably well on bench tests but it will be interesting to see how they fare in the real cave environment. The drip loggers we left on the surface as crude rain gauges will be upgraded with protective housings and catchment funnels, hopefully providing a more accurate precipitation record. They will be joined at the surface by new pressure/temp/r.h. loggers that sport some DIY radiation shields and they will have none of the Qsil silicone which swamped out the barometric readings with thermal expansion last time.

A bit of shoelace becomes a wick for the wet bulb. It’s made from a synthetic material, as I suspect that the traditional cotton wicks would quickly rot in the cave.
And we will have a couple of new humidity sensors to deploy on the next fieldwork trip. The rapid demise of our HTU21D’s back in December prompted me to look for other methods that would survive long periods in a condensing environment. That search lead me to some old school Masons hygrometers, which in theory let you derive relative humidity with two thermometers provided you keep one of them wet all the time so that it is cooled by evaporation. The key insight here is that I am already tracking drip rates, so I have a readily available source of water to maintain the “wet bulb” for very long periods of time. If the drip count falls too low I will know that my water source has dried up, so I will ignore the readings from those times.
Underwater deployments have already proven that the MS5803 pressure sensors are up to the task and waterproof DS18B20s look like they might have enough precision for the job. The relatively poor ±0.5°C accuracy of the DS18’s does not matter so much in this case as the “wet bulb depression” is purely a relative measurement, so all you have to do is normalize the sensors to each other before deploying them. I still had a few closely matched sets left over from the temperature string calibrations, so I just used those.

This RH sensor has a copper sintered mesh, and all the non-sensing internals are coated with silicone. It’s worth noting that the SHT series does not play well with I2C sensors, and must have it’s own set of dedicated com pins. It also pulls far more current than the datasheet says it should, so this logger draws a whopping 0.8mA while sleeping. I’m driving it with the library from practical arduino’s github, so perhaps something in there is preventing the SHT11 from sleeping(?)
Of course there are a host of things that I will be blatantly disregarding in this experiment. For starters you are only supposed to use pure distilled water, and cave drip water is generally saturated by its passage through the limestone. Perhaps the biggest unknown will be the psychrometric constant, which changes pretty dramatically depending on ventilation, and with several other physical parameters of the instrument. Since there is no way I am going to derive any of that from first principles, I though I would try a parallel deployment with a second humidity sensor so I could determine the constant empirically. The toughest looking electronic R.H. sensor I could find for this co-deployment was the soil moisture sensor from Seeed Studios. Even with it’s robust packaging, I expect it to croak after a few months in the cave, but hopefully the SHT11 will give me enough data to interpret the readings from the other hygrometer.
Once the epoxy had cured, I set the two units up in the furnace room so the wet bulb was not ventilated. Recent heavy rains meant our basement was hitting 75% RH, and I had a dehumidifier running at night to pull that down to 55%. (far from the Masons so there was no air movement at the wick!). That test produced wet-bulb depressions between 2-4 degrees Celsius, allowing me to create the following graph:
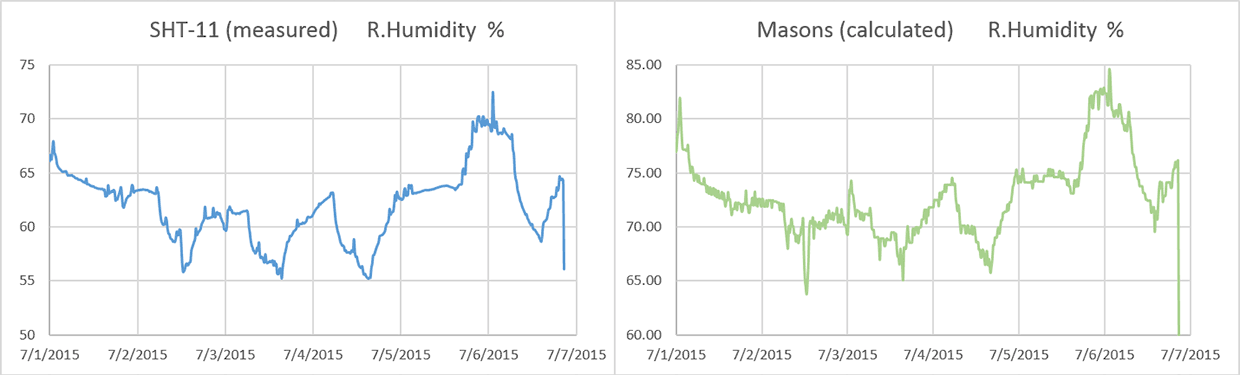
Even with the psychrometer constant bumped up to 0.0015 (0.0012 is usually quoted for non ventilated designs with warnings that the number will be different for each instrument) the Mason is reading about 10-12% above the SHT11. I can deal with that if the offset is constant, but it means that the difference between the two bulbs is smaller than it should be. That is typically the direction of errors for this kind of design but when the humidity gets up into the 90’s, my humble DS18’s might not have enough resolution to discriminate those small differences – especially if there is some ugly non-linear compression happening. You can already see some of that digital grit showing up on the green plot above. I was pleasantly surprised to see very little difference in the response time for the two sensors, although I suspect that is because they both have significant lag.
For a first run, those curves match well enough that the method is worth investigating. We can put up with lower resolution & a lot of post processing if the sensor will operate reliably in the cave environment for a year. And if the idea doesn’t work I will still be left with a multi-head temperature probe, which can be put to other good uses. I will build a couple more of these, and keep at least one at home for further calibration testing.
Addendum 2015-07-21

I did not use distilled water in those reservoirs, as the cave drip water will have plenty of dissolved solutes which will shrink the wet bulb depressions
I set up the new hygrometer caps for a long run in an enclosed storage space under the porch; which is the closest thing I have to an unventilated cave environment. Fortunately the weather obliged with a good bit of rain during the test, pushing the relative humidity up towards the 90’s where the loggers will be spending most of their time after they are deployed. These builds include pressure sensors, but the one I will be keeping at home also has an HTU21D R.H. sensor, since the SHT-11 I am using as my primary reference will go into the field.
Readings from the HTU21 vary between 4-6% lower than the SHT-11:

So as usual, having multiple sensors to read RH directly puts me back into “the man with two watches” territory; though I have slightly more faith in the Sensirion. If I match the overall dynamic range of the Mason output to the soil moisture sensor by tweaking psychometric constants, I can bring the them within 3.5% of the SHT (with uncorrected R-squares > 0.93) :

I was hoping that those psychometric constants would be much closer to each other and I will have to chew on these results to see if I can figure out what is causing the variance between the instruments. I would also like to know where that positive 3.5% offset comes from.
I should mention here that a similar offset problem affects the atmospheric pressure sensors which I need to calculate the actual water vapor pressure using:
Saturation Vapor Pressure @ wet bulb temp:
= 0.61078*EXP((17.08085*T(wet))/(237.175+T(wet)))
Actual Vapor Pressure:
= Sat. V.P.@wet bulb – [ (psy. constant) * (Atm.Pressure in kPa) * (T(dry)-T(wet)) ]
Relative Humidity:
= (Actual V.P./ Saturation V.P.)*100
Fortunately at weather.gov they post three days of historical data from your local NOAA weather station, which you can use to find the offset for your home built pressure sensors:
 (Note:I had to concatenate the date/time info into Excel’s time format to make this graph)
Most of my MS58xx sensors seem to have a -10 to -20 mBar offset after they are mounted. I suspect that this is due to the epoxy placing strain on the housing because of some shrinkage while curing. Overall variations in air pressure have a small effect on the calculation, and many wall mount hygrometers don’t even specify corrections for elevation. So you could probably use this method reasonably well without a “local” barometric sensor by just putting 101.3 kPa in the calculation.
Addendum 2015-07-22
I just stumbled across a neat soil moisture sensor project, that measures moisture dependent conductivity through some Plaster of Paris in a straw. I’m not sure it would give me the durability I need for long cave deployments but it still looks like a great DIY solution. It would be interesting to see how they compare to the commercial gypsum based sensors which usually run around $40 each.
There’s also a good overview of calibrating RH sensors with saturated salt solutions by Samantha Alderson and Rachael Perkins over at A.M Art Conservation,
Addendum 2015-07-23
A helpful comment over at the Arduino.cc sensors forum put me onto this tutorial. I did not know that the meat & dairy industry is still using wet & dry bulbs to monitor R.H. so I have a new place to look for information on the method. There is another document over at Sensors Magazine at Sensors Magazine outlining how a thermistor pair can be used to determine humidity if one is hermetically encapsulated in dry nitrogen and the other is exposed to the environment. You drive current through the sensors to produce self heating, and then measure the differential cooling rates of the dry nitrogen vs exposed sensor to derive the humidity.
Addendum 2015-08-14
Two Masons Hygrometers are now deployed in Rio Secreto cave next to my drip loggers:
(I will keep the third one at home for further testing)

This unit has the two dry bulb probes suspended in air with cable ties, while the wet bulb is fed by runoff from a drip station. I tried to choose a station that does not run dry at any time through the year.
It will be at least four months before we pull these units and find out if the experiment worked. Fingers crossed!
