These MS5803 pressure sensors are my first attempt at diy SMD. Hopefully I did not toast them on the electric skillet I was using to reflow…
While I was waiting on the results of the week-long power consumption test of the SRAM buffering script, I continued thinking about other ways I might extend the operating lifespan of the Pearls. I had originally considered using the processors 1024 bytes of internal eeprom for temporary storage, but work over at the solar duino project showed me that using an external 24AA256 is faster and consumes less power than the internal eeprom. AND the cheap DS3231 RTC boards I had just received from eBay had an AT24C32 eeprom chip: 4k of storage just sitting there waiting to be used…And the data sheets told me that the SD card could be drawing up to 80 ma for who knew how long, while the datasheet for the eeprom listed a paltry 2 ma per block write taking only 5 milliseconds…
Three days of heavy lifting later…I had cobbled together this script, using PSTRING to to dramatically simplify the concatenation of the sensor data into a 28 byte long char buffer (the wire library buffer is only 32 characters long and you need two bytes for the mem address + room for string termination characters, etc). Pstring uses simple print statements, but more importantly, it never causes buffer overflows if you try to stuff in too much data, like a mishandled sprintf statement could. This also gives me some flexibility while I am still changing my sensors around, as I don’t quite know what the final data is going to look like yet.
So this code buffers each sensor read cycle to the I²C eeprom, using two page writes per cycle. This simplifies the code a bit, as I have only one set of variables on the go. Then when the countlog = SamplesPerCycle, it does a reverse for loop to pull the data back out of the eeprom, and write it to the SD card. With a rated endurance of 1 million write cycles, I’m not worried about wearing the eeprom out either.
And the result? This script gives me ~700 sensor read cycles per 8mV drop on a 2 AA battery power supply. This is less than half the performance of the SRAM buffering code, which surprised me quite a bit, but I guess that *192 eeprom page writes (with the attendant I2C coms) +1 SD card write per day, uses 2-3 times as much power as SRAM buffering with 8 SD card write cycles for that same days worth of records. On paper all that eeprom writing represents almost one second per day at 2 mA, which doesn’t seem like much. So either my tiny 128 mb SD cards are very quickly to going back into sleep mode, or keeping the CPU running during all that I2C traffic is using a significant amount of power…?
So what did I learn: Well knowing that a fair bit of I²C & eeprom traffic will more than double the power drain is quite handy, as I now jump into connecting temperature, pressure, compass, and perhaps other sensors, to those same I2C lines. It will be interesting to see what the real world performance of these loggers is when the rubber meets the…ummm…cave diver.
Addendum 2015-04-18

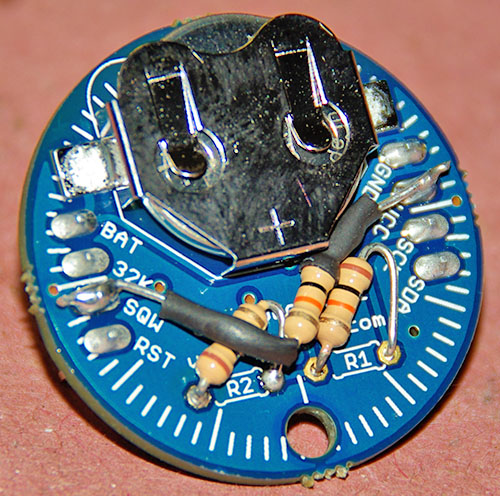
I simply let the wires I am already using to tap the cascade port I²C lines poke up enough to give me solder points for the EEprom. Don’t forget to remove the pullups on the EEprom board as you already have pullups on the RTC breakout.
The AT24c32 chip can only hold 4k of data – if you write beyond 4096 bytes, it rewrites over the old data! So once you have done 128 page writes, you need to flush to the sd card. In this code, I write two 32-byte pages per record. So I have a upper limit of 64 records before I hit that block limit and start to overwrite the data! I could bump it up to 32k of external eeprom for only $1.50, so I will have to try a few experiments to see if that helps. That 32k eeprom is a code compatible, drop in replacement. All you have to do is change the I2C address for the eeprom for the new board.
Addendum 2014-07-16
The Code below has been posted to the projects GitHub. Look around as the more recent codebuilds are much more elegant than this crude early version, and include sensor support for an easy to build logger.
//Date, Time and Alarm functions using a DS3231 RTC connected via I2C and Wire lib by https://github.com/MrAlvin/RTClib
// based largely on Jean-Claude Wippler from JeeLab’s excellent RTC library https://github.com/jcw
// clear alarm interupt from http://forum.arduino.cc/index.php?topic=109062.0
// get temp from http://forum.arduino.cc/index.php/topic,22301.0.html
// BMA250_I2C_Sketch.pde -BMA250 Accelerometer using I2C from http://www.dsscircuits.com/accelerometer-bma250.html
// internal Vcc reading trick //forum.arduino.cc/index.php/topic,15629.0.html
// and http://forum.arduino.cc/index.php?topic=88935.0
// free ram code trick: http://learn.adafruit.com/memories-of-an-arduino/measuring-free-memory
// power saving during sleep from http://www.gammon.com.au/forum/?id=11497
// I2C routine based on http://playground.arduino.cc/Code/I2CEEPROM#.UwrbpPldUyI
// New file name routine from http://forums.adafruit.com/viewtopic.php?f=31&t=17964
#include <Wire.h> // 128 byte Serial buffer
#include <SPI.h> // not used here, but needed to prevent a RTClib compile error
#include <avr/sleep.h>
#include <RTClib.h>
#include <PString.h>
#include <SdFat.h>
SdFat sd; // Create the objects to talk to the SD card
SdFile file;
const byte chipSelect = 10; //sd card chip select
#define SampleInterval 1 // power-down time in minutes before interupt triggers the next sample
#define SamplesPerCycle 5 // # of sample cycles to buffer in eeprom before writing to the sd card: MAX of 64! (do not exceed 128 page writes or data will be lost)
unsigned int countLogs = 0; // how many records written to each file
unsigned int fileInterval = 10; // #of log records before new logfile is made
/* count each time a log is written into each file. Must be less than 65,535
counts per file. If the sampleinterval is 15min, and fileInterval is 2880
seconds, then 96samples/day * 30days/month = 30 day intervals */
#define ECHO_TO_SERIAL // echo data that we are logging to the serial monitor
// if you don’t want to echo the data to serial, comment out the above define
#ifdef ECHO_TO_SERIAL
//#define WAIT_TO_START
/* Wait for serial input in setup(), only if serial is enabled. You don’t want
to define WAIT_TO_START unless ECHO_TO_SERIAL is defined, because it would
wait forever to start if you aren’t using the serial monitor.
If you want echo to serial, but not wait to start,
just comment out the above define */
#endif
char FileName[] = “LOG00000.CSV”; //the first file name
#ifndef cbi //defs for stopping the ADC during sleep mode
#define cbi(sfr, bit) (_SFR_BYTE(sfr) &= ~_BV(bit))
#endif
#ifndef sbi
#define sbi(sfr, bit) (_SFR_BYTE(sfr) |= _BV(bit))
#endif
#define DS3231_I2C_ADDRESS 104 //for the RTC temp reading function
#define EEPROM_ADDR 0x57 // I2C Buss address of AT24C32 32K EEPROM
#define EEPromPageSize 32 //32 bytes for the AT24c32 I am using
#define BMA250 0x18
#define BW 0x08 //7.81Hz bandwith
#define GSEL 0x03 // set range 0x03=2g, 0x05=4, 0x08=8g, 0x0C=16g
//I2C eeprom variables
unsigned int CurrentPageStartAddress = 0; //set to zero at the start of each cycle
char EEPROMBuffer[28]; //this buffer contains a string of ascii
//char EEPROMinBuffer[28]; // this buffer recieves numbers from the eeprom was an unsigned char
//note the data read from the eeprom is binary – not ascii characters!
RTC_DS3231 RTC;
byte Alarmhour = 1;
byte Alarmminute = 1;
byte dummyRegister;
byte INTERRUPT_PIN = 2;
volatile boolean clockInterrupt = false;
byte tMSB, tLSB; //for the RTC temp reading function
float RTCTempfloat;
char CycleTimeStamp[ ]= “0000/00/00,00:00:00”;
byte Cycle=0;
//variables for accellerometer reading
uint8_t dataArray[16];
int8_t BMAtemp;
float BMAtempfloat;
uint8_t wholeBMAtemp,fracBMAtemp;
int x,y,z; //acc readings range to negative values
int temp3231;
uint8_t wRTCtemp,fRTCtemp; //components for holding RTC temp as whole and fraction component integers
int Vcc;//the supply voltage via 1.1 internal band gap
byte ledpin = 13; //led indicator pin not used in this code
// the LED on pin 13 is also shared with the SPI SCLK clock, which is used by the microSD card TinyShield.
// So when you use a SPI device like the SD card, the LED will blink, and the SD library will override the digitalWrite() function call.
// If you need a LED for indication, you’ll need to hook up an external one to a different I/O pin.
void setup () {
pinMode(INTERRUPT_PIN, INPUT);
digitalWrite(INTERRUPT_PIN, HIGH);//pull up the interrupt pin
pinMode(13, OUTPUT); // initialize the LED pin as an output.
Serial.begin(9600);
Wire.begin();
RTC.begin();
clearClockTrigger(); //stops RTC from holding the interrupt low if system reset
// time for next alarm
RTC.turnOffAlarm(1);
#ifdef WAIT_TO_START // only triggered if WAIT_TO_START is defined at beging of code
Serial.println(F(“Type any character to start”));
while (!Serial.available());
#endif
delay(1000); //delay to prevent power stutters from writing header to the sd card
DateTime now = RTC.now();
DateTime compiled = DateTime(__DATE__, __TIME__);
if (now.unixtime() < compiled.unixtime()) { //checks if the RTC is not set yet
Serial.println(F(“RTC is older than compile time! Updating”));
// following line sets the RTC to the date & time this sketch was compiled
RTC.adjust(DateTime(__DATE__, __TIME__));
}
initializeBMA(); //initialize the accelerometer – do I have to do this on every wake cycle?
//get the SD card ready
pinMode(chipSelect, OUTPUT); //make sure that the default chip select pin is set to output, even if you don’t use it
#ifdef ECHO_TO_SERIAL
Serial.print(F(“Initializing SD card…”));
#endif
// Initialize SdFat or print a detailed error message and halt
// Use half speed like the native library. // change to SPI_FULL_SPEED for more performance.
if (!sd.begin(chipSelect, SPI_HALF_SPEED)) {
Serial.println(F(“Cound not Initialize Sd Card”));
error(“0”);}
#ifdef ECHO_TO_SERIAL
Serial.println(F(“card initialized.”));
Serial.print(F(“The sample interval for this series is: “));Serial.print(SampleInterval);Serial.println(F(” minutes”));
Serial.println(F(“Timestamp Y/M/D, HH:MM:SS,Time offset, Vcc = , X = , Y = , Z = , BMATemp (C) , RTC temp (C)”));
#endif
// open the file for write at end like the Native SD library
// O_CREAT – create the file if it does not exist
if (!file.open(FileName, O_RDWR | O_CREAT | O_AT_END)) {
Serial.println(F(“1st open LOG.CSV fail”));
error(“1”);
}
file.print(F(“The sample interval for this series is: “));file.print(SampleInterval);file.println(F(” minutes”));
file.println(F(“YYYY/MM/DD HH:MM:SS, Vcc(mV), X = , Y = , Z = , BMATemp (C) , RTC temp (C)”));
file.close();
digitalWrite(13, LOW);
}
void loop () {
// keep track of how many lines have been written to a file
// after so many lines, start a new file
if(countLogs >= fileInterval){
countLogs = 0; // reset our counter to zero
createLogFile(); // create a new file
}
CurrentPageStartAddress = 0;
for (int Cycle = 0; Cycle < SamplesPerCycle; Cycle++) { //this counts from 0 to (SamplesPerCycle-1)
if (clockInterrupt) {
clearClockTrigger();
}
read3AxisAcceleration(); //loads up the Acc data
DateTime now = RTC.now(); // Read the time and date from the RTC
sprintf(CycleTimeStamp, “%04d/%02d/%02d %02d:%02d:%02d”, now.year(), now.month(), now.day(), now.hour(), now.minute(), now.second());
wholeBMAtemp = (int)BMAtempfloat; fracBMAtemp= (BMAtempfloat – wholeBMAtemp) * 100; // Float split into 2 intergers
//can use sprintf(BMATempHolder, “%2d.%2d”, wholeBMAtemp[Cycle], fracBMAtemp[Cycle]) if we need to recompose that float
RTCTempfloat= get3231Temp(); wRTCtemp = (int)RTCTempfloat; fRTCtemp= (RTCTempfloat – wRTCtemp) * 100; // Float split into 2 intergers
Vcc = (readVcc());
if (Vcc < 2800){Serial.println(F(“Voltage too LOW”));error (“L”);}
//serial output for debugging – comment out ECHO_TO_SERIAL to eliminate
#ifdef ECHO_TO_SERIAL
Serial.print(CycleTimeStamp); Serial.print(F(” Cycle “)); Serial.print(Cycle);Serial.print(F(“,”)); Serial.print(Vcc); Serial.print(F(“,”));
Serial.print(x); Serial.print(F(“,”));Serial.print(y); Serial.print(F(“,”)); ;Serial.print(z); Serial.print(F(“,”));
Serial.print(wholeBMAtemp);Serial.print(F(“.”));Serial.print(fracBMAtemp);Serial.print(F(“,”));
Serial.print(wRTCtemp);Serial.print(F(“.”));Serial.print(fRTCtemp);
Serial.print(F(“, Ram:”));Serial.print(freeRam());
delay(40); //short delay to clear com lines
#endif
//Construct first char string of 28 bytes – end of buffer is filled with blank spaces flexibly with pstring
//but could contruct the buffer with sprintf if I wasn’t changing my sensors so often!
PString str(EEPROMBuffer, sizeof(EEPROMBuffer));
str = CycleTimeStamp;str.print(F(“,”));str.print(Vcc);str.print(F(” “));
Write_i2c_eeprom_page(EEPROM_ADDR, CurrentPageStartAddress, EEPROMBuffer); // whole page is written at once here
CurrentPageStartAddress += EEPromPageSize;
//Construct second char string of 28 bytes to complete the record
str = “,”; str.print(x);str.print(F(“,”));str.print(y);str.print(F(“,”));str.print(z);str.print(F(“,”));
str.print(wholeBMAtemp);str.print(F(“.”));str.print(fracBMAtemp);str.print(F(“,”));
str.print(wRTCtemp);str.print(F(“.”));str.print(fRTCtemp);str.print(F(“,”));str.print(F(” “));
Write_i2c_eeprom_page(EEPROM_ADDR, CurrentPageStartAddress, EEPROMBuffer); // 28 bytes/page is max whole page is written at once here
CurrentPageStartAddress += EEPromPageSize;
// IF full set of sample cycles is complete, run a loop to dump data to the sd card
// BUT only if Vcc is above 2.85 volts so we have enough juice!
if (Cycle==(SamplesPerCycle-1) && Vcc >= 2850){
#ifdef ECHO_TO_SERIAL
Serial.print(F(” –Writing to SDcard –“)); delay (10);// this line for debugging only
#endif
CurrentPageStartAddress=0; //reset the page counter back to the beginning
file.open(FileName, O_RDWR | O_AT_END);
// open the file for write at end like the Native SD library
//if (!file.open(FileName, O_RDWR | O_AT_END)) {
// error(“L open file fail”);
//}
for (int i = 0; i < SamplesPerCycle; i++) { //loop to read from I2C ee and write to SD card
Read_i2c_eeprom_page(EEPROM_ADDR, CurrentPageStartAddress, EEPROMBuffer, sizeof(EEPROMBuffer) ); //there will be a few blank spaces
CurrentPageStartAddress += EEPromPageSize;
file.write(EEPROMBuffer,sizeof(EEPROMBuffer));
Read_i2c_eeprom_page(EEPROM_ADDR, CurrentPageStartAddress, EEPROMBuffer, sizeof(EEPROMBuffer) );
CurrentPageStartAddress += EEPromPageSize;
file.write(EEPROMBuffer,sizeof(EEPROMBuffer));
file.println(F(” “));
countLogs++;
// An application which writes to a file using print(), println() or write() must call sync()
// at the appropriate time to force data and directory information to be written to the SD Card.
// every 8 cycles we have dumped approximately 512 bytes to the card
// note only going to buffer 96 cycles to eeprom (one day at 15 min samples)
if(i==8){syncTheFile;}
if(i==16){syncTheFile;}
if(i==24){syncTheFile;}
if(i==32){syncTheFile;}
if(i==40){syncTheFile;}
if(i==48){syncTheFile;}
if(i==56){syncTheFile;}
if(i==64){syncTheFile;}
if(i==72){syncTheFile;}
if(i==80){syncTheFile;}
if(i==88){syncTheFile;}
}
file.close();
}
// setNextAlarmTime();
Alarmhour = now.hour(); Alarmminute = now.minute()+SampleInterval;
if (Alarmminute > 59) { //error catch – if alarmminute=60 the interrupt never triggers due to rollover!
Alarmminute =0; Alarmhour = Alarmhour+1; if (Alarmhour > 23) {Alarmhour =0;}
}
RTC.setAlarm1Simple(Alarmhour, Alarmminute);
RTC.turnOnAlarm(1);
#ifdef ECHO_TO_SERIAL
Serial.print(F(” Alarm Set:”)); Serial.print(now.hour(), DEC); Serial.print(‘:’); Serial.print(now.minute(), DEC);
Serial.print(F(” Sleep:”)); Serial.print(SampleInterval);Serial.println(F(” min.”));
delay(100); //a delay long enought to boot out the serial coms
#endif
sleepNow(); //the sleep call is inside the main cycle counter loop
} //samples per cycle loop terminator
} //the main void loop terminator
void createLogFile(void) {
// create a new file, up to 100,000 files allowed
// we will create a new file every time this routine is called
// If we are creating another file after fileInterval, then we must
// close the open file first.
if (file.isOpen()) {
file.close();
}
for (uint16_t i = 0; i < 100000; i++) {
FileName[3] = i/10000 + ‘0’;
FileName[4] = i/1000 + ‘0’;
FileName[5] = i/100 + ‘0’;
FileName[6] = i/10 + ‘0’;
FileName[7] = i%10 + ‘0’;
// O_CREAT – create the file if it does not exist
// O_EXCL – fail if the file exists O_WRITE – open for write
if (file.open(FileName, O_CREAT | O_EXCL | O_WRITE)) break;
//if you can open a file with the new name, break out of the loop
}
// clear the writeError flags generated when we broke the new name loop
file.writeError = 0;
if (!file.isOpen()) error (“diskful?”);
Serial.print(F(“Logging to: “));
Serial.println(FileName);
// fetch the time
DateTime now = RTC.now();
// set creation date time
if (!file.timestamp(T_CREATE,now.year(),now.month(),now.day(),now.hour(),
now.minute(),now.second() )) {
error(“cr t”);
}
// set write/modification date time
if (!file.timestamp(T_WRITE,now.year(),now.month(),now.day(),now.hour(),
now.minute(),now.second() )) {
error(“wr t”);
}
// set access date
if (!file.timestamp(T_ACCESS,now.year(),now.month(),now.day(),now.hour(),
now.minute(),now.second() )) {
error(“ac t”);
}
file.sync();
//file.close();
//file.open(FileName, O_RDWR | O_AT_END);
// write the file as a header:
file.print(F(“The sample interval for this series is:”)); ;Serial.print(SampleInterval);Serial.println(F(” minutes”));
file.println(F(“YYYY/MM/DD HH:MM:SS, Vcc(mV), X = , Y = , Z = , BMATemp (C) , RTC temp (C)”));
file.close();
#ifdef ECHO_TO_SERIAL
Serial.println(F(“New log file created on the SD card!”));
#endif // ECHO_TO_SERIAL
// write out the header to the file, only upon creating a new file
if (file.writeError) {
// check if error writing
error(“write header”);
}
// if (!file.sync()) {
// check if error writing
// error(“fsync er”);
// }
}
void syncTheFile(void) {
/* don’t sync too often – requires 2048 bytes of I/O to SD card.
512 bytes of I/O if using Fat16 library */
/* blink LED to show we are syncing data to the card & updating FAT!
but cant use LED on pin 13, because chipselect */
// digitalWrite(LEDpin, HIGH);
if (!file.sync()) { error(“sync error”);}
// digitalWrite(greenLEDpin, LOW);
}
// Address is a page address
// But data can be maximum of 28 bytes, because the Wire library has a buffer of 32 bytes
void Write_i2c_eeprom_page( int deviceaddress, unsigned int eeaddress, char* data) {
unsigned char i=0;
unsigned int address;
address=eeaddress;
Wire.beginTransmission(deviceaddress);
Wire.write((int)((address) >> 8)); // MSB
Wire.write((int)((address) & 0xFF)); // LSB
do{
Wire.write((byte) data[i]);i++;
} while(data[i]);
Wire.endTransmission();
delay(10); // data sheet says 5ms for page write
}
// should not read more than 28 bytes at a time!
void Read_i2c_eeprom_page( int deviceaddress, unsigned int eeaddress,char* data, unsigned int num_chars) {
unsigned char i=0;
Wire.beginTransmission(deviceaddress);
Wire.write((int)(eeaddress >> 8)); // MSB
Wire.write((int)(eeaddress & 0xFF)); // LSB
Wire.endTransmission();
Wire.requestFrom(deviceaddress,(num_chars-1));
while(Wire.available()) data[i++] = Wire.read();
}
void sleepNow() {
// can set the unused digital pins to output low – BUT only worth 1-2 µA during sleep
// if you have an LED or something like that on an output pin, you will draw more current.
// for (byte i = 0; i <= number of digital pins; i++)
// {
// pinMode (i, OUTPUT);
// digitalWrite (i, LOW);
// }
cbi(ADCSRA,ADEN); // Switch ADC OFF: worth 334 µA during sleep
set_sleep_mode(SLEEP_MODE_PWR_DOWN);
sleep_enable();
attachInterrupt(0,clockTrigger, LOW);
// turn off brown-out enable in software: worth 25 µA during sleep
// BODS must be set to one and BODSE must be set to zero within four clock cycles
// BUT http://learn.adafruit.com/low-power-coin-cell-voltage-logger/other-lessons
// MCUCR = bit (BODS) | bit (BODSE); // turn on brown-out enable select
// MCUCR = bit (BODS); // The BODS bit is automatically cleared after three clock cycles
sleep_mode();
//HERE AFTER WAKING UP
sleep_disable();
detachInterrupt(0);
sbi(ADCSRA,ADEN); // Switch ADC converter back ON
//digitalWrite(13, HIGH); this doesnt work because of conflict with sd card chip select
}
void clockTrigger() {
clockInterrupt = true; //do something quick, flip a flag, and handle in loop();
}
void clearClockTrigger()
{
Wire.beginTransmission(0x68); //Tell devices on the bus we are talking to the DS3231
Wire.write(0x0F); //Tell the device which address we want to read or write
Wire.endTransmission(); //Before you can write to and clear the alarm flag you have to read the flag first!
Wire.requestFrom(0x68,1); // Read one byte
dummyRegister=Wire.read(); // In this example we are not interest in actually using the bye
Wire.beginTransmission(0x68); //Tell devices on the bus we are talking to the DS3231
Wire.write(0x0F); //Tell the device which address we want to read or write
Wire.write(0b00000000); //Write the byte. The last 0 bit resets Alarm 1
Wire.endTransmission();
clockInterrupt=false; //Finally clear the flag we use to indicate the trigger occurred
}
// could also use RTC.getTemperature() from the library here as in:
// RTC.convertTemperature(); //convert current temperature into registers
// Serial.print(RTC.getTemperature()); //read registers and display the temperature
float get3231Temp()
{
//temp registers (11h-12h) get updated automatically every 64s
Wire.beginTransmission(DS3231_I2C_ADDRESS);
Wire.write(0x11);
Wire.endTransmission();
Wire.requestFrom(DS3231_I2C_ADDRESS, 2);
if(Wire.available()) {
tMSB = Wire.read(); //2’s complement int portion
tLSB = Wire.read(); //fraction portion
temp3231 = ((((short)tMSB << 8 | (short)tLSB) >> 6) / 4.0);
// Allows for readings below freezing – Thanks to Coding Badly
//temp3231 = (temp3231 * 1.8 + 32.0); // Convert Celcius to Fahrenheit
return temp3231;
}
else {
temp3231 = 255.0; //Use a value of 255 as error flag
}
return temp3231;
}
byte read3AxisAcceleration()
{
Wire.beginTransmission(BMA250);
Wire.write(0x02);
Wire.endTransmission();
Wire.requestFrom(BMA250,7);
for(int j = 0; j < 7;j++)
{
dataArray[j] = Wire.read();
}
if(!bitRead(dataArray[0],0)){return(0);}
BMAtemp = dataArray[6];
x = dataArray[1] << 8;
x |= dataArray[0];
x >>= 6;
y = dataArray[3] << 8;
y |= dataArray[2];
y >>= 6;
z = dataArray[5] << 8;
z |= dataArray[4];
z >>= 6;
BMAtempfloat = (BMAtemp*0.5)+24.0;
}
byte initializeBMA()
{
Wire.beginTransmission(BMA250);
Wire.write(0x0F); //set g
Wire.write(GSEL);
Wire.endTransmission();
Wire.beginTransmission(BMA250);
Wire.write(0x10); //set bandwith
Wire.write(BW);
Wire.endTransmission();
return(0);
}
long readVcc() { //trick to read the Vin using internal 1.1 v as a refrence
long result;
// Read 1.1V reference against AVcc
ADMUX = _BV(REFS0) | _BV(MUX3) | _BV(MUX2) | _BV(MUX1);
delay(3); // Wait for Vref to settle
ADCSRA |= _BV(ADSC); // Convert
while (bit_is_set(ADCSRA,ADSC));
result = ADCL;
result |= ADCH<<8;
result = 1126400L / result; // Back-calculate AVcc in mV
return result;
}
int freeRam () {
extern int __heap_start, *__brkval;
int v;
return (int) &v – (__brkval == 0 ? (int) &__heap_start : (int) __brkval);
}
void error(char *str) {
// always write error messages to the serial monitor but this routine wastes
// everything passed to the string from the original call is in sram!
Serial.print(F(“error in: “));Serial.println(str);
/* this next statement will start an endless loop, basically stopping all
operation upon any error. Change this behavior if you want. */
while (1);
}